

Genuine OEM replacement part, this item is sold individually.
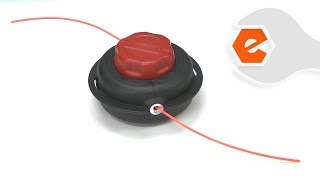
This Cutting Head Assembly is different from your basic Cutting Head Assemblies used on other trimmers.
The cutting line is fed into an opening on the side of the Cutting Head, and then you turn the bottom of the Head and it will load the line.
It can be used on any on the trimmers listed below.
Cutting Head Asm 753-08182
OEM part for: Troy-Bilt, MTD, Yard Machines
Part Number: 753-08182
$19.04
In Stock
Jump To:
Product Description ?
- Classification: Part
- Weight: 0.51 lbs.
- Shipping: Ships Worldwide
Frequently Purchased Together ?


Compatibility
This part will fit the following 27 machines
MTD
41AD26CC900 Handheld Trimmer View Diagrams & Manuals
41CD26SC900 Handheld Trimmer View Diagrams & Manuals
MP429 (41BD429C995) Curved Shaft String Trimmer View Diagrams & Manuals
SS725 (41BJSS-C954) Attachment View Diagrams & Manuals
Troy-Bilt
TB575EC (41ADT57C766) Gas String Trimmer View Diagrams & Manuals
TB575EC (41EDT57C966) Gas String Trimmer View Diagrams & Manuals
TB525EC (41ADZ52C766) Curve Shaft Gas String Trimmer View Diagrams & Manuals
TB525EC (41ADZ52C966) Curve Shaft Gas String Trimmer View Diagrams & Manuals
TB525EC (41EDT52C966) String Trimmer View Diagrams & Manuals
TB539ES (41CDT53C966) 4-Cycle Gas Trimmer View Diagrams & Manuals
TB539ES (41DDT53C966) 4-Cycle Gas Trimmer View Diagrams & Manuals
TB525ES (41DDT52C966) Trimmer View Diagrams & Manuals
TB575SS (41BDT57C966) Trimmer View Diagrams & Manuals
TB539E Trimmer View Diagrams & Manuals
SS725 (41BJSS-C954) Speed Feed Attachment View Diagrams & Manuals
TB304CEC (41AD304C866) Trimmer View Diagrams & Manuals
TB525ES (41CDT52C966) Trimmer View Diagrams & Manuals
TB575ES (41CDT57C966) Trimmer View Diagrams & Manuals
TB575ES (41DDT57C966) Trimmer View Diagrams & Manuals
Yard Machines
Y26CS (41AD26CC900) Trimmer View Diagrams & Manuals
Y26SS (41CD26SC900) Trimmer View Diagrams & Manuals
Y4700EC Trimmer View Diagrams & Manuals
Y4700EC (41AD470C900) Trimmer View Diagrams & Manuals
Y4800EC (41AD480C800) Trimmer View Diagrams & Manuals
Y4800EC (41AD480C900) Trimmer View Diagrams & Manuals
Y4800EC Trimmer View Diagrams & Manuals
Y 4700 EC (41AD470C800) String Trimmer View Diagrams & Manuals
Show More Compatible Models
This item works with the following types of products:
- Trimmer Parts
This part replaces obsolete part #: 753-06129, 753-06130
Repair Videos ?
Watch the Repair Video for
Cutting Head Asm
Articles:
|
Step-by-step instructions for removing and installing the cutting head on your Troy-Bilt trimmer....
July 30, 2018
|

Customer Part Reviews ?
Average Rating (out of 5):
Click to filter by ratings:
5 stars
20
4 stars
1
3 stars
1
2 stars
0
1 stars
4
< PREV
- 1
- 2
- 3
Works perfectly, shipped fast!
Ereplacementparts.com did an awesome job putting new life in an old string trimmer! Good quality part that fit like the original.
Guest -
August 19, 2023
Verified Purchase
Fast delivery thanks
My item arrive in good condition thanks.
Guest -
July 7, 2022
Verified Purchase
Great Part
It arrived on time and was easy to install on the machime.
Guest -
September 30, 2021
Verified Purchase
easy to work with
ereplacement parts is amazing, easy to work wtih, lots of helpful tips for parts replacement, the best online experience, thanks
Guest -
June 17, 2021
Verified Purchase
Great swap
New head for my Toro weed-eater; works perfectly!
Guest -
October 29, 2020
Verified Purchase
Parts I couldn't find
Weed eater running like new again
Guest -
July 4, 2020
Verified Purchase
Exact replacement
It was the right part at the right price
Guest -
May 23, 2020
Verified Purchase
Correct part - Fast service
After ordering the wrong part from the manufactures web page (horrible page), in which I received the part in an open box in torn packaging, I discovered ereplacements.com. Easy to navigate ordering page which confirmed I was ordering the correct part. Received part quickly in new condition. Installed in seconds and works great. Also, it was less then half the price of the wrong part I received from the manufacture. Thank you ereplacements!
Guest -
April 27, 2020
Verified Purchase
Perfect Fit!
It took more time to clean the grass off the cutting head unit than to put the new part on.
Thank you for having what I needed the first time!
Guest -
April 23, 2020
Verified Purchase
Cutting Head Assembly
The cutting head assembly worked great easy to put on and a perfect fit.
Jack -
November 12, 2019
Verified Purchase
t
t
t -
t days ago
Verified Purchase
eReplacementParts Team
t
Questions & Answers ?
Our customer Service team is at the ready daily to answer your part and product questions.

Ask our Team
We have a dedicated staff with decades of collective experience in helping customers just like you purchase parts to repair their products.
Does this fit my product?Questions & Answers for Cutting Head Asm
Does this fit Troy Bilt TB575EC trimmer. I cannot find one that looks like the one on my trimmer.
Tom
for model number TB575EC
asked on 2023-05-27
Hello Tom, thank you for your question. No, the correct one is 753-08202. We are pleased to have been able to help
eReplacementParts Team May 27, 2023
Does head, 753-08182 fit a Troy bilt 41AD25CB966? Thanks
Rob
for model number 753-08182
asked on 2022-04-09
Hello Rob, Thank you for your inquiry. We have researched the model number you have provided and do not show this part as compatible. We show that the parts for the cutting head are sold separately. We hope this helps and if you need help placing an order, customer service is open 7 days a week. Please feel free to give us a call. We look forward to hearing from you!
eReplacementParts Team April 09, 2022
Customer Repair Instructions ?
All our customer repair instructions are solicited directly from other customers just like you who have purchased and replaced this exact part.
String could no longer be loaded on the spool.
BERNARD - November 21, 2016
👍 33 of 39 people found this instruction helpful
Tool Type
Trimmer
Difficulty
Easy
Time
15-30 minutes
Tools Used
Screwdriver, Pliers
Parts Used
1. Remove old Cutting Head Assembly. You need to lock the shaft by sticking a 3/16" diameter steel rod into the hole in the shaft just above the cutting head assembly. The hole may be filled with dry grass or other debris and may have to be cleaned out before being able to insert the steel rod in. Once the shaft is locked the assembly can be unscrewed from the end of the shaft. 2. After all the old parts of the assembly have been removed the new cutting head assembly can be screwed back on the shaft.
Did you find this story helpful?
Thanks for voting and helping fellow customers!
Trimmer cutting head assembly broke and needed replacement.
Steven - June 23, 2016
👍 18 of 21 people found this instruction helpful
Tool Type
Trimmer
Difficulty
Easy
Time
Less than 15 minutes
Tools Used
Screwdriver, None
Parts Used
Removed old cutting head assembly by turning it counter-clockwise and using screwdriver to keep the trimmer driver cable in place. Installed new cutting assembly by turning it clockwise.
Did you find this story helpful?
Thanks for voting and helping fellow customers!
Worn cutter head
coy - April 27, 2016
👍 21 of 30 people found this instruction helpful
Tool Type
Trimmer
Difficulty
Easy
Time
Less than 15 minutes
Tools Used
Screwdriver
Parts Used
I unscrewed the old cutter head from the spindle and threaded the new cutterhead to the spindle, in a matter of minutes.
Did you find this story helpful?
Thanks for voting and helping fellow customers!
Parts were missing on old head
George - March 18, 2016
👍 10 of 11 people found this instruction helpful
Tool Type
Trimmer
Difficulty
Easy
Time
Less than 15 minutes
Tools Used
Wrench Set
Parts Used
Ordered new cutting head assembly and screwed it on.
Did you find this story helpful?
Thanks for voting and helping fellow customers!
The line spool wore out.
Tom - May 1, 2017
👍 8 of 9 people found this instruction helpful
Tool Type
Trimmer
Difficulty
Easy
Time
Less than 15 minutes
Tools Used
Screwdriver, Wrench Set
Parts Used
I screwed the old spool off then screwed the new one on
Did you find this story helpful?
Thanks for voting and helping fellow customers!
Head broke where attaching threaded nut that screws onto shaft.
MIKE - April 25, 2017
👍 3 of 3 people found this instruction helpful
Tool Type
Trimmer
Difficulty
Easy
Time
Less than 15 minutes
Tools Used
Screwdriver
Parts Used
Simply screwed on the new head and went to work. The line on the new head is great. I have used for approximately two hours and have not had to install the new line. Great product. Thank you.
Did you find this story helpful?
Thanks for voting and helping fellow customers!
The head on the trimmer stopped and upon review, the old gearbox had seized up.
Robert - August 21, 2017
👍 2 of 2 people found this instruction helpful
Tool Type
Trimmer
Difficulty
Easy
Time
15-30 minutes
Tools Used
Screwdriver
At first I thought the motor had seized up, but removing the lower cutting arm, the motor was fine. I took the old trimmer apart, removing the shroud, then removed three screws and the old gearbox came off. I also went ahead and replaced the trimmer head as the old one was not advance string like it used to. I put the new gearbox on, then the new trimmer head. Replacing the shroud was probably the most difficult part of the process because for some reason I felt it went on backwards. Sort of like playing Tetris with the shroud...it only fits one way. Mental note....take a photo with your phone before removing the shroud.
Did you find this story helpful?
Thanks for voting and helping fellow customers!
Head wouldn't advance trimming line
Claudia - June 5, 2017
👍 2 of 2 people found this instruction helpful
Tool Type
Trimmer
Difficulty
Easy
Time
15-30 minutes
Tools Used
Screwdriver, Adjustable Wrench
Parts Used
1. Insert screwdriver into slot to hold head in place
2 Take adjustable wrench, loosen head turning counterclockwise
3. Twist on new head clockwise
4. Tighten
2 Take adjustable wrench, loosen head turning counterclockwise
3. Twist on new head clockwise
4. Tighten
Did you find this story helpful?
Thanks for voting and helping fellow customers!
Gears stripped
Leon - September 8, 2016
👍 1 of 1 people found this instruction helpful
Tool Type
Trimmer
Difficulty
Easy
Time
15-30 minutes
Tools Used
Screwdriver, Wrench Set, Nutdriver
Installed gearbox and touch bump head
Did you find this story helpful?
Thanks for voting and helping fellow customers!
Worn out
Gary - August 5, 2016
👍 1 of 1 people found this instruction helpful
Tool Type
Trimmer
Difficulty
Easy
Time
Less than 15 minutes
Tools Used
Adjustable Wrench, Hand
Parts Used
Broke free from bolt! Screwed new part on!
Did you find this story helpful?
Thanks for voting and helping fellow customers!
Load More Install Stories
OEM stands for Original Equipment Manufacturer and means the part you’re buying is sourced directly from the manufacturer who made your product. At eReplacementParts, we sell only genuine OEM parts, guaranteeing the part you’re purchasing is of better design and of higher quality than aftermarket parts.
Our product descriptions are a combination of data sourced directly from the manufacturers who made your product as well as content researched and curated by our content & customer service teams. This content is edited and reviewed internally before being made public to customers.
Our customer service team are at the ready daily to answer your part and product questions. We have a dedicated staff with decades of collective experience in helping customers just like you purchase parts to repair their products.
All our part reviews are solicited directly from other customers who have purchased this exact part. While we moderate these reviews for profanity, offensive language or personally identifiable information, these reviews are posted exactly as submitted and no alterations are made by our team.
All our customer repair instructions are solicited directly from other customers just like you who have purchased and replaced this exact part. While we moderate these reviews for profanity, offensive language or personally identifiable information, these reviews are posted exactly as submitted and no alterations are made by our team.
Based on data from past customer purchasing behaviors, these parts are most commonly purchased together along with the part you are viewing. These parts may be necessary or helpful to replace to complete your current repair.
All our installation videos are created and produced in collaboration with our in-house repair technician, Mark Sodja, who has helped millions of eReplacementParts customers over the last 13 years repair their products. Mark has years of experience in selling and repairing both commercial and residential products with a specialty in gas-powered equipment.
This data is collected from customers who submitted a repair instruction after replacing this exact part. Customers can rate how easy the repair was to complete and how long it took. We aggregate this data to provide a repair rating that allows customers to quickly determine the difficulty and time needed to perform their own repair.