
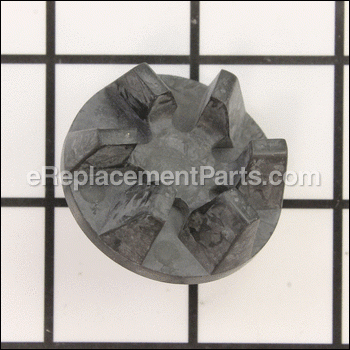
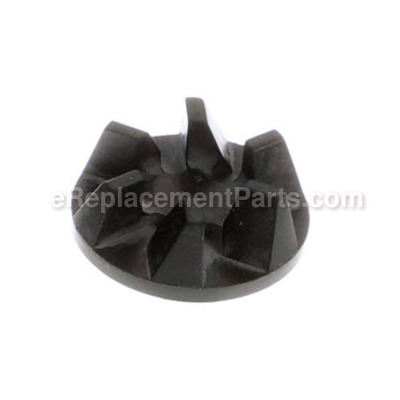

Coupling 018999
Part Number: 018999
Order within the next 7 hours
and your part ships today!
and your part ships today!
Product Information
Description:
| This is a genuine manufacturer sourced replacement part used on Waring blenders. The coupling is the part of a blender that transfers power from the blender's motor to the blade assembly. Over time, the teeth on blender coupling wear down until they no longer engage properly on the blade assembly. This coupling is made out of plastic and it is sold individually. |
Compatibility
the 71 compatible machines
This part is compatible with the following machines:
Waring
37BL32 Blender
37BL60 Blender
37BL95 Blender
38BL12 Blender
38BL21 Blender
38BL35 Blender
37BL78 Blender
39BL23 Blender
39BL30 Blender
39BL33 Blender
39BL28 Blender
39BL38 Blender
HGBPWTP4 Blender
36BL24 Blender
34BL92 Blender
36BL22 Blender
36BL23 Blender
34BL75 Blender
36BL36 Blender
36BL37 Blender
35BL49 Blender
36BL27 Blender
37BL33 Blender
HGBBPBKS6 Blender
HGBPBKP6 Blender
HGBPBKS6 Blender
HGBSSSS6 Blender
38BL49 Blender
38BL91 Blender
HGBPWTP6 Blender
35BL47 Blender
39BL18 Blender
HGBPBKP4 Blender
39BL56 Blender
HPBSGYP4 Blender
39BL68 Blender
37BL50 Blender
37BL75 Blender
37BL52 Blender
38BL46 Blender
38BL48 Blender
39BL32 Salsa Rita Blender
HGB140 1/2-Gallon Food Blender
HPB300 Mega Mix Blender
HPB300BK Mega Mix Blender
HPB300C Mega Mix Blender
HGB146 Heavy Duty Blender
HGB147 Heavy Duty Blender
HGB14D Heavy Duty Blender
HGB150 Blender
HGBSP Blender
HGBSS Blender
HGB13R Blender
HGQ200 Blender
HGCSS Blender
HGC140 Blender
HGC150 Blender
HGD140 Blender
HGD150 Blender
HPB305 Brushed Stainless Steel Blender
MMB142 Margarita Madness Blender
MMB142-3 Margarita Madness Blender
MMB14C Margarita Madness Blender
MMB14CRD Margarita Madness Blender
MMB144 Mardi Gras Madness Blender
MMBCC Cocktail Cantina Blender
MMC142 Margarita Madness Blender
MMD14C Margarita Madness Blender
MMT149 Tropics Blender
HGB14S Blender
HGC14S Blender
Products Compatibility
This item works with the following types of products:
- • Blender
Questions & Answers for Coupling
No questions have been asked yet
Repair Instructions: Submitted by Customers Like You
1 of 1 people found this instruction helpful
Tool Type:
Blender
Parts Used:
Repair Difficulty:
Easy
Time Spent Repairing:
Less than 15 minutes
Tools Used:
, None
Blender did not blend properly
Inside coupling thread was damaged and needed to be replaced. The coupling took a few seconds to screw on and reuse the blender
Did you find this story helpful?
Thanks for voting and helping fellow customers!
Tool Type:
Blender
Parts Used:
Repair Difficulty:
Medium
Time Spent Repairing:
1-2 hours
Tools Used:
Adjustable Wrench
Leaking from use over time
Remove coupling
Big crescent wrench to hold nut securing blade assbly, smaller crescent to loosen clockwise on bottom of blend. Remove blade assbly, replace 1 rubber gasket, 2 plastic gaskets, 2 stain. Steel washers and small washer under coupling. Use parts diagram to see order of installation, part numbers and quantity needed. Reassemble, test for leaks. Voila, remember to tighten/ install button nut counterclockwise.
Big crescent wrench to hold nut securing blade assbly, smaller crescent to loosen clockwise on bottom of blend. Remove blade assbly, replace 1 rubber gasket, 2 plastic gaskets, 2 stain. Steel washers and small washer under coupling. Use parts diagram to see order of installation, part numbers and quantity needed. Reassemble, test for leaks. Voila, remember to tighten/ install button nut counterclockwise.
Did you find this story helpful?
Thanks for voting and helping fellow customers!
Tool Type:
Blender
Parts Used:
Repair Difficulty:
Easy
Time Spent Repairing:
Less than 15 minutes
Tools Used:
Screwdriver, Pliers
Coupling install
In observation, the coupling appears to be designed to take hard impact of the blade cutting / blending hard items (ice, frozen fruit, etc) . The couplings internal threads are of a softer material that wear or give over time... a great design the lengthens the life of the motor and everything below the coupling. The coupling screws right back onto the threaded shaft but do note the coupling shaft exits at the opposite end / bottom of the blender. There is a flat blade screwdriver slot in the shaft to hold it in place while reattaching the coupling... this guarantees a very snug coupling fit. A very easy install and worth the effort.
Did you find this story helpful?
Thanks for voting and helping fellow customers!
Tool Type:
Blender
Parts Used:
Repair Difficulty:
Easy
Time Spent Repairing:
Less than 15 minutes
Tools Used:
The threads on the Original Coupler Stripped from use...
Pulled old coupler off motor as no threads
Screwed new coupler onto motor threads in a counter clockwise direction finger tight...
Took about a minute!
Screwed new coupler onto motor threads in a counter clockwise direction finger tight...
Took about a minute!
Did you find this story helpful?
Thanks for voting and helping fellow customers!
0 of 1 people found this instruction helpful
Tool Type:
Blender
Repair Difficulty:
Easy
Time Spent Repairing:
Less than 15 minutes
Tools Used:
, hands only
Threads on coupling stripped
Hand screw on new coupling, press fit the feet and install lid.
Did you find this story helpful?
Thanks for voting and helping fellow customers!
Reviews
1 Reviews
Average Rating (out of 5):
Click to filter by ratings:
5 stars
1
4 stars
0
3 stars
0
2 stars
0
1 stars
0
< PREV
- 1
Perfect fit
The part rescued my old but great blender. The part fit perfectly and was simple to replace the old part. It saved the blender from the junk pile.
Guest -
April 20, 2021
Verified Purchase
Verified Purchase
eReplacementParts Team
< PREV
- 1
Product Information