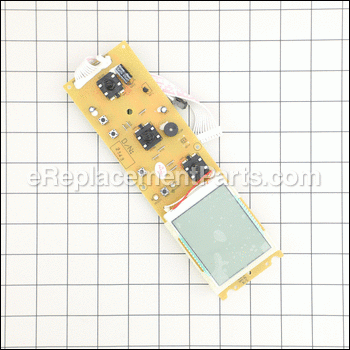
Control Pcb Assembly SP0024079
Part Number: SP0024079
Leaves our warehouse within
7 - 12 business days
7 - 12 business days
*This part replaces obsolete part #: BOV800XL/170A and BOV800XL170A.
Product Information
Specifications
|
Compatibility
Products Compatibility
This item works with the following types of products:
- • Oven
Questions & Answers for Control Pcb Assembly
I want to buy the control panel in the 1st picture, as the other one is not the same. Let me know if you have it in stock and that I'd be getting that one. They are both 9 pins, but I believe the other one is of a newer model. Let me know if this can work.
Christos
for model number Bov800xl
asked on 2022-09-04
Hello Christos, thank you for your question. If you order the SP0024079 you will get the one in the first picture that has 9 pins. If you need help placing an order, customer service is open 7 days a week. Please feel free to give us a call. We look forward to hearing from you.
eReplacementParts Team September 04, 2022
The 1st picture is the parent I'd like, however, the second shot is different.Could you let me know which part would be sent as I don't want any issues.Cheers
Christos
for model number BOV 800XL/A
asked on 2022-09-03
Hi Christos,
Thank you for your question. Both images are for the same part. One image shows the part on a one-inch grid square, so you may estimate the dimensions of it. If you need help placing an order for it, customer service is open 7 days a week and anyone will be happy to assist you. Please feel free to give us a call. We look forward to hearing from you!
eReplacementParts Team September 03, 2022
The first picture is representative of my part that needs replacing, but the second is different. I'd like to order the 9 pin control panel but need to know which one you have. Please let me know, as I need it for my daughter who is off to school. Thanks in advance, Christos
Christos
for model number Bov800xl
asked on 2022-09-02
Hello Christos, Thank you for the question. This Control Pcb Assembly has 9 pins. If you need help placing an order, customer service is open 7 days a week. Please feel free to give us a call. We hope this helps!
eReplacementParts Team September 02, 2022
Repair Instructions: Submitted by Customers Like You
35 of 38 people found this instruction helpful
Tool Type:
Convection Oven
Parts Used:
Repair Difficulty:
Medium
Time Spent Repairing:
1-2 hours
Tools Used:
Screwdriver, Long and thin phillips screwdriver works best
Control knob on oven would no longer work properly
The problem of control knobs no longer working correctly was traced back to a failing control board (PCB assembly). eReplacementParts shipped a new board and the challenge was getting the old one out. The oven has about a million little screws to remove and using a long, narrow phillips screwdriver worked the best. Not knowing exactly how the PCB board was connected I took pictures along the way so I would have some visual help during the reassembly. Once the outer metal shell was removed it was fairly easy to disconnect and remove the PCB board and put the new one in. The metal shell has fairly sharp edges so it's easy to get scratched up and cut. Be careful. After reassembling everything, I found out the the replacement part was a dud. Stupid me, should've checked it first when the wires were connected before putting everything back together. But practice makes perfect. Returning the PCB board via RMA was very simple and eReplacementParts shipped out a new one right away (Thanks, very good customer service !). After receiving the new part, doing the same job a second time took just about 30 minutes, knowing where everything had to go. Now the oven works great again. A $40 fix vs. a new oven that would cost about $250. Make sure you place a big towel or blanket on your work surface because the sharp metal edges can really scratch things up.
Did you find this story helpful?
Thanks for voting and helping fellow customers!
12 of 12 people found this instruction helpful
Tool Type:
Convection Oven
Parts Used:
Repair Difficulty:
Hard
Time Spent Repairing:
1-2 hours
Tools Used:
Screwdriver, none
Breville oven display suffers heat-related failure
The only tools needed for this repair are phillips screwdrivers. All the screws are sheet metal screws. You will need a #2 phillips of any length, and another phillips driver that can provide you a reach of at least 12", 18" preferable.
Generally, you simply remove all screws you can see - EXCEPT for the ones that are obviously holding the control and heating elements to the frame, and there are only 2-4 of those.
The outside case is held on internally by black sheet metal screws that can only be reached once the back is removed and the case is flexed outward slightly. The display is in a separate assembly, that is simple to disassemble, again, with phillips screwdrivers. There is no problem with figuring out the correct orientation of the electrical connectors, as they are both keyed.
For me, the hardest problem was replacing the internal screws that hold the outside case to the chassis. To do that without permanently deforming the cover was difficult as I did not have a screwdriver with long enough reach. It took some dexterity, but anyone who is daring enough to fix his/her own appliances will not be daunted by simple machine screws.
Did you find this story helpful?
Thanks for voting and helping fellow customers!
10 of 11 people found this instruction helpful
Tool Type:
Convection Oven
Parts Used:
Repair Difficulty:
Hard
Time Spent Repairing:
1-2 hours
Tools Used:
Screwdriver, Pliers, Power Drill, jeweler screwdrier set, needlenose pliers, patience
Start/stop function working at random
There's a million little screws so make sure remember where they go. Take pictures before you disassembly any covers. The wrap around cover did not come off completely and just like the Pcb board panel had some screws impossible to get at to completely remove it so as long as your hands are not oversized you should be able to squeeze through to disconnect the connectors and remove the pcb. After about 1.5 hours and few cuts from sharp edges it was back together and working. I saved $200 buying a new one. Good luck
Did you find this story helpful?
Thanks for voting and helping fellow customers!
5 of 5 people found this instruction helpful
Tool Type:
Convection Oven
Parts Used:
Repair Difficulty:
Medium
Time Spent Repairing:
1-2 hours
Tools Used:
Screwdriver, Socket set, long (12\\
Controls malfunctioning.
Removed about two dozen #2 phillips screws from back panel and from plastic foot assemblies at both ends of unit. Some of the foot screws are hidden by a rubber grommet. Once the back panel was removed I proceeded to try to remove five black screws that fasten the control panel assembly to the main unit. I got the first two with a 6" phillips screwdriver, but you really need a screwdriver with a 12" shaft and magnetic head, and I was unable to reach the three most obscure screws. I visited my local big box store looking for a 12" #2 phillips without success. I settled on a 12" socket extension, which I fitted with a 1/4" socket and a short phillips screwdriver head. I secured the screwdriver head in the socket with electricians putty, and magnetized the head a bit. With this combination I was able to reach the final three screws and remove the control panel assembly. Reassembly was straightforward, and the oven is better than new, since the replacement circuit board is a new model that presumably corrects the weaknesses of the old discontinued model.
Did you find this story helpful?
Thanks for voting and helping fellow customers!
3 of 3 people found this instruction helpful
Tool Type:
Toaster
Parts Used:
Repair Difficulty:
Hard
Time Spent Repairing:
30-60 minutes
Tools Used:
Screwdriver, Magnetic end on driver is a plus!.
Control Board malfunction - sluggish. Quite common with this product it seems.
This website has the best repair procedure I found: Thanks to Chris Helming! Scroll down to his Review about 1 page down
https://es.ifixit.com/Answers/View/414726/Fixing+the+start+button
If you don't have magnetic pickup on your screwdriver, like me....use scotch tape for reaching for some screws. Also take pictures as you dismantle, it helps putting it back. Count and get tally of all your screws...there are a lot!
https://es.ifixit.com/Answers/View/414726/Fixing+the+start+button
If you don't have magnetic pickup on your screwdriver, like me....use scotch tape for reaching for some screws. Also take pictures as you dismantle, it helps putting it back. Count and get tally of all your screws...there are a lot!
Did you find this story helpful?
Thanks for voting and helping fellow customers!
2 of 2 people found this instruction helpful
Tool Type:
Convection Oven
Parts Used:
Repair Difficulty:
Medium
Time Spent Repairing:
30-60 minutes
Tools Used:
Screwdriver, Nutdriver
Timer stopped working
To get to the circuit board that was to be replaced I had to remove several screws, actually a whole bunch of them. Took about an hour because I had never been inside one of these before and to figure it out.
Works fine now and I'm happy. Thank you! Good price and quick service. Would buy from you again if needed.
Thanks again..........G
Works fine now and I'm happy. Thank you! Good price and quick service. Would buy from you again if needed.
Thanks again..........G
Did you find this story helpful?
Thanks for voting and helping fellow customers!
1 of 1 people found this instruction helpful
Tool Type:
Convection Oven
Parts Used:
Repair Difficulty:
Medium
Time Spent Repairing:
More than 2 hours
Tools Used:
Screwdriver, Pliers
On/off button working intermittently
Did you find this story helpful?
Thanks for voting and helping fellow customers!
Reviews
2 Reviews
Average Rating (out of 5):
Click to filter by ratings:
5 stars
2
4 stars
0
3 stars
0
2 stars
0
1 stars
0
< PREV
- 1
Easy to order and quick delivery
The part arrived quickly and in great condition. My friend who is repairing the toaster oven said it was the right part but I don't know if he has it together yet. I'm confident it will work perfectly.
Guest -
November 4, 2020
Verified Purchase
Really appreciated eReplacementParts service.
Alas, I had an older model of the oven, so the part wasn't compatible. But I got it quickly, found enough instructions at their website to know how to attempt the repair, and they made returning the part for credit extremely easy. I'll definitely order from here again.
Guest -
August 2, 2020
Verified Purchase
Verified Purchase
eReplacementParts Team
< PREV
- 1
Product Information