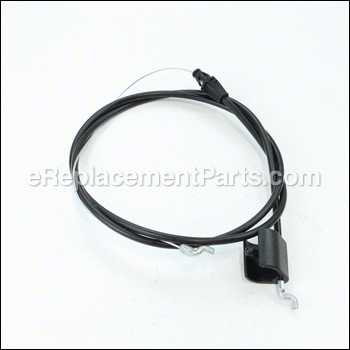

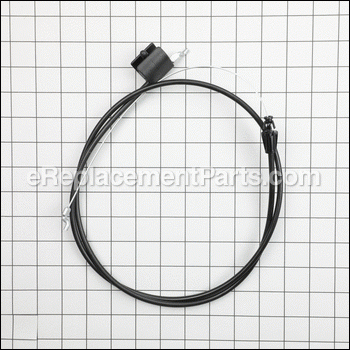

This is an authentic replacement part manufactured for use with walk-behind lawnmowers. The control cable is the linkage between the handle and the engine and is used to run the engine. Through normal use, the cable ends can wear out and break. Replacing a broken control cable is a relatively simple repair. This control cable is available as an individual replacement part.
Repair Info:
• With a cold engine cut cable ties.
• Remove cable from control bail.
• Using pliers remove cable clip from the engine.
• Remove cable from the engine.
• Insert new cable end into control bail.
• Replace the bent end into the engine.
• Snap the cable snap into place.
• Secure the cable to the handle with zip ties.
Cable-ers Control 946-04479
OEM part for: MTD, Bolens, Yard Man, Yard Machines, Husky, Murray
Part Number: 946-04479
$21.82
In Stock
Product Description ?
- Classification: Part
- Weight: 0.16 lbs.
- Shipping: Ships Worldwide
Compatibility
This part will fit the following 50 machines
Bolens
11A-A14A065 (2011) Push Lawn Mower View Diagrams & Manuals
11A-A14S265 (2011) Push Lawn Mower View Diagrams & Manuals
MTD
11A-A0JC006 (2011) Push Lawn Mower View Diagrams & Manuals
11A-A0JC027 (2011) Push Lawn Mower View Diagrams & Manuals
11A-B0JC006 (2011) Push Lawn Mower View Diagrams & Manuals
11A-B2M7004 (2011) Push Lawn Mower View Diagrams & Manuals
11A-B22Q704 (2011) Push Lawn Mower View Diagrams & Manuals
12AVB2M7004 (2011) Self Propelled Lawn Mower View Diagrams & Manuals
11A-A1JC027 (2011) 21" Push Mower View Diagrams & Manuals
12AVB2K9095 (2011) 21" Self-Propelled Lawn Mower View Diagrams & Manuals
11A-A0JT827 (2012) Lawn Mower View Diagrams & Manuals
11A-B26M004 (2012) Lawn Mower View Diagrams & Manuals
11A-B2J1704 (2012) 11A-B2J1704 2012 View Diagrams & Manuals
11A-B22Q704 (2012) Lawn Mower View Diagrams & Manuals
11A-A18N255 Walk Behind Gas Lawn Mower View Diagrams & Manuals
11A-A14A065 (2011) Push Walk Behind Mower View Diagrams & Manuals
11A-A14S265 (2011) Push Walk Behind Mower View Diagrams & Manuals
11A-B24A059 (2011) Lawn Mower View Diagrams & Manuals
11A-B2M7059 (2011) Lawn Mower View Diagrams & Manuals
11A-B24A059 (2012) Lawn Mower View Diagrams & Manuals
12AVB2M7059 (2011) Lawn Mower View Diagrams & Manuals
11A-A18M055 (2011) Push Walk Behind Mower View Diagrams & Manuals
11A-A19Q701 (2011) Push Walk Behind Mower View Diagrams & Manuals
11A-B29Q701 (2011) Push Walk Behind Mower View Diagrams & Manuals
11A-B2M7001 (2011) Push Walk Behind Mower View Diagrams & Manuals
11A-A19Q701 (2012) Push Walk Behind Mower View Diagrams & Manuals
11A-B29Q701 (2012) Push Walk Behind Mower View Diagrams & Manuals
Yard Man
11A-A18M055 (2011) Push lawn Mower View Diagrams & Manuals
11A-B2M7001 (2011) Push lawn Mower View Diagrams & Manuals
11A-A19Q701 (2011) Push lawn Mower View Diagrams & Manuals
11A-B29Q701 (2011) Push lawn Mower View Diagrams & Manuals
11A-A19Q701 (2012) Lawn Mower View Diagrams & Manuals
11A-B29Q701 (2012) Lawn Mower View Diagrams & Manuals
11A-A18N255 (2011) Push Walk-Behind Mower View Diagrams & Manuals
Yard Machines
11A-A14E029 (2011) Push Lawn Mower View Diagrams & Manuals
11A-A04D000 (2011) Push Lawn Mower View Diagrams & Manuals
11A-A14R229 (2011) Push Lawn Mower View Diagrams & Manuals
11A-B24A000 (2011) Push Lawn Mower View Diagrams & Manuals
11A-A00J000 (2011) Push Lawn Mower View Diagrams & Manuals
11A-B04E000 (2011) Push Lawn Mower View Diagrams & Manuals
Husky
11A-A0JC031 (2011) Lawn Mower View Diagrams & Manuals
11A-A0K7231 (2011) Lawn Mower View Diagrams & Manuals
11A-B2K7231 (2011) Lawn Mower View Diagrams & Manuals
11A-B2M7031 (2011) Lawn Mower View Diagrams & Manuals
11A-B29Q731 (2012) Lawn Mower View Diagrams & Manuals
11A-B2J1731 (2012) Lawn Mower View Diagrams & Manuals
11A-B2K7231 (2012) Lawn Mower View Diagrams & Manuals
11A-B2M7031 (2012) Lawn Mower View Diagrams & Manuals
Murray
11A-B23M758 (2012) Lawn Mower View Diagrams & Manuals
11A-B24Z758 (ME21625)(2012) Lawn Mower View Diagrams & Manuals
Show More Compatible Models
This item works with the following types of products:
- Lawn Mower Parts
This part replaces obsolete part #: 746-04479 (11a-B24z758), 946-04479S (11a-B2m7031;11a-B2m7001;11a-B2m7004;11a-B2m7059), 746-04479 (11a-B2m7031;11a-B2m7001;11a-B2m7004;11a-B2m7059), 746-04479
Customer Part Reviews ?
Average Rating (out of 5):
Click to filter by ratings:
5 stars
2
4 stars
0
3 stars
0
2 stars
0
1 stars
0
< PREV
- 1
quick fix
good part-mower is up and running
Guest -
August 4, 2021
Verified Purchase
Easy and perfect fit
Part was great. Great experience
Guest -
June 3, 2019
Verified Purchase
t
t
t -
t days ago
Verified Purchase
eReplacementParts Team
t
Questions & Answers ?
Our customer Service team is at the ready daily to answer your part and product questions.

Ask our Team
We have a dedicated staff with decades of collective experience in helping customers just like you purchase parts to repair their products.
Does this fit my product?Questions & Answers for Cable-ers Control
What are the dimensions of this part? i.e. How long is the cable, how long is the casing?
Richard
asked on 2022-08-23
Hello Richard, Thank you for the question. The Cable Length is 61" and 48-1/4" Conduit Length. We hope this helps, good luck with this repair!
eReplacementParts Team August 23, 2022
Customer Repair Instructions ?
All our customer repair instructions are solicited directly from other customers just like you who have purchased and replaced this exact part.
Control cable siezed
Greg - June 25, 2017
👍 1 of 1 people found this instruction helpful
Tool Type
Lawn Mower
Difficulty
Easy
Time
Less than 15 minutes
Tools Used
Parts Used
Removed old cable, attached the new one. Just the same as the old one was.
Did you find this story helpful?
Thanks for voting and helping fellow customers!
Throttle cable corroded & seized. Primer bulb collapsed
Wesley - July 17, 2019
Tool Type
Lawn Mower
Difficulty
Easy
Time
Less than 15 minutes
Tools Used
Pliers, Socket set, Curved O-ring pick
Quick and easy throttle cable replacement. With pliers this was changed in under 2 min.
Removed air filter cover & filter. Removed old primer bulb with o-ring pick. Install new by slowly pressing in edges with rounded back of o-ring pick
Easy peasy.
Removed air filter cover & filter. Removed old primer bulb with o-ring pick. Install new by slowly pressing in edges with rounded back of o-ring pick
Easy peasy.
Did you find this story helpful?
Thanks for voting and helping fellow customers!
The throttle control bar broke and the throttle cable was rusted and crimped to where it was not moving through its protective rubber cover.
Brian - June 2, 2019
Tool Type
Lawn Mower
Difficulty
Medium
Time
Less than 15 minutes
Tools Used
Screwdriver, Socket set
1) Popped the blade control into the existing holes on the lawnmower handle.
2) With a wrench, take off cover for throttle control.
3) Unhook the cable from the handle, the plate by the control (by squeezing the inside piece you can pull it through), and finally from the throttle control itself.
4) Put new cable on, hook it through the throttle control and the blade control holes, and secure it.
5) Replace cover and test.
Did you find this story helpful?
Thanks for voting and helping fellow customers!
The start/stop cable rusted and would not mkve.
Allan - May 11, 2019
Tool Type
Lawn Mower
Difficulty
Easy
Time
Less than 15 minutes
Tools Used
Pliers
Parts Used
I basically snapped the old cable off and snapped the new cable on.
Did you find this story helpful?
Thanks for voting and helping fellow customers!
Lawn Mower Control Cable Broke
LARRY - October 1, 2018
Tool Type
Lawn Mower
Difficulty
Easy
Time
Less than 15 minutes
Tools Used
Screwdriver, Pliers
Parts Used
1. Removed the broken Control Cable.
2. Installed the replacement cable to the handle lever and the control device on the lawnmower.
2. Installed the replacement cable to the handle lever and the control device on the lawnmower.
Did you find this story helpful?
Thanks for voting and helping fellow customers!
OEM stands for Original Equipment Manufacturer and means the part you’re buying is sourced directly from the manufacturer who made your product. At eReplacementParts, we sell only genuine OEM parts, guaranteeing the part you’re purchasing is of better design and of higher quality than aftermarket parts.
Our product descriptions are a combination of data sourced directly from the manufacturers who made your product as well as content researched and curated by our content & customer service teams. This content is edited and reviewed internally before being made public to customers.
Our customer service team are at the ready daily to answer your part and product questions. We have a dedicated staff with decades of collective experience in helping customers just like you purchase parts to repair their products.
All our part reviews are solicited directly from other customers who have purchased this exact part. While we moderate these reviews for profanity, offensive language or personally identifiable information, these reviews are posted exactly as submitted and no alterations are made by our team.
All our customer repair instructions are solicited directly from other customers just like you who have purchased and replaced this exact part. While we moderate these reviews for profanity, offensive language or personally identifiable information, these reviews are posted exactly as submitted and no alterations are made by our team.
Based on data from past customer purchasing behaviors, these parts are most commonly purchased together along with the part you are viewing. These parts may be necessary or helpful to replace to complete your current repair.
All our installation videos are created and produced in collaboration with our in-house repair technician, Mark Sodja, who has helped millions of eReplacementParts customers over the last 13 years repair their products. Mark has years of experience in selling and repairing both commercial and residential products with a specialty in gas-powered equipment.
This data is collected from customers who submitted a repair instruction after replacing this exact part. Customers can rate how easy the repair was to complete and how long it took. We aggregate this data to provide a repair rating that allows customers to quickly determine the difficulty and time needed to perform their own repair.