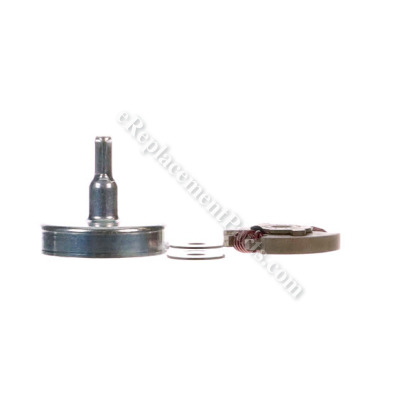


Genuine OEM replacement kit used on Gas Trimmers and Tillers. This part includes: Clutch Drum, Clutch and Clutch Washers. A centrifugal clutch is a part that uses centrifugal force to connect two concentric shafts, with the driving shaft nested inside the driven shaft. Today’s centrifugal clutches will function even when they shouldn’t, far beyond the point of when they need to be replaced. Keeping an eye on equipment performance will determine when the centrifugal clutch requires attention.
Clutch Assembly 753-06281
OEM part for: Yard Man, MTD, Troy-Bilt, Cub Cadet
Part Number: 753-06281
$21.24
In Stock
Jump To:
Frequently Purchased Together ?

Compatibility
This part will fit the following 78 machines
Yard Man
41AD452C755 Curved Shaft String Trimmer View Diagrams & Manuals
41AD457C755 YM4570 Straight Shaft String Trimmer View Diagrams & Manuals
YM4570 (41AD457C755) Trimmer View Diagrams & Manuals
YM4570 41ad457c755 Gas String Trimmer View Diagrams & Manuals
MTD
21AA144R900 Walk Behind Tiller View Diagrams & Manuals
MP429 (41AD429C995) String Trimmer View Diagrams & Manuals
MP429 (41BD429C995) Curved Shaft String Trimmer View Diagrams & Manuals
MP479 (41AD479C995) Trimmer View Diagrams & Manuals
MP475 (41CD475D995) String Trimmer View Diagrams & Manuals
41AD304G799 Trimmer View Diagrams & Manuals
41AD535C799 Trimmer View Diagrams & Manuals
41AD536C799 Trimmer View Diagrams & Manuals
41AD537C799 Trimmer View Diagrams & Manuals
41AD586C799 Trimmer View Diagrams & Manuals
41ADZ40C799 Trimmer View Diagrams & Manuals
41ADZ41C799 Trimmer View Diagrams & Manuals
41ADZ42C799 Trimmer View Diagrams & Manuals
41ADZ43C799 (316.794490)(2014) Trimmer View Diagrams & Manuals
41BD536C799 Trimmer View Diagrams & Manuals
41BD537C799 Trimmer View Diagrams & Manuals
41BD546G799 Trimmer View Diagrams & Manuals
41BDZ41C799 Trimmer View Diagrams & Manuals
41BDZ41C899 (C459) Trimmer View Diagrams & Manuals
41CD588C799 Trimmer View Diagrams & Manuals
41DD588C799 Trimmer View Diagrams & Manuals
Y4700EC 41BD470C800 Gas String Trimmer View Diagrams & Manuals
Y4800EC 41CD480C800 Gas String Trimmer View Diagrams & Manuals
Troy-Bilt
TB146EC (21BK146G966) (2011) Super Bronco Tiller View Diagrams & Manuals
TB575EC (41ADT57C766) Gas String Trimmer View Diagrams & Manuals
TB575EC (41EDT57C966) Gas String Trimmer View Diagrams & Manuals
TB525EC (41ADZ52C766) Curve Shaft Gas String Trimmer View Diagrams & Manuals
TB525EC (41ADZ52C966) Curve Shaft Gas String Trimmer View Diagrams & Manuals
TB525EC (41EDT52C966) String Trimmer View Diagrams & Manuals
TB590EC (41ADZ59C766) Trimmer View Diagrams & Manuals
TB590EC (41ADZ59C966) Trimmer View Diagrams & Manuals
TB590EC (41BDT59C966) Trimmer View Diagrams & Manuals
TB590EC (41CDT59C966) Trimmer View Diagrams & Manuals
21AK146G866 (TB146EC) Tiller View Diagrams & Manuals
TB146EC (21AK146G766)(2013) Tiller View Diagrams & Manuals
TB146EC (21CK146G966) Tiller View Diagrams & Manuals
TBC304 (21AKC304766) Tiller View Diagrams & Manuals
TB146EC (21BK146G766) Tiller View Diagrams & Manuals
TB146EC (21AK146G766)(2012) Tiller View Diagrams & Manuals
TB304BC (41AD304S866) Trimmer View Diagrams & Manuals
TB304CEC (41AD304C866) Trimmer View Diagrams & Manuals
TB304H (41AD304H766) Trimmer View Diagrams & Manuals
TB304S (41AD304S766) Trimmer View Diagrams & Manuals
TB525EC (41ADZ52C866) Trimmer View Diagrams & Manuals
TB525EC (41BDZ52C766) Trimmer View Diagrams & Manuals
TB525EC (41BDZ52C866) Trimmer View Diagrams & Manuals
TB525EC (41CDZ52C766) Trimmer View Diagrams & Manuals
TB575EC (41BDT57C766) Trimmer View Diagrams & Manuals
TB575EC (41CDT57C766) Trimmer View Diagrams & Manuals
TB590EC (41ADZ59C866) Trimmer View Diagrams & Manuals
TB590EC (41BDZ59C866) Trimmer View Diagrams & Manuals
TB590EC (41BDZ59C966) Trimmer View Diagrams & Manuals
Cub Cadet
ST227C (41AD2C7C912) (2010) 41AD2C7C Gas String Trimmer View Diagrams & Manuals
ST227S (41AD2S7C912) (2010) 41AD2S7C Gas String Trimmer View Diagrams & Manuals
BC5090 (41AD590C912) (2011) 41AD590C Gas String Trimmer View Diagrams & Manuals
BC5090 (41BD590C912) (2011) 41BD590C Gas String Trimmer View Diagrams & Manuals
ST227C (41BD2C7C912) (2011) 41BD2C7C Gas String Trimmer View Diagrams & Manuals
ST227S (41BD2S7C912) (2011) 41BD2S7C Gas String Trimmer View Diagrams & Manuals
BC509 (41AD591C912) (2012) 41AD591C912 Gas String Trimmer View Diagrams & Manuals
SS418 (41ADZ41C912) (2012) 41ADZ41C912 Gas String Trimmer View Diagrams & Manuals
ST228 (41AD2S8C912) (2012) 41AD2S8C912 Gas String Trimmer View Diagrams & Manuals
CC148 (21AK148G912) (2013) 21AK148G912 Tiller View Diagrams & Manuals
BC509 (41BD591C912) (2013) 41BD591C912 Gas String Trimmer View Diagrams & Manuals
SS418 (41BDZ41C912) (2013) 41BDZ41C912 Gas String Trimmer View Diagrams & Manuals
ST228 (41AD2S8C912) (2013) 41AD2S8C912 Gas String Trimmer View Diagrams & Manuals
CC148 (21AK148G912) (2014) 21AK148G912 Tiller View Diagrams & Manuals
BC509 (41BD591C912) (2014) 41BD591C912 Gas String Trimmer View Diagrams & Manuals
SS418 (41ADZ41C912) (2014) 41ADZ41C912 Gas String Trimmer View Diagrams & Manuals
SS418 (41CDZ41C912) (2014) 41CDZ41C912 Gas String Trimmer View Diagrams & Manuals
ST228 (41AD2S8C912) (2014) 41AD2S8C912 Gas String Trimmer View Diagrams & Manuals
CC148 (21AK148G912) (2015) 21AK148G912 Tiller View Diagrams & Manuals
BC509 (41BD591C912) (2015) 41BD591C912 Gas String Trimmer View Diagrams & Manuals
SS418 (41CDZ41C912) (2015) 41CDZ41C912 Gas String Trimmer View Diagrams & Manuals
ST228 (41AD2S8C912) (2015) 41AD2S8C912 Gas String Trimmer View Diagrams & Manuals
Show More Compatible Models
This item works with the following types of products:
- Trimmer Parts
Repair Videos ?
Watch the Repair Video for
Clutch Assembly

Customer Part Reviews ?
Average Rating (out of 5):
Click to filter by ratings:
5 stars
14
4 stars
0
3 stars
1
2 stars
0
1 stars
0
< PREV
- 1
- 2
Easy fit parts. Thanks!!
Great quality parts and fast shipping. Thanks!!!
iGlobal -
March 7, 2024
Verified Purchase
CLUTCH ASSEMBLY
Part was received quickly. Replaced with no issues and weedwacker issue resolved.
Guest -
August 2, 2022
Verified Purchase
VERY EASY REPAIR
PART FIT PERFECTLY AND WORKS GREAT ON AN OLD CUB CADET WEEDEATER. THE BLOWN UP PICTURE MAKE IT EASY TO SELECT PART. IT WOULD BE HELPFUL TO BRING ATTENTION TO THE LITTLE SCREW INSIDE THE OUTSIDE CLUTCH HOUSING, IT WOULD HAVE NEVER GOT TIGHTENED IF I HAD NOT LOOKED MORE CAREFULLY AT THE CLUTCH HOUSING
Guest -
July 16, 2022
Verified Purchase
Easy to install
Just the part i needed
iGlobal -
January 22, 2022
Verified Purchase
Thank you for the quick service. The part fit perfectly. Thanks again.
The part was easy to install. Trimmer works great
Guest -
July 9, 2021
Verified Purchase
Just what I needed
The part was easy to order, was shipped quickly and brought life back to my string trimmer.
Guest -
June 19, 2021
Verified Purchase
Worked as expected
Perfect fit! Arrived quickly! Trimmer is working great! Thank you for shipping to Puerto Rico.
iGlobal -
June 15, 2021
Verified Purchase
Great part.
Arrived early, the clucth was easy to install, my weadeater is like new again.
Guest -
May 18, 2020
Verified Purchase
Reparación terminada , buen trabajo.
Las piezas llegaron rápido y en buenas condiciones,ajustaron perfectamente a la maquina.La maquina quedó trabajando como nueva, estoy muy agradecido con e Replacement parts.
Gerardo -
April 17, 2020
Verified Purchase
Weed eater clutch.
Parts came quick, fit and worked as designed.
Guest -
August 3, 2019
Verified Purchase
t
t
t -
t days ago
Verified Purchase
eReplacementParts Team
t
Questions & Answers ?
Our customer Service team is at the ready daily to answer your part and product questions.

Ask our Team
We have a dedicated staff with decades of collective experience in helping customers just like you purchase parts to repair their products.
Does this fit my product?Questions & Answers for Clutch Assembly
No questions have been asked yet
Customer Repair Instructions ?
All our customer repair instructions are solicited directly from other customers just like you who have purchased and replaced this exact part.
Broken clutch drum body
Richard - May 1, 2016
👍 20 of 21 people found this instruction helpful
Tool Type
Trimmer
Difficulty
Medium
Time
30-60 minutes
Tools Used
Screwdriver, Torx driver, hammer
Parts Used
Remove the clutch cover assembly. The remove the spark plug , then put some rope inside of the cylinder to stop the piston, make sure you leave 4 or 5 inches of rope outside of the cylinder. Then pull the starter rope slowly until the piston comes in contact with the rope and stops. Use a Torx screw to remove the clutch drum. Sorry I cannot remember the size. Then take a screwdriver and hammer, put the screwdriver on a outside edge of the clutch, then strike the hammer and the clutch will come of. It is a standard RH thread. Replace the washers, then thread the new clutch on hand tight, then screw on the clutch drum. Install the spark plug. Then put the clutch cover assembly back on, and your ready to go.
Did you find this story helpful?
Thanks for voting and helping fellow customers!
Clutch assembly springs weakened and stretched. Eventually clutch plates broke. Uneasy rattling sound.
Parker - June 30, 2016
👍 8 of 8 people found this instruction helpful
Tool Type
Trimmer
Difficulty
Medium
Time
30-60 minutes
Tools Used
, Torx wrench, LG visegrips (locking pliers), LG slip-joint pl
Parts Used
Removed shaft from clutch/engine assembly. Also had to remove wires from handle/switch to pull the shaft up and over the main assembly. I removed all the broken clutch pieces but there was one tricky part. Part of the clutch assembly was threaded onto the crankshaft and there wasn't an easy way to unscrew it without also turning the crankshaft. There was no easy way to hold the crankshaft since it is cylindrical, so I just used large vise grips (or any locking pliers) with a larger surface grabbing area and clamped them very tightly on the crankshaft to hold it still. The with a set of slip-joint pliers I unscrewed the clutch assembly. I put the new one on the same way, minding the two different sizes of washers that need to be replaced. The metal cap is put over the whole thing. When putting the trimmer shaft back onto the clutch/engine assembly, you need to be mindful that the square end of the inner shaft cable fits directly into the center hole of the clutch assembly, which is also square. Replace torx screws and if it works, you did it right!
Did you find this story helpful?
Thanks for voting and helping fellow customers!
Trimmer head suddenly stopped rotating.
William - June 15, 2016
👍 4 of 4 people found this instruction helpful
Tool Type
Trimmer
Difficulty
Medium
Time
30-60 minutes
Tools Used
Screwdriver, Allen wrench
Parts Used
The process is fairly simple, and once you have accessed the clutch the repair is fairly easy. Just make sure the clutch drum is connected to the flex drive before buttoning everything up. In my situation the clutch wasn't the problem, after I made the repair and my trimmer head still did not rotate I decided to investigate the gear box, and discovered my flex drive had sheared off at the gear. So if the trimmer head stops spinning suddenly I would recommend looking into the flex drive entirely.
Did you find this story helpful?
Thanks for voting and helping fellow customers!
Starter spring broken, needed new clutch
John - June 6, 2016
👍 2 of 2 people found this instruction helpful
Tool Type
Trimmer
Difficulty
Easy
Time
30-60 minutes
Tools Used
Screwdriver, Pliers, allen wrench,tork driver
Remove the clutch cover. Then remove the spark plug and insert a length of rope into the cylinder, leaving a few inches out. Then pull on the starter rope until the piston comes in contact with the rope and stops the engine from turning. Then using a torx T-20 (As I remember it might be a T-25) remove the clutch drum. Then with safety glasses on, strike an edge of the clutch with a hammer and screwdriver until it is loose, once usually does it. Then remove the old starter housing assembly by removing the screws that secure it. An install the new one. Replace the clutch assembly and clutch cover in reverse order of tear down. Remove the rope from the cylinder, and install the new spark plug gapped at 0.025 I also replaced the o-ring between the cylinder and rocker cover.
Did you find this story helpful?
Thanks for voting and helping fellow customers!
Clutch dog broke and got jammed in clutch drum.
David - October 31, 2017
👍 1 of 1 people found this instruction helpful
Tool Type
Trimmer
Difficulty
Medium
Time
15-30 minutes
Tools Used
Screwdriver, Torx bit, Drift punch, Hammer
Parts Used
1. Took apart housing where clutch is located.
2. Removed keeper screw holding clutch drum with Torx bit.
3.Ordered part from eReplacementParts.
4. Removed clutch hub by framming it with a drift punch and hammer. (lefthand threads)
5. Installed new clutch and drum.
6. Reassembled housing.
2. Removed keeper screw holding clutch drum with Torx bit.
3.Ordered part from eReplacementParts.
4. Removed clutch hub by framming it with a drift punch and hammer. (lefthand threads)
5. Installed new clutch and drum.
6. Reassembled housing.
Did you find this story helpful?
Thanks for voting and helping fellow customers!
Trimmer clutch drum worn
John - June 3, 2016
👍 1 of 1 people found this instruction helpful
Tool Type
Trimmer
Difficulty
Medium
Time
15-30 minutes
Tools Used
Screwdriver, Wrench Set, Torx driver, hammer
Parts Used
Remove the spark plug and place a length of rope into the cylinder, with some left out of the cylinder. Then pull the starter rope until the piston stops. Remove the clutch cover. Then with a torx bit, it is either a T-20 or T-25, remove the clutch drum. Then with a screwdriver and hammer hit an edge of the clutch to remove it from the spindle. Remove the clutch and washer. Install the new washer then the new clutch, tap it lightly a few times to seat it. Place the other washer on the spindle and screw on the new clutch drum. Then replace the clutch cover. And remove the rope from the cylinder and install the spark plug.
Did you find this story helpful?
Thanks for voting and helping fellow customers!
clutch assembly wear
Manuel - June 15, 2023
Tool Type
Trimmer
Difficulty
Easy
Time
15-30 minutes
Tools Used
Screwdriver, Pliers, Socket set, Wrench Set
Parts Used
Removed engine cover removed hardware for clutch and replaced clutch assembly
Did you find this story helpful?
Thanks for voting and helping fellow customers!
clutch went bad
ernie - September 25, 2021
Tool Type
Trimmer
Difficulty
Easy
Time
15-30 minutes
Tools Used
, torx bit set allen wrench
Parts Used
removed old clutch and installed new one. just make shure to remove and install torx screw in top center of drum.
Did you find this story helpful?
Thanks for voting and helping fellow customers!
One of the clutch springs broke
Terry - July 24, 2021
Tool Type
Trimmer
Difficulty
Easy
Time
Less than 15 minutes
Tools Used
Screwdriver
Parts Used
1 removed shaft housing 2 removed plastic housing 3 removed clutch assembly
Did you find this story helpful?
Thanks for voting and helping fellow customers!
Clutch spring broke
DANIEL - September 17, 2020
Tool Type
Trimmer
Difficulty
Easy
Time
15-30 minutes
Tools Used
Socket set, Wrench Set, Allen wrench
Parts Used
Pulled the shaft and handle. Removed the nose. Used Allen wrench to lock the motor and screw driver to remove bell housing and then unscrew clutch.
Replace new parts and reassemble.
Replace new parts and reassemble.
Did you find this story helpful?
Thanks for voting and helping fellow customers!
Load More Install Stories
OEM stands for Original Equipment Manufacturer and means the part you’re buying is sourced directly from the manufacturer who made your product. At eReplacementParts, we sell only genuine OEM parts, guaranteeing the part you’re purchasing is of better design and of higher quality than aftermarket parts.
Our product descriptions are a combination of data sourced directly from the manufacturers who made your product as well as content researched and curated by our content & customer service teams. This content is edited and reviewed internally before being made public to customers.
Our customer service team are at the ready daily to answer your part and product questions. We have a dedicated staff with decades of collective experience in helping customers just like you purchase parts to repair their products.
All our part reviews are solicited directly from other customers who have purchased this exact part. While we moderate these reviews for profanity, offensive language or personally identifiable information, these reviews are posted exactly as submitted and no alterations are made by our team.
All our customer repair instructions are solicited directly from other customers just like you who have purchased and replaced this exact part. While we moderate these reviews for profanity, offensive language or personally identifiable information, these reviews are posted exactly as submitted and no alterations are made by our team.
Based on data from past customer purchasing behaviors, these parts are most commonly purchased together along with the part you are viewing. These parts may be necessary or helpful to replace to complete your current repair.
All our installation videos are created and produced in collaboration with our in-house repair technician, Mark Sodja, who has helped millions of eReplacementParts customers over the last 13 years repair their products. Mark has years of experience in selling and repairing both commercial and residential products with a specialty in gas-powered equipment.
This data is collected from customers who submitted a repair instruction after replacing this exact part. Customers can rate how easy the repair was to complete and how long it took. We aggregate this data to provide a repair rating that allows customers to quickly determine the difficulty and time needed to perform their own repair.