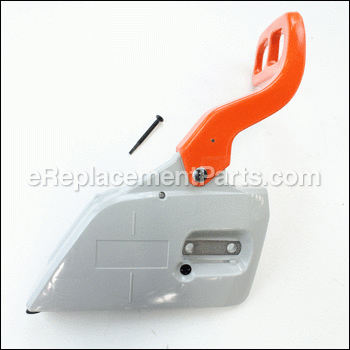

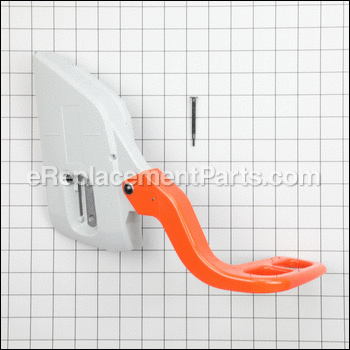
Chain Brake Assembly P021010652
Part Number: P021010652
Leaves our warehouse within
7 - 12 business days
7 - 12 business days
*This part replaces obsolete part #: P021010650, 43320232638, 43320232634, 43320232633 and 43320232637.
Product Information
Compatibility
Products Compatibility
This item works with the following types of products:
- • Chain Saw
- • Saw
Questions & Answers for Chain Brake Assembly
No questions have been asked yet
Repair Instructions: Submitted by Customers Like You
Tool Type:
Chain Saw
Parts Used:
Repair Difficulty:
Easy
Time Spent Repairing:
Less than 15 minutes
Tools Used:
Screwdriver, Nutdriver
Worn out parts
Replaced brake assembly, SIMPLE
Did you find this story helpful?
Thanks for voting and helping fellow customers!
Tool Type:
Chain Saw
Repair Difficulty:
Medium
Time Spent Repairing:
15-30 minutes
Tools Used:
Screwdriver, Nutdriver, Pick and brushes for cleaning, 4mm allen required
Resurrected!! Saw was left for dead in the dirt - it ran, but poorly
Well for starters, before I began this repair, I had already replaced the bar and chain. It wouldn't adjust because the gears on the tensioning screw were stripped - had to replace that assembly too before I could tighten the chain around the bar. Even for a chainsaw that had 1000s of hours on it, and that had been left to rot outside in the sun, was still worth repairing as it was large saw CS-670 (66.7cc) and I didn't have anything that size in my arsenal (nor could I afford it). So after being able to tension the chain and actually cut, it wouldn't make it through a tank of gas and it wasn't cutting straight through the thicker logs. And so here we begin:
1. Began by stripping down the whole saw - removing everything except the oiler and the engine. I mocked up a piece of cardboard and poked holes for the screws so I would know where all the fasteners went for reassembly.
2. I separated parts that were plastic from parts that came into contact with fuel and cleaned everything! I used compressed air and then Simple Green to clean everything except the carb and engine assembly. As for the main assembly with the engine, I used mostly brake parts cleaner and compressed air. For the carb, I used.... you guessed it... carb & choke cleaner.
3. The carb... installing the kit is very easy. There are basically just a few things you need to check on the carb, especially if it was running before. Remove the top and bottom caps and the gaskets, which are your fuel pump and diaphragm. Mine were full of crud and not worth keeping, so I replaced them with parts in the kit. Below the diaphragm is the metering valve. If the spring is not missing or broken (it wouldn't run if it was...), then just check it's height with a straight-edge - it should be flush with the top. Take out the float needle and inspect it carefully. Unless the carb is leaking gas or visibly looks worn, leave it alone. I've had problems with float/metering valves by just replacing them because they're new - if it ain't broke don't fix it! Clean the rest of the carb until it's spotless and carb cleaner comes out off all orifices in the carb. Then finish with compressed air and reassemble. I didn't mess with the jet screws as new ones were not included in the kit and are sealed by factory installed guards.
4. Move the tensioning assembly from the old guard to the new one. My brake was broken and other parts on the guard as well, so it made sense to just replace the whole thing and I'm glad I did.
5. Install the Spiked Bumper Kit
6. Reassembled the chainsaw, reverse of disassembly. Be careful with the oil lines as there are tiny o-rings that seal the manual pump assembly, that can easily fall out.
7. Fire it up! Mine didn't run for crap, so I had to remove and adjust the carb. It was pretty worn as the preset limits for the jet screws reached their limit before I got a satisfactory tune. This usually means the carb is just worn out - the jet cavities are literally washed out and opened up ever so slightly, allowing for a rich condition. Sometimes, new jet screws will fix this, but often not and the carb must be replaced, eventually.... I decided to hack it and remove the preset guards so I could tighten those screws past the factory limits (like this thing is still under warranty lol). That got it where I wanted and I was able to tune it to run great!! Now it screams and rips logs - certainly an awesome saw! Won't last forever, but I'll get through the summer's cutting before I need new rings and a new carb (it's June now).
Did you find this story helpful?
Thanks for voting and helping fellow customers!
Product Information