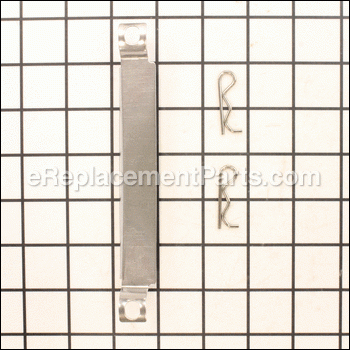

This is a manufacturer approved replacement part designed for use with Char-Broil gas grills. This item is made out of metal and it is sold individually. The carryover tube provides support for the burners, and carries the flame from one burner to the next. They also help to secure the burners in place. Over time, your carryover tubes may rust or warp. This would be the time to replace them. This assembly includes two (2) cotter pins.
Carryover Tube Assembly G614-0095-W1A
OEM part for: Char-Broil
Part Number: G614-0095-W1A
$3.99
In Stock
Jump To:
Frequently Purchased Together ?


Compatibility
This part will fit the following 6 machines
Char-Broil
463224611 4-Burner Precisionflame Infrared Gas Grill View Diagrams & Manuals
463269411 Tru-Infrared IR Gas Grill With Flex Cart View Diagrams & Manuals
463241113 Commercial Grill View Diagrams & Manuals
463449914 Commercial 4-Burner Grill C-45D View Diagrams & Manuals
461251314 Gas Grill With Lidded Sideburner View Diagrams & Manuals
466224611 4-Burner Precisionflame Infrared Gas Grill View Diagrams & Manuals
Show More Compatible Models
This item works with the following types of products:
Repair Videos ?

Articles:
|
Having trouble getting your grill to light up? A common cause of this issue is a defective ignition switch. We'll sho...
November 08, 2012
|

Customer Part Reviews ?
Average Rating (out of 5):
Click to filter by ratings:
5 stars
5
4 stars
0
3 stars
1
2 stars
0
1 stars
0
< PREV
- 1
Easy fix
The replacement was an easy fix. Just replace the cotter pins and carryover bars. Grill works great again...
Susan m -
June 27, 2023
Verified Purchase
Easy install.
It fit exactly as it should.
Guest -
July 2, 2020
Verified Purchase
Glad I used you instead of the A word.
Part works great, did just what I needed it to.
Guest -
June 30, 2020
Verified Purchase
Easy Peasy
Prompt delivery, part was as described, easy install.
Guest -
November 19, 2019
Verified Purchase
Had what I needed
Went to several stores that sell the bbq I have. None of them carried the replacement part. I ordered the part from you and it came sooner than I expected at a great price too. Thank you for a great online experience.
Guest -
June 11, 2019
Verified Purchase
Took way too long
I ordered this way at the very beginning of this pandemic, but the company used the pandemic regulations as an excuse for sending this part out 3 months later.
Guest -
June 18, 2020
Verified Purchase
t
t
t -
t days ago
Verified Purchase
eReplacementParts Team
t
Questions & Answers ?
Our customer Service team is at the ready daily to answer your part and product questions.

Ask our Team
We have a dedicated staff with decades of collective experience in helping customers just like you purchase parts to repair their products.
Does this fit my product?Questions & Answers for Carryover Tube Assembly
Dimensions
Helen
for model number 463642116
asked on 2022-10-13
Hello Helen, Thank you for the question. This Carryover Tube is approximately 7" Long according to the 1" Grid. Thank you for your inquiry, good luck with this repair!
eReplacementParts Team October 13, 2022
Customer Repair Instructions ?
All our customer repair instructions are solicited directly from other customers just like you who have purchased and replaced this exact part.
Burners rusted out
Steve - June 1, 2017
👍 4 of 4 people found this instruction helpful
Tool Type
Outdoor Grill
Difficulty
Medium
Time
30-60 minutes
Tools Used
Screwdriver, Pliers, Vacuum
Parts Used
1. Took old parts out
2. Scraped food debris from inside of Grill.
3. Vacuumed all loose debris.
4. Replaced burners and carry over tubes.
5. Started grill to make sure it worked and to burn off any oils.
6. Everything worked and I have already cooked some chicken. They came out nice with replaced and even cooking burners.
Did you find this story helpful?
Thanks for voting and helping fellow customers!
Carryover tubes worn out
Annette - July 7, 2016
👍 2 of 2 people found this instruction helpful
Tool Type
Outdoor Grill
Difficulty
Easy
Time
Less than 15 minutes
Tools Used
Pliers
Parts Used
1. Pulled cotter pins out of old carryover tubes
2. Removed old carryover tubes
3. Installed new carryover tubes and replaced cotter pins - simple
2. Removed old carryover tubes
3. Installed new carryover tubes and replaced cotter pins - simple
Did you find this story helpful?
Thanks for voting and helping fellow customers!
4 main burner tubes, carry over tube assembly and heat tent were rusted and not functional
William - July 25, 2018
👍 1 of 1 people found this instruction helpful
Tool Type
Outdoor Grill
Difficulty
Easy
Time
30-60 minutes
Tools Used
Screwdriver, Pliers
1 Removed all rusted parts to be replaced and cleaned fire box with Shop Vac. This was done prior to placing order which helped me determine exactly what I needed. Approximately 30min.
2 When I received the parts I started with the main burner tubes following the instructions included each tube was inserted and a cotter pin placed on the back end of each tube secured them. Needle Nose pliers made this easy.
3 The carry over tube assembly was next but before you can complete this part you need to screw a small eyelet screw in the front of each burner tube. When this is completed the carry over tubes can be put in place and secured with a cotter pin.
4 The final step was to place the 4 heat tents over each burner. They simply fit into a niche in the fire box over each burner. Approximately 30 min.
Did you find this story helpful?
Thanks for voting and helping fellow customers!
Original parts rusted out
Russell - June 19, 2017
👍 1 of 1 people found this instruction helpful
Tool Type
Outdoor Grill
Difficulty
Easy
Time
15-30 minutes
Tools Used
Screwdriver
1. Removed grate
2. Removed rusted parts, main burners and carry over tubes with screw driver
3. Cleaned area
4. Attached main burners to ignition wiring
5. Put burners in place with cotter pins
6. Attached carry over tubes with screw using screw driver
7. Tested burners
8. Return grate and shields
2. Removed rusted parts, main burners and carry over tubes with screw driver
3. Cleaned area
4. Attached main burners to ignition wiring
5. Put burners in place with cotter pins
6. Attached carry over tubes with screw using screw driver
7. Tested burners
8. Return grate and shields
Did you find this story helpful?
Thanks for voting and helping fellow customers!
Burner and associated parts were rusted, not heating properly
Jean - August 11, 2018
Tool Type
Outdoor Grill
Difficulty
Easy
Time
1-2 hours
Tools Used
Screwdriver, Pliers
This was a very simple repair.
Remove old rusted parts.
Minor clean up of the burner area.
Install replacement parts.
Everything fit in place correctly without modification.
Test for proper operation - good to go!
Remove old rusted parts.
Minor clean up of the burner area.
Install replacement parts.
Everything fit in place correctly without modification.
Test for proper operation - good to go!
Did you find this story helpful?
Thanks for voting and helping fellow customers!
Burner tubes and carryover tubes rusted out.
joseph - August 3, 2018
Tool Type
Outdoor Grill
Difficulty
Easy
Time
15-30 minutes
Tools Used
Pliers
Parts Used
Removed & replaced the burner tubes and the carryover tubes. Cleaned out the bottom of the grill box.
Did you find this story helpful?
Thanks for voting and helping fellow customers!
Rusted parts
Renee - May 26, 2018
Tool Type
Outdoor Grill
Difficulty
Easy
Time
15-30 minutes
Tools Used
, Used a center punch to remove old spring clips.
Very happy with this product. Saved hundreds of dollars by not having to replace our grill.
Did you find this story helpful?
Thanks for voting and helping fellow customers!
Uneven heating due to blocked gas tubes. Corroded heat tents.
john - April 24, 2018
Tool Type
Outdoor Grill
Difficulty
Easy
Time
Less than 15 minutes
Tools Used
Screwdriver
1. Remove the grill grates.
2. Remove the old heat tents.
3. Remove the cotter pins from the carryover tube assemblies.
4. Remover the cotter pins from the gas tubes.
5. Replace in the reverse order.
2. Remove the old heat tents.
3. Remove the cotter pins from the carryover tube assemblies.
4. Remover the cotter pins from the gas tubes.
5. Replace in the reverse order.
Did you find this story helpful?
Thanks for voting and helping fellow customers!
All internal parts wore out.
Paul - April 23, 2018
Tool Type
Outdoor Grill
Difficulty
Easy
Time
15-30 minutes
Tools Used
Screwdriver, Pliers
Replaced all old worn parts with the new purchased parts and the grill works great.
Did you find this story helpful?
Thanks for voting and helping fellow customers!
Burner and cross over pieces were rusted out
Bruce - April 20, 2018
Tool Type
Outdoor Grill
Difficulty
Easy
Time
1-2 hours
Tools Used
Screwdriver, Pliers
Removed the grates and heat deflector. Removed the cotter keys on both the cross over and burners and removed them. Slide the new burners in on to the gas heater and tied them down with the new cotter keys. Checked each burner by turning on the gas and igniting them. Then installed the cross over pieces. Everything fit.
Did you find this story helpful?
Thanks for voting and helping fellow customers!
Load More Install Stories
OEM stands for Original Equipment Manufacturer and means the part you’re buying is sourced directly from the manufacturer who made your product. At eReplacementParts, we sell only genuine OEM parts, guaranteeing the part you’re purchasing is of better design and of higher quality than aftermarket parts.
Our product descriptions are a combination of data sourced directly from the manufacturers who made your product as well as content researched and curated by our content & customer service teams. This content is edited and reviewed internally before being made public to customers.
Our customer service team are at the ready daily to answer your part and product questions. We have a dedicated staff with decades of collective experience in helping customers just like you purchase parts to repair their products.
All our part reviews are solicited directly from other customers who have purchased this exact part. While we moderate these reviews for profanity, offensive language or personally identifiable information, these reviews are posted exactly as submitted and no alterations are made by our team.
All our customer repair instructions are solicited directly from other customers just like you who have purchased and replaced this exact part. While we moderate these reviews for profanity, offensive language or personally identifiable information, these reviews are posted exactly as submitted and no alterations are made by our team.
Based on data from past customer purchasing behaviors, these parts are most commonly purchased together along with the part you are viewing. These parts may be necessary or helpful to replace to complete your current repair.
All our installation videos are created and produced in collaboration with our in-house repair technician, Mark Sodja, who has helped millions of eReplacementParts customers over the last 13 years repair their products. Mark has years of experience in selling and repairing both commercial and residential products with a specialty in gas-powered equipment.
This data is collected from customers who submitted a repair instruction after replacing this exact part. Customers can rate how easy the repair was to complete and how long it took. We aggregate this data to provide a repair rating that allows customers to quickly determine the difficulty and time needed to perform their own repair.