
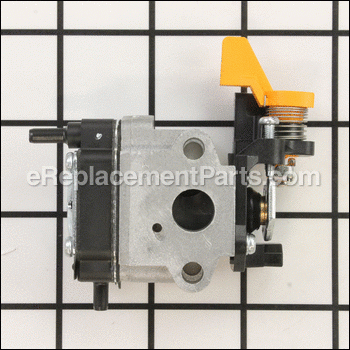
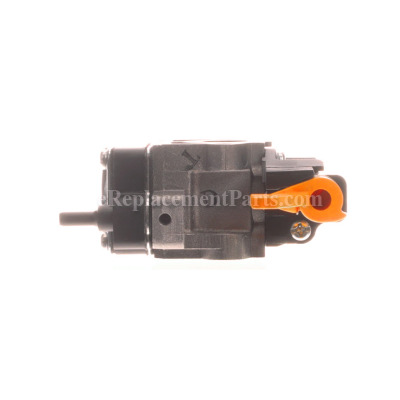


This authentic replacement carburetor is used on Ryobi gas pruners and string trimmers. Its function is to supply a mixture of air and fuel in the engine. It also controls engines speed. This carburetor has a metal body and a plastic lever. When replacing carburetor it is advised to replace gaskets (sold separately) to ensure top performance.
To complete this repair you would need a wrench.
• Remove air box cover, filter and the base
• Disconnect fuel lines and remove old carburetor
• Install new carburetor and re-connect fuel lines
• Re-assemble and test the unit
Carburetor 985893001
OEM part for: Ryobi
Part Number: 985893001
$113.71
In Stock
Product Description ?
- Classification: Part
- Weight: 0.20 lbs.
- Shipping: Ships Worldwide
Compatibility
This part will fit the following 20 machines
Ryobi
RY30020 30cc Curved Shaft String Trimmer View Diagrams & Manuals
RY30020A 30cc String Trimmer View Diagrams & Manuals
RY30020B 30cc String Trimmer View Diagrams & Manuals
RY30023 30cc Curved Shaft String Trimmer View Diagrams & Manuals
SS30 (RY30040) 30cc Straight Shaft String Trimmer View Diagrams & Manuals
RY30040A 30cc String Trimmer View Diagrams & Manuals
RY30040B 30cc String Trimmer View Diagrams & Manuals
SS30 (RY30043) 30cc Straight Shaft String Trimmer View Diagrams & Manuals
RY30060A 30cc Brushcutter View Diagrams & Manuals
RY30060B 30cc Brushcutter View Diagrams & Manuals
RY30063 30cc Brushcutter View Diagrams & Manuals
RY52002 Pruner / Trimmer View Diagrams & Manuals
RY52002A Pruner / Trimmer View Diagrams & Manuals
RY52004 30cc Gas Pruner View Diagrams & Manuals
RY52004A Gas Pruner View Diagrams & Manuals
RY30060 30cc Brushcutter View Diagrams & Manuals
RY52002A (PC30) Pruner/Trimmer View Diagrams & Manuals
RY52004 (TP30) 30cc Gas Pruner View Diagrams & Manuals
RY52002 (PC30) Pruner/Trimmer View Diagrams & Manuals
RY52004A (TP30) Gas Pruner View Diagrams & Manuals
Show More Compatible Models
This item works with the following types of products:
- Trimmer Parts
- Pruner Parts
Questions & Answers ?
Our customer Service team is at the ready daily to answer your part and product questions.

Ask our Team
We have a dedicated staff with decades of collective experience in helping customers just like you purchase parts to repair their products.
Does this fit my product?Questions & Answers for Carburetor
No questions have been asked yet
Customer Repair Instructions ?
All our customer repair instructions are solicited directly from other customers just like you who have purchased and replaced this exact part.
Carburetor was gummed up, no fuel flow
Sylvester - May 29, 2016
👍 4 of 4 people found this instruction helpful
Tool Type
Trimmer
Difficulty
Easy
Time
30-60 minutes
Tools Used
Screwdriver
Parts Used
1-Remove the air filter assembly
2-Remove the fuel lines and throttle
3-Remove the two nuts holding the carburetor and gasket. You may want to order a new gasket, it is not included with the new carburetor.
4- Remove the carburetor.
5-Install the new carburetor and gasket, and tighten the nuts securing the new carburetor
6-Replace the fuel lines, throttle and air filter assembly
Did you find this story helpful?
Thanks for voting and helping fellow customers!
Trimmer was stalling at start-up, had trouble accelerating even after warm-up.
Gilberto - March 9, 2016
👍 4 of 4 people found this instruction helpful
Tool Type
Trimmer
Difficulty
Easy
Time
Less than 15 minutes
Tools Used
Pliers, Nutdriver
Parts Used
The repair was easy because replacement part was identical, no special tools required. Removed the filter housing, removed the 2 nuts holding the old carb, remove fuel lines and linkage replaced with new carb.
Did you find this story helpful?
Thanks for voting and helping fellow customers!
Trimmer was not running properly, it would bog down as throtle was increased.
Ronald - June 19, 2017
👍 2 of 2 people found this instruction helpful
Tool Type
Trimmer
Difficulty
Easy
Time
15-30 minutes
Tools Used
Screwdriver, Pliers, Nutdriver
Parts Used
I tried to clean the existing carburetor but that helped the problem but did not solve it completely.
Went online and found a carburetor replacement part and purchased it. Replaced it and the trimmer runs like it should now.
Remove the air filter, removed the fuel lines and the throttle, remove the nuts and remove the old carburetor. Installed the new carburetor on the screws and tighten the nuts. Connect the fuel lines and the throttle, then attach the air filter.
Did you find this story helpful?
Thanks for voting and helping fellow customers!
No power when throttle increased
Larry - April 10, 2016
👍 2 of 2 people found this instruction helpful
Tool Type
Trimmer
Difficulty
Medium
Time
30-60 minutes
Tools Used
Screwdriver, Pliers, Socket set, Wrench Set
Trimmer would start but had no power. Found out that the fuel lines had rotted away,( the fuel filter was broke off and bouncing around in tank) So I first tried to replace the lines but when trying to remove main fuel line from carburetor I broke the plastic fitting on the carb itself. So went ahead and ordered a new carb and fuel tank that came with everything (fuel lines and filter). Install was pretty easy two bolts on the carb, except I got the fuel lines mixed up, so watch out for that. Works like brand new now!
Did you find this story helpful?
Thanks for voting and helping fellow customers!
Type of Ryobi carburetor would not allow adjustment of the High and low screws.
Lee - June 3, 2017
👍 1 of 1 people found this instruction helpful
Tool Type
Trimmer
Difficulty
Easy
Time
15-30 minutes
Tools Used
Nutdriver
Parts Used
Remove the air filter
Remove the throttle and the fuel lines
Remove the old carburetor and install the new one
Install the throttle and fuel lines
Install the air filter
Remove the throttle and the fuel lines
Remove the old carburetor and install the new one
Install the throttle and fuel lines
Install the air filter
Did you find this story helpful?
Thanks for voting and helping fellow customers!
Wouldn’t stay started
Ronald - May 7, 2020
Tool Type
Trimmer
Difficulty
Easy
Time
Less than 15 minutes
Tools Used
Nutdriver, Brain
Parts Used
Put the carb. On and it stayed started
Did you find this story helpful?
Thanks for voting and helping fellow customers!
Broken fuel line attachment
Michael - July 27, 2016
Tool Type
Trimmer
Difficulty
Easy
Time
15-30 minutes
Tools Used
Screwdriver, Pliers
Parts Used
Removed air filter and 2 carb screws removed carb replaced the gasket, carb, gasket, reinstalled carb screws and air filter.
Did you find this story helpful?
Thanks for voting and helping fellow customers!
OEM stands for Original Equipment Manufacturer and means the part you’re buying is sourced directly from the manufacturer who made your product. At eReplacementParts, we sell only genuine OEM parts, guaranteeing the part you’re purchasing is of better design and of higher quality than aftermarket parts.
Our product descriptions are a combination of data sourced directly from the manufacturers who made your product as well as content researched and curated by our content & customer service teams. This content is edited and reviewed internally before being made public to customers.
Our customer service team are at the ready daily to answer your part and product questions. We have a dedicated staff with decades of collective experience in helping customers just like you purchase parts to repair their products.
All our part reviews are solicited directly from other customers who have purchased this exact part. While we moderate these reviews for profanity, offensive language or personally identifiable information, these reviews are posted exactly as submitted and no alterations are made by our team.
All our customer repair instructions are solicited directly from other customers just like you who have purchased and replaced this exact part. While we moderate these reviews for profanity, offensive language or personally identifiable information, these reviews are posted exactly as submitted and no alterations are made by our team.
Based on data from past customer purchasing behaviors, these parts are most commonly purchased together along with the part you are viewing. These parts may be necessary or helpful to replace to complete your current repair.
All our installation videos are created and produced in collaboration with our in-house repair technician, Mark Sodja, who has helped millions of eReplacementParts customers over the last 13 years repair their products. Mark has years of experience in selling and repairing both commercial and residential products with a specialty in gas-powered equipment.
This data is collected from customers who submitted a repair instruction after replacing this exact part. Customers can rate how easy the repair was to complete and how long it took. We aggregate this data to provide a repair rating that allows customers to quickly determine the difficulty and time needed to perform their own repair.