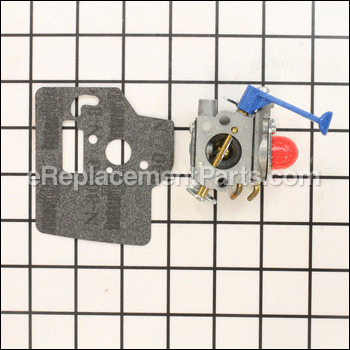
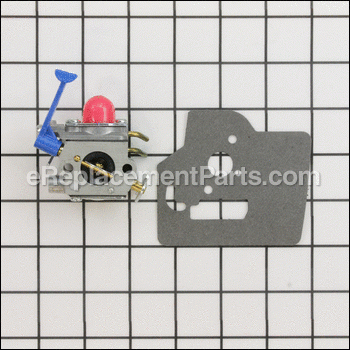


Genuine Manufacturer Approved Carburetor Kit which includes a Metal Body Carburetor and a Carburetor Gasket. It is used on some Husqvarna Gas Powered String Trimmers. The purpose of this part is to mix air and gas before the fuel mix goes to the engine. If the engine won\'t start and the tank is full of fresh fuel, test the carburetor by removing the air filter and pouring about a teaspoon of fuel into the carburetor. Pull the starter rope. If the engine starts and then quickly dies, the carburetor is likely the problem.
Carburetor Kit 545081848
OEM part for: Husqvarna, Craftsman, Jonsered
Part Number: 545081848
$46.07
In Stock
Jump To:
Frequently Purchased Together ?


Compatibility
This part will fit the following 45 machines
Husqvarna
128LD 952711969 2010-06 Trimmer/Edger View Diagrams & Manuals
128C (2010-08) Trimmer/Edger View Diagrams & Manuals
128CD 28cc Gas Line Lawn Trimmer View Diagrams & Manuals
125R (2006-10) Brushcutter View Diagrams & Manuals
125R (2007-10) Brushcutter View Diagrams & Manuals
125RJ (2009-09) Brushcutter View Diagrams & Manuals
128R (2010-08) Brushcutter View Diagrams & Manuals
124 R (2010-08) Brushcutter View Diagrams & Manuals
128 RJ (952715759) (2011-08) Row Brushcutter View Diagrams & Manuals
128 RJ (952715754) (2010-08) Brushcutter View Diagrams & Manuals
128 RJ (952711950) (2010-08) Brushcutter View Diagrams & Manuals
125 LDX (2009-09) Row Trimmer View Diagrams & Manuals
128 DJX (966712501) (2012-05) Trimmer View Diagrams & Manuals
128 DJX (966712501) (2011-01) Trimmer View Diagrams & Manuals
128 L (952715755) (2010-08) Row Trimmer View Diagrams & Manuals
128 L (952715750) (2010-08) Eu Au View Diagrams & Manuals
128 L (952711946) (2010-08) Us Can View Diagrams & Manuals
128 LD (952711969) (2010-08) Us Can View Diagrams & Manuals
128 LD (952711953) (2010-08) Us Lowes View Diagrams & Manuals
128LDX (966589201) (2010-06) Us Can View Diagrams & Manuals
128 LDX (952715757) (2012-01) Row Trimmer View Diagrams & Manuals
128 LDX (952715753) (2012-01) Eu Au View Diagrams & Manuals
128 LDX (952711948) (2010-08) Us Can View Diagrams & Manuals
128 LDX (545192137) (2010-08) Row Trimmer View Diagrams & Manuals
Craftsman
358792030 Trimmer View Diagrams & Manuals
358792031 Trimmer View Diagrams & Manuals
358792032 Trimmer View Diagrams & Manuals
358792033 Trimmer View Diagrams & Manuals
Jonsered
BC2126 CAN (2009-09) Brushcutter View Diagrams & Manuals
BC2126 EU AU (2010-08) Brushcutter View Diagrams & Manuals
BC2126 US (2009-09) Brushcutter View Diagrams & Manuals
BC2128 CAN - 952711959 (2010-08) Brushcutter View Diagrams & Manuals
BC2128 EU AU - 952715763 (2010-08) Brushcutter View Diagrams & Manuals
CC2126 CAN (2009-09) Brushcutter View Diagrams & Manuals
CC2126 EU AU (2010-08) Brushcutter View Diagrams & Manuals
CC2126 US (2010-08) Brushcutter View Diagrams & Manuals
CC2128 CAN - 952711960 (2010-06) Brushcutter View Diagrams & Manuals
CC2128 EU AU - 952715764 (2010-08) Brushcutter View Diagrams & Manuals
CC2128 US - 952711957 (2010-06) Brushcutter View Diagrams & Manuals
GC2128 US CAN - 952711955 (2010-08) Trimmer View Diagrams & Manuals
GC2128C CAN - 952711958 (2010-06) Trimmer View Diagrams & Manuals
GC2128C EU AU - 952715762 (2011-04) Trimmer View Diagrams & Manuals
GC2128C US - 952711956 (2011-03) Trimmer View Diagrams & Manuals
GT2128 EU AU - 952715761 (2010-06) Trimmer View Diagrams & Manuals
GT2128 US CAN (2010-06) Trimmer View Diagrams & Manuals
Show More Compatible Models
This item works with the following types of products:
- Edger Parts
- Trimmer Parts
This part replaces obsolete part #: 5450818-49, 5450818-47, 545006063, 5450060-34, 5450060-62
Customer Part Reviews ?
Average Rating (out of 5):
Click to filter by ratings:
5 stars
27
4 stars
6
3 stars
0
2 stars
0
1 stars
0
< PREV
- 1
- 2
- 3
Easy repair. Parts fit great.
Parts arrived in great condition. Put the carb on and the trimmer started right up. A couple of adjustments and they were ready to go back to work.
Nick -
June 8, 2023
Verified Purchase
Exactly what was needed, repair was simple and fast.
Received fast and weed eater was fixed and running. Easy to find on web page .
Guest -
May 20, 2023
Verified Purchase
Weed eater repair
Parts arrived promptly with instructions easy to find and read parts diagrams, My new home for parts purchases
Guest -
May 12, 2023
Verified Purchase
Great part
The carburetor was the exact fit, weedeater cranked right up after install.
Guest -
August 30, 2022
Verified Purchase
Replacement part
Easy peasy lemon squeezey remove and replace old part
Guest -
May 5, 2022
Verified Purchase
Easy repair
Part arrived, on time, easy fix,
Guest -
April 28, 2022
Verified Purchase
10 minuite repair
just as always, exactly as advertised perfect fit and fix. Off to yard work now ! thanks, Neil S.
Guest -
April 19, 2022
Verified Purchase
A not expensive part
It fit and the lawn trimmer is function again.
iGlobal -
February 19, 2022
Verified Purchase
OEM Part - Worked as expected
This is an OEM carburetor for my Husqvarna 128LD string trimmer. Installed and my string trimmer is back up and running.
Tod -
October 20, 2021
Verified Purchase
Great service and very fast
I found a carb replacement on line and once again it was replacement parts.
Great price, even better customer service and very fast delivery. Your parts could already be on their way
Guest -
August 10, 2021
Verified Purchase
t
t
t -
t days ago
Verified Purchase
eReplacementParts Team
t
Questions & Answers ?
Our customer Service team is at the ready daily to answer your part and product questions.

Ask our Team
We have a dedicated staff with decades of collective experience in helping customers just like you purchase parts to repair their products.
Does this fit my product?Questions & Answers for Carburetor Kit
No questions have been asked yet
Customer Repair Instructions ?
All our customer repair instructions are solicited directly from other customers just like you who have purchased and replaced this exact part.
Trimmer was starting, running for 3 minutes then stalling.
william - May 19, 2016
👍 14 of 14 people found this instruction helpful
Tool Type
Trimmer
Difficulty
Easy
Time
Less than 15 minutes
Tools Used
Power Drill, Socket set
Parts Used
Remove the air filter assembly, remove the fuel lines and throttle from the old carburetor. Note where the fuel lines went. Remove the old carburetor and gasket and install the new ones. Install the air box to secure the new carburetor. Install the fuel lines and throttle. Install the filter and filter cover. Press the primer a few times, choke it until it kicks over, open the choke, and you should be running.
Did you find this story helpful?
Thanks for voting and helping fellow customers!
Carburetor problems
chris - May 20, 2016
👍 8 of 8 people found this instruction helpful
Tool Type
Trimmer
Difficulty
Easy
Time
15-30 minutes
Tools Used
Nutdriver
Parts Used
Remove the air cleaner cover then the air filter. Remove the fuel lines and throttle ( pay attention where the fuel line went) Remove the two nuts holding the air box and carburetor. Remove the old carburetor and gasket. Then install the new gasket and carburetor and tighten up the two nuts behind the air box. Install the fuel lines and throttle. Then the air cleaner assembly.
Did you find this story helpful?
Thanks for voting and helping fellow customers!
Would not start. Carburator was plugged up and would not deliver fuel with plunge bulb. Tried carb and choke cleaner. Spark was good.
Robert - November 16, 2015
👍 8 of 9 people found this instruction helpful
Tool Type
Trimmer
Difficulty
Medium
Time
15-30 minutes
Tools Used
Screwdriver, Pliers, Nutdriver
1st Drain remaining fuel and discard. Unpacked the new parts and familiarized with all.Took off cover with nut driver. Discarded used air filter and replaced it with the new one and set it aside. The throttle cable and fuel tubing were removed with needle nose pliers. Removed the old carburetor. Removed old gasket and installed the new. Replaced the old carb with the new. Without cover the carb is loose for attaching the throttle cable first and then the fuel tubing. Used needle nose pliers to attach the throttle cable and to attach the tubing to the new carb and carefully slid them up snug to the carb. Tested the throttle and it worked properly. Replaced cover. Tightened cover nuts with nut driver. Added fresh oil and gas mix. Pumped the new plunge bulb about 4 to 6 times, with no throttle pulled 2 times at full choke, and then on 3rd pull at half choke it fired up. I let it warm up for10+/- seconds and flipped off the choke. Idle is slightly high but haven't changed it with the idle adjust screw yet. Went right work and it ran for about 2 hours like it was brand new.
Did you find this story helpful?
Thanks for voting and helping fellow customers!
Carburator replacement
Kevin - May 31, 2016
👍 5 of 5 people found this instruction helpful
Tool Type
Trimmer
Difficulty
Easy
Time
Less than 15 minutes
Tools Used
Screwdriver, Socket set
Parts Used
1- Remove the air cleaner
2- Remove the fuel lines and throttle from the old carburetor
3- Remove the nut holding the old carb and gasket on
4- Place the new gasket and carb on and tighten the nuts
5- Place the fuel lines and throttle on the new carb.
6- Install the air cleaner assembly
2- Remove the fuel lines and throttle from the old carburetor
3- Remove the nut holding the old carb and gasket on
4- Place the new gasket and carb on and tighten the nuts
5- Place the fuel lines and throttle on the new carb.
6- Install the air cleaner assembly
Did you find this story helpful?
Thanks for voting and helping fellow customers!
Carburetor was leaking gas.
Rose - April 22, 2016
👍 4 of 4 people found this instruction helpful
Tool Type
Trimmer
Difficulty
Easy
Time
15-30 minutes
Tools Used
Screwdriver, Pliers
Parts Used
Remove the air cleaner assembly, Then remove the fuels lines (Note where the fuel lines were connected) and the throttle cable from the old carburetor. Install the fuel lines and throttle cable on the new carburetor. Then install the air cleaner assembly.
Did you find this story helpful?
Thanks for voting and helping fellow customers!
Trimmer would only run with choke turned halfway on and would not accept any throttle.
Ron - September 19, 2017
👍 2 of 2 people found this instruction helpful
Tool Type
Trimmer
Difficulty
Easy
Time
15-30 minutes
Tools Used
Screwdriver, Nutdriver, #25 torx bit
Parts Used
1. Remove air filter cover and air filter.
2. Remove two visible hex nuts.
3. Remove plastic cowling over carburetor.
4. Remove fuel lines. Push lines of carburetor fittings with flat blade screw driver.
5. Gently pull carburetor from side of engine.
6. When clear of the studs, unhook throttle cable from carburetor. Remove gasket.
7. Install gasket, hook throttle cable in carburetor and slide carburetor over studs.
8. Reinstall remaining parts. Do not over tighten hex nuts.
Did you find this story helpful?
Thanks for voting and helping fellow customers!
Weed eater only run with choke on.
juan - August 1, 2017
👍 2 of 2 people found this instruction helpful
Tool Type
Trimmer
Difficulty
Easy
Time
15-30 minutes
Tools Used
Screwdriver, Socket set
Parts Used
Removed the plastic cover.
Removed nuts holding carburetor.
Removed gas lines.
Removed carburetor.
Installed new carburetor re-attach gas lines.
Done.
Removed nuts holding carburetor.
Removed gas lines.
Removed carburetor.
Installed new carburetor re-attach gas lines.
Done.
Did you find this story helpful?
Thanks for voting and helping fellow customers!
Carburetor had had ethanol gas run through it. Needed replacement.
Bryan - June 27, 2016
👍 2 of 2 people found this instruction helpful
Tool Type
Trimmer
Difficulty
Medium
Time
30-60 minutes
Tools Used
Pliers, Socket set
Repair was simple. Most difficult part was replacing fuel and return lines. Cut lines at an angle, put oil on them, push through hole and grab with a pair of hemostats and pull. Not sure pliers would work. Other than that simple.
Did you find this story helpful?
Thanks for voting and helping fellow customers!
Trimmer would not stay running, tried cleaning the carb. Continued to run poorly even after adjusting the carb. Replaced with a new carb from replacement parts and it now runs perfectly.
James - August 18, 2020
👍 1 of 1 people found this instruction helpful
Tool Type
Trimmer
Difficulty
Easy
Time
Less than 15 minutes
Tools Used
Socket set
Parts Used
Removed air breather cover, disconnected fuel lines and throttle cable. Removed old carb and replaced with new one in reverse order.
Did you find this story helpful?
Thanks for voting and helping fellow customers!
Would not start or run
Michael - August 15, 2020
👍 1 of 1 people found this instruction helpful
Tool Type
Trimmer
Difficulty
Easy
Time
Less than 15 minutes
Tools Used
Socket set
Parts Used
Installed new carb. in 5 minutes. Runs like new.
Did you find this story helpful?
Thanks for voting and helping fellow customers!
Load More Install Stories
OEM stands for Original Equipment Manufacturer and means the part you’re buying is sourced directly from the manufacturer who made your product. At eReplacementParts, we sell only genuine OEM parts, guaranteeing the part you’re purchasing is of better design and of higher quality than aftermarket parts.
Our product descriptions are a combination of data sourced directly from the manufacturers who made your product as well as content researched and curated by our content & customer service teams. This content is edited and reviewed internally before being made public to customers.
Our customer service team are at the ready daily to answer your part and product questions. We have a dedicated staff with decades of collective experience in helping customers just like you purchase parts to repair their products.
All our part reviews are solicited directly from other customers who have purchased this exact part. While we moderate these reviews for profanity, offensive language or personally identifiable information, these reviews are posted exactly as submitted and no alterations are made by our team.
All our customer repair instructions are solicited directly from other customers just like you who have purchased and replaced this exact part. While we moderate these reviews for profanity, offensive language or personally identifiable information, these reviews are posted exactly as submitted and no alterations are made by our team.
Based on data from past customer purchasing behaviors, these parts are most commonly purchased together along with the part you are viewing. These parts may be necessary or helpful to replace to complete your current repair.
All our installation videos are created and produced in collaboration with our in-house repair technician, Mark Sodja, who has helped millions of eReplacementParts customers over the last 13 years repair their products. Mark has years of experience in selling and repairing both commercial and residential products with a specialty in gas-powered equipment.
This data is collected from customers who submitted a repair instruction after replacing this exact part. Customers can rate how easy the repair was to complete and how long it took. We aggregate this data to provide a repair rating that allows customers to quickly determine the difficulty and time needed to perform their own repair.