


Genuine OEM replacement part, this part is sold individually.
A carburetor basically consists of an open pipe through which the air passes into the inlet manifold of the engine. The pipe is in the form of a Venturi: it narrows in section and then widens again, causing the airflow to increase in speed in the narrowest part. Below the Venturi is a butterfly valve called the throttle valve — a rotating disc that can be turned end-on to the airflow, so as to hardly restrict the flow at all, or can be rotated so that it (almost) completely blocks the flow of air. This valve controls the flow of air through the carburetor throat and thus the quantity of air/fuel mixture the system will deliver, thereby regulating engine power and speed. The throttle is connected, usually through a cable or a mechanical linkage of rods and joints.Fuel is introduced into the air stream through small holes at the narrowest part of the Venturi and at other places where pressure will be lowered when not running on full throttle.
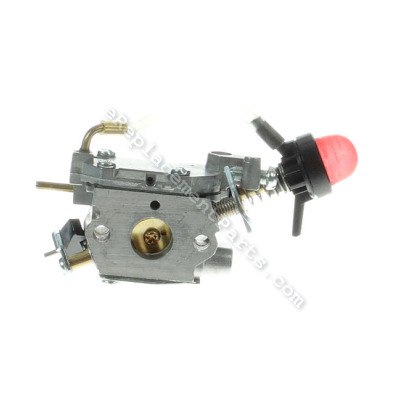
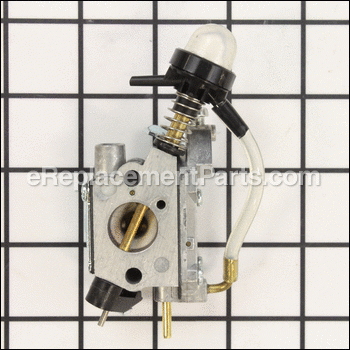
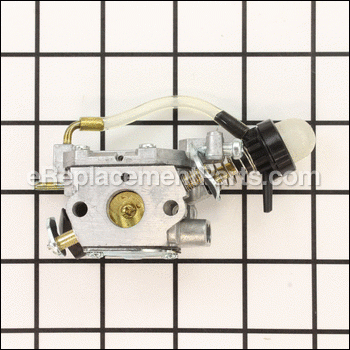
Carburetor Assembly 577135902
OEM part for: Poulan, Weed Eater
Part Number: 577135902
Product Description ?
- Classification: Part
- Weight: 0.27 lbs.
- Shipping: Ships Worldwide
Compatibility
This part will fit the following 7 machines
Weed Eater
Poulan
This item works with the following types of products:
- Trimmer Parts
- Edger Parts
This part replaces obsolete part #: 577135901
Customer Part Reviews ?
- 1
Questions & Answers ?
Our customer Service team is at the ready daily to answer your part and product questions.

Ask our Team
We have a dedicated staff with decades of collective experience in helping customers just like you purchase parts to repair their products.
Does this fit my product?Questions & Answers for Carburetor Assembly
Customer Repair Instructions ?
All our customer repair instructions are solicited directly from other customers just like you who have purchased and replaced this exact part.
Engine would not start
Tool Type
Trimmer
Difficulty
Easy
Time
Less than 15 minutes
Tools Used
, Allen Wrench
Parts Used
Weed Eater would start to hesitate at higher speeds then got to the point of stalling and not starting at all. Tried new fuel lines and adjustments with no luck. Purchased new carb at a reasonable pri
Tool Type
Trimmer
Difficulty
Medium
Time
30-60 minutes
Tools Used
Screwdriver, Needle nose pliers
Parts Used
2) With needle nose pliers remove fuel lines from carburetor.
3) Remove 2 phillip-head screws.
4) Tilt carburetor to remove throttle cable.
5) Check position of gasket at this time to ensure proper positioning when installing.
6) Clean any dirt from carburetor opening and gasket area.
7) Reverse procedure to install ensuring gasket is in proper position.
8) DO NOT over tighten screws as they are going into plastic.When resistance is felt on screws,
STOP. When both screws are even give an additional 1/8 turn. DO NOT OVER TIGHTEN.
9) With job is done it'll run like new. Only thing I had to do was adjust idle, very simple.
Just take your time and you'll be fine. Good Luck
Engine was hard to start but would idle once it did. Then it would bog down and die anytime you gave it throttle.
Tool Type
Trimmer
Difficulty
Easy
Time
Less than 15 minutes
Tools Used
, Hex driver
Parts Used
Wish the carb would have included the gasket though. Mine was fine to re-use but it would have been nice to replace it. The gasket is included in a gasket kit, and I didn't need all of the items on the kit. No big deal since mine was fine though.
primer bulb need to be replaced
Tool Type
Trimmer
Difficulty
Easy
Time
15-30 minutes
Tools Used
, allen wrench
Parts Used
Replace carburetor.
New carburetor was slightly different than one that came with trimmer, but it worked fine.
it would start but die out when given gas
Tool Type
Trimmer
Difficulty
Medium
Time
15-30 minutes
Tools Used
Wrench Set, Allen wrench
Parts Used
Gas lines and Bubble pump had holes in it
Tool Type
Trimmer
Difficulty
Easy
Time
Less than 15 minutes
Tools Used
, allen wrench
Parts Used
Trimmer would not start.
Tool Type
Trimmer
Difficulty
Easy
Time
15-30 minutes
Tools Used
Screwdriver
Parts Used
Crack in primer bulb
Tool Type
Trimmer
Difficulty
Easy
Time
Less than 15 minutes
Tools Used
, Allen wrench
Parts Used
2. Remove 2 carburetor retaining screws using allen key
3. Disconnect trigger cable from carburetor
4. Remove old carburetor
5. Reassemble in reverse order
Fuel problems
Tool Type
Trimmer
Difficulty
Medium
Time
30-60 minutes
Tools Used
Socket set, Allen wrench
Remove the fuel lines and throttle from the old carburetor
Remove the screws hold the carburetor on
Install the new carburetor and tighten the screws
Put the fuel lines and the throttle on the new carburetor
Replace the air filter assembly
Remove the old spark plug
Gapped the new one at 0.025
Hard start turn in to no start over time.
Tool Type
Trimmer
Difficulty
Easy
Time
Less than 15 minutes
Tools Used
Screwdriver, Pliers, Socket set
Parts Used
2. Removed carb bolts with works bit on a screwdriver.
3. Disconnect fuel hoses using pliers and pull up carb watching out for a gasket.
4. Pull bolts out of old carb and place in new carb.
5. Place new carb back on the motor making sure gasket stay in place.
6. Tighten bolts and connect fuel lines. Installation complete.
7. Now just need to prime carb and check for fuel leaks. No leaks found try to start trimmer.
OEM stands for Original Equipment Manufacturer and means the part you’re buying is sourced directly from the manufacturer who made your product. At eReplacementParts, we sell only genuine OEM parts, guaranteeing the part you’re purchasing is of better design and of higher quality than aftermarket parts.
Our product descriptions are a combination of data sourced directly from the manufacturers who made your product as well as content researched and curated by our content & customer service teams. This content is edited and reviewed internally before being made public to customers.
Our customer service team are at the ready daily to answer your part and product questions. We have a dedicated staff with decades of collective experience in helping customers just like you purchase parts to repair their products.
All our part reviews are solicited directly from other customers who have purchased this exact part. While we moderate these reviews for profanity, offensive language or personally identifiable information, these reviews are posted exactly as submitted and no alterations are made by our team.
All our customer repair instructions are solicited directly from other customers just like you who have purchased and replaced this exact part. While we moderate these reviews for profanity, offensive language or personally identifiable information, these reviews are posted exactly as submitted and no alterations are made by our team.
Based on data from past customer purchasing behaviors, these parts are most commonly purchased together along with the part you are viewing. These parts may be necessary or helpful to replace to complete your current repair.
All our installation videos are created and produced in collaboration with our in-house repair technician, Mark Sodja, who has helped millions of eReplacementParts customers over the last 13 years repair their products. Mark has years of experience in selling and repairing both commercial and residential products with a specialty in gas-powered equipment.
This data is collected from customers who submitted a repair instruction after replacing this exact part. Customers can rate how easy the repair was to complete and how long it took. We aggregate this data to provide a repair rating that allows customers to quickly determine the difficulty and time needed to perform their own repair.