
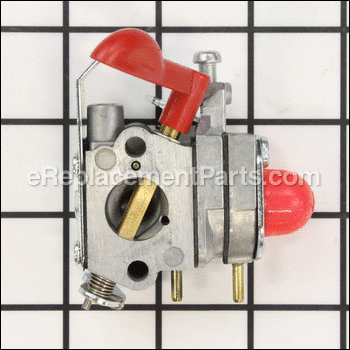
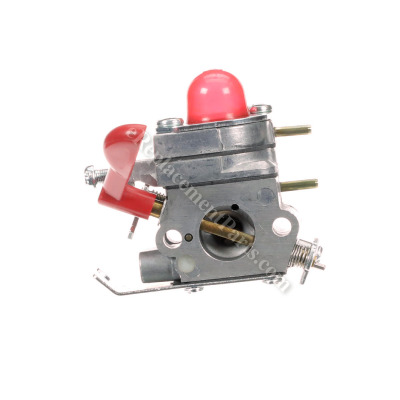


This is a genuine OEM replacement part, it is sold individually. It is used on specific Gas Trimmers. The purpose of this part is to mix air and gas before the fuel mix goes to the engine. If the engine won't start and the tank is full of fresh fuel, test the carburetor by removing the air filter and pouring about a teaspoon of fuel into the carburetor. Pull the starter rope. If the engine starts and then quickly dies, the carburetor is likely the problem.
Carburetor Assembly 530071811
OEM part for: Poulan, Weed Eater
Part Number: 530071811
$52.31
In Stock
Jump To:
Frequently Purchased Together ?


Compatibility
This part will fit the following 27 machines
Poulan
P4500 Gas Trimmer View Diagrams & Manuals
PP025 Gas Trimmer View Diagrams & Manuals
PP125 Gas Trimmer View Diagrams & Manuals
PP325 Gas Trimmer View Diagrams & Manuals
PP258TP (Type 1) Pole Pruner View Diagrams & Manuals
PP258TP (Type 2) Pole Pruner View Diagrams & Manuals
SM705 (Type 1) Gas Trimmer View Diagrams & Manuals
SM705 (Type 2) Gas Trimmer View Diagrams & Manuals
PP25E Gas Trimmer View Diagrams & Manuals
PP125E (967112801) Trimmer View Diagrams & Manuals
PP26E Gas Trimmer View Diagrams & Manuals
SM706 (Type 1) Gas Trimmer View Diagrams & Manuals
SM706 (Type 2) Gas Trimmer View Diagrams & Manuals
PP 258 TP (Type 1)(2008-12) Pole Saw View Diagrams & Manuals
PP 258 TP (Type 2)(2008-12) Pole Saw View Diagrams & Manuals
PP 258 TPC (579218001)(2011-10) Pole Saw View Diagrams & Manuals
PP 125 (Type 1) String Trimmer View Diagrams & Manuals
PP 125 (Type 1)(2009-03) String Trimmer View Diagrams & Manuals
PP 125 (Type 2) String Trimmer View Diagrams & Manuals
PP 125 (Type 2)(2009-03) String Trimmer View Diagrams & Manuals
PP 25 (Type 1) String Trimmer View Diagrams & Manuals
PP 25 (Type 2) String Trimmer View Diagrams & Manuals
PP 25 CFA (967185601)(2013-07) String Trimmer View Diagrams & Manuals
PP 25 SFA (967185701)(2013-06) String Trimmer View Diagrams & Manuals
PP 325 (Type 1)(2008-12) String Trimmer View Diagrams & Manuals
PP 325 (Type 2)(2008-12) String Trimmer View Diagrams & Manuals
Weed Eater
PP258TPC (579218001)(2011-10) Pole Saw View Diagrams & Manuals
Show More Compatible Models
This item works with the following types of products:
- Trimmer Parts
- Pruner Parts
Customer Part Reviews ?
Average Rating (out of 5):
Click to filter by ratings:
5 stars
7
4 stars
1
3 stars
0
2 stars
0
1 stars
0
< PREV
- 1
Works great!.
Just what I needed to get my chainsaw running, Thanks
Ronald -
January 14, 2022
Verified Purchase
easy replacement
Carburetor was as advertised, was an easy replacement,and was delivered quickly, I will use eReplacementParts again good company
Guest -
November 4, 2021
Verified Purchase
No problems. Instructions were great. Works as advertised.
Pole saw works great again. Thanks.
Guest -
July 7, 2020
Verified Purchase
Received part that I ordered and it solved my problem.
Guest -
June 3, 2020
Verified Purchase
Part came as advertised. In 2 minutes I had it installed. My equipment was working again.
The part fit like new. Quality part.
Guest -
June 3, 2020
Verified Purchase
Easy to install fixed the problem
Up and running in no time
John -
August 4, 2019
Verified Purchase
Very easy repair. Two screws to attached to weedeater. Started 4th pull.
The part was just what I needed and I received it in the time frame you stated.
Guest -
July 25, 2019
Verified Purchase
Replace carburetor
The part arrived on schedule and was installed right away, my weed eater working again like it was brand new😀
Steve -
July 11, 2021
Verified Purchase
t
t
t -
t days ago
Verified Purchase
eReplacementParts Team
t
Questions & Answers ?
Our customer Service team is at the ready daily to answer your part and product questions.

Ask our Team
We have a dedicated staff with decades of collective experience in helping customers just like you purchase parts to repair their products.
Does this fit my product?Questions & Answers for Carburetor Assembly
I need to see a Carburetor diagrams
Francisco
for model number SM705
asked on 2023-03-23
Hi Francisco,
Glad to here from you. The carburetor for this model is sold as a complete unit, there is no diagram listed for it. If there is an issue with the carburetor it will need to be replaced. We would recommend checking the videos on our website for information, if you need to take it part. Here is a link to the videos, https://www.ereplacementparts.com/repair-center/lawn-equipment/videos/?search_string=carburetor. If you have any questions, please let us know. We look forward to hearing from you!
eReplacementParts Team March 23, 2023
Customer Repair Instructions ?
All our customer repair instructions are solicited directly from other customers just like you who have purchased and replaced this exact part.
Engine would not stay running
Joseph - February 18, 2016
👍 18 of 19 people found this instruction helpful
Tool Type
Pruner
Difficulty
Easy
Time
Less than 15 minutes
Tools Used
Screwdriver, allen wrench
Parts Used
Repair instructions we're not needed simple. Remove the air filter assembly, then remove two screws, remove the gas lines and throttle cable the cable from the old carburetor. Remove old carburetor and install the new one. Assemble in reverse order.
Did you find this story helpful?
Thanks for voting and helping fellow customers!
Current carburetor had a broken part.
William - June 7, 2016
👍 5 of 7 people found this instruction helpful
Tool Type
Trimmer
Difficulty
Medium
Time
30-60 minutes
Tools Used
Screwdriver, Pliers
Basically, remove the carburetor assembly, existing fuel lines and fuel filter. Screw the new carburetor (bolts) onto its mount. Measure the length of the existing fuel lines and cut the new ones to that length(s). Cut the ends of the new fuel lines at a 45 degree angle so they can be twisted into the fuel tank without damage. After inserting the lines, hook them back out of the fuel tank with a piece of curved wire, re-cut them straight across and twist on the new fuel filter. After inserting the lines back into the fuel tank, and connecting them to the carburetor, add fuel, pump up the carburetor and pull start the engine. After it warms up, adjust the carburetor idle speed screw and it's all done. It works like new.
Did you find this story helpful?
Thanks for voting and helping fellow customers!
Would not run with choke in off position.
Joseph - May 4, 2017
👍 2 of 2 people found this instruction helpful
Tool Type
Trimmer
Difficulty
Easy
Time
15-30 minutes
Tools Used
, Allen Wrench
These are the steps i used... Remove fuel lines from carburetor note position of each. Open up cover of air box. Remove air filter. Remove two screws with Allen wrench. Remove air box. Slighty remove carburetor and unhook throttle cable linkage noting the way it hooks up. Remove carburetor. Make sure old gasket doesn't stick to carburetor adapter. Remove two screws and remove carburetor adapter. Take carburetor adapter, air box, and air box cover and clean with toothbrush and dishwash liquid. Dry thoroughly. Take a q-tip dip in cleaner and clean around cylinder where adapter fits. Push screws through carburetor adapter and put new gasket on screws pushing it on adapter so it lines up perfectly. Tighten adapter on cylinder. Push screws through air box, new carburetor, and place new gasket on screws against carburetor so gasket lines up perfectly. Install throttle linkage cable to carburetor. Tighten screws back down. Clean air filter, or replace then install air box cover. Hook fuel lines back up in proper position. Always, ALWAYS use non-ethanol gas in your weed eater with proper oil mixture. My Poulan weed eater is 13 years old and this is the first time I habe replaced anything on it.
Did you find this story helpful?
Thanks for voting and helping fellow customers!
Trimmer not running at high speed
Neil - May 23, 2016
👍 3 of 4 people found this instruction helpful
Tool Type
Edger
Difficulty
Easy
Time
15-30 minutes
Tools Used
, torx wrench
You start by removing the air cleaner assembly. Remove the fuel lines from the old carburetor and mark where they go. Remove the throttle assembly. Then remove the two screws securing the carburetor and gasket. Remove the old carburetor and gasket.. The install the new gasket and carburetor, and tighten down the screws. Replace the fuel lines and throttle. Then put the air cleaner assembly back on the unit. And your done.
Did you find this story helpful?
Thanks for voting and helping fellow customers!
This is a Poulan extended chainsaw trimmer. From day one it was hard to start and ran sporadically.
John - March 7, 2017
👍 1 of 1 people found this instruction helpful
Tool Type
Chain Saw
Difficulty
Medium
Time
15-30 minutes
Tools Used
, Hex wrench
Removed filter and carburetor. Next I removed the air and gas line from tank after draining the gas. Removed gas tank. I then ran the new fuel lines. It is a tight fit to reinsert the new lines. I ran a small diameter wire through the lines ,folded it over the end that would be inserted at the Carb. and pulled the new lines into the tank. After reinstalling the gas tank, I replaced the spark plug. Securing the new carburetor and reattaching new gas lines. I filled gas tank with new premixed 50:1 fuel. Pumped the fuel bulb, gave two pulls on the pull rope. The unit started right up and ran so smooth. This is about the 4th gas powered equipment that I have ordered parts from ereplacement that has fixed each one of them. It won't be the last time. Thanks eReplacement Parts.
Did you find this story helpful?
Thanks for voting and helping fellow customers!
My trimmer would not start
William - June 24, 2016
👍 2 of 3 people found this instruction helpful
Tool Type
Trimmer
Difficulty
Medium
Time
15-30 minutes
Tools Used
, Hex wrenches
Parts Used
I tested the carb with starter spray by spraying some into the carb, and it started briefly so I knew the carb was not sending air and fuel to the cylinder. Rather that rebuilding the carb it was easier just to replace it.
Did you find this story helpful?
Thanks for voting and helping fellow customers!
Weed Wacker was hard to start and wouldn't stay running.
Thomas - July 17, 2016
👍 2 of 3 people found this instruction helpful
Tool Type
Trimmer
Difficulty
Medium
Time
15-30 minutes
Tools Used
, Allen wrenches and Torch screwdriver
1. Disconnected fuel lines and throttle linkage
2. Removed 2 bolts from carb and removed carb.
3. Removed 2 bolts from carb plate and removed carb plate.
4. Installed new parts, fit perfectly!
2. Removed 2 bolts from carb and removed carb.
3. Removed 2 bolts from carb plate and removed carb plate.
4. Installed new parts, fit perfectly!
Did you find this story helpful?
Thanks for voting and helping fellow customers!
Would only run with choke on.
John - December 26, 2020
Tool Type
Hedge Trimmer
Difficulty
Easy
Time
Less than 15 minutes
Tools Used
Screwdriver
Parts Used
1. Disconnected fuel lines.
2. Removed both mounting bolts/screws.
3. Carefully removed carb as to not damage the gasket on the backside.
4. Disconnected throttle cable.
5. Connected throttle cable to new carb.
6. Positioned new carb in place and reinstalled both bolts/screws.
7. Attached fuel lines.
8. Primed carb with fresh fuel.
9. Started trimmer.
Did you find this story helpful?
Thanks for voting and helping fellow customers!
Limb pruner would start with the choke engaged, but would not run when the trottle was pressed of when the choke was disengaged.
Howard - December 18, 2020
Tool Type
Pruner
Difficulty
Medium
Time
Less than 15 minutes
Tools Used
Pliers, torx screwdriver, razor knife
Parts Used
This carburetor did not offer a rebuild kit, so a new carburetor was ordered. Replaced the carburetor and the two fuel lines (supply and return lines). Two screws hold the carburetor and air breather assembly in place. Removed breather and carburetor and disconnected the throttle cable. Connected the throttle cable to the new carburetor (do not forget to use the rubber gasket that sits between the carburetor and cylinder). Installed the screws that hold the carburetor and air breather, installed the breather element. Also replaced the supply and return fuel lines from the gas tank to the carburetor. HINT for routing the fuel line through the gas tank: Make an angled cut, with a razor knife, to make a point on the fuel line. Use a little two cycle oil and wipe down the fuel lines about 3 to 5 inches from the point. Push the fuel line point into the hole of the gas tank. Using a pair of angled needle nose pliers, reach into the gas tank through the fill hole, grab the fuel line and pull the amount of fuel line needed inside the tank, cut off the point, install the furl filter on the supply line and place back into the tank. Follow the same procedure for the return fuel line.
Did you find this story helpful?
Thanks for voting and helping fellow customers!
Carb fuel pump
Richard - November 25, 2020
Tool Type
Trimmer
Difficulty
Easy
Time
Less than 15 minutes
Tools Used
Socket set
Parts Used
Removed the 2 bolts that go through the carb and replaced it with the new one
Did you find this story helpful?
Thanks for voting and helping fellow customers!
Load More Install Stories
OEM stands for Original Equipment Manufacturer and means the part you’re buying is sourced directly from the manufacturer who made your product. At eReplacementParts, we sell only genuine OEM parts, guaranteeing the part you’re purchasing is of better design and of higher quality than aftermarket parts.
Our product descriptions are a combination of data sourced directly from the manufacturers who made your product as well as content researched and curated by our content & customer service teams. This content is edited and reviewed internally before being made public to customers.
Our customer service team are at the ready daily to answer your part and product questions. We have a dedicated staff with decades of collective experience in helping customers just like you purchase parts to repair their products.
All our part reviews are solicited directly from other customers who have purchased this exact part. While we moderate these reviews for profanity, offensive language or personally identifiable information, these reviews are posted exactly as submitted and no alterations are made by our team.
All our customer repair instructions are solicited directly from other customers just like you who have purchased and replaced this exact part. While we moderate these reviews for profanity, offensive language or personally identifiable information, these reviews are posted exactly as submitted and no alterations are made by our team.
Based on data from past customer purchasing behaviors, these parts are most commonly purchased together along with the part you are viewing. These parts may be necessary or helpful to replace to complete your current repair.
All our installation videos are created and produced in collaboration with our in-house repair technician, Mark Sodja, who has helped millions of eReplacementParts customers over the last 13 years repair their products. Mark has years of experience in selling and repairing both commercial and residential products with a specialty in gas-powered equipment.
This data is collected from customers who submitted a repair instruction after replacing this exact part. Customers can rate how easy the repair was to complete and how long it took. We aggregate this data to provide a repair rating that allows customers to quickly determine the difficulty and time needed to perform their own repair.