eReplacementParts.com
877-346-4814
Ryobi Parts
Repair Parts Home
  
Lawn Equipment Parts
  
Ryobi Parts
  308054013 Carburetor Assembly

Carburetor Assembly 308054013

OEM part for: Ryobi, Ridgid, Homelite

Part Number: 308054013


Install
Videos!
Grid squares measure 1x1 inch
In Stock
Order within the next 2 hours and your part ships today!
Easy 15-30 minutes (48 rated repairs)?
OEM: Original Equipment Manufacturer ?
RyobiRidgidHomelite
Does this d-block d-md-none fit my product?

Product Description ?

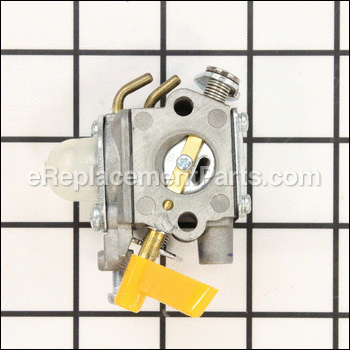
A carburetor basically consists of an open pipe through which the air passes into the inlet manifold of the engine.
The pipe is in the form of a Venturi: it narrows in section and then widens again, causing the airflow to increase in speed in the narrowest part.
Below the Venturi is a butterfly valve called the throttle valve — a rotating disc that can be turned end-on to the airflow, so as to hardly restrict the flow at all, or can be rotated so that it (almost) completely blocks the flow of air.
This valve controls the flow of air through the carburetor throat and thus the quantity of air/fuel mixture the system will deliver, thereby regulating engine power and speed. The throttle is connected, usually through a cable or a mechanical linkage of rods and joints.

Fuel is introduced into the air stream through small holes at the narrowest part of the Venturi and at other places where pressure will be lowered when not running on full throttle.

  • Classification: Part
  • Weight: 0.29 lbs.
  • Shipping: Ships Worldwide

Compatibility

This part will fit the following 76 machines

Ryobi

RY29550 30cc String Trimmer View Diagrams & Manuals
RY30120 30cc String Trimmer View Diagrams & Manuals
RY30140 30cc String Trimmer View Diagrams & Manuals
BC30 (RY30160) 30cc Brushcutter View Diagrams & Manuals
RY30220 30cc String Trimmer View Diagrams & Manuals
RY30220A 30cc String Trimmer View Diagrams & Manuals
RY30220B 30cc String Trimmer View Diagrams & Manuals
RY30240 30cc String Trimmer View Diagrams & Manuals
RY30240B 30cc String Trimmer View Diagrams & Manuals
RY30260 30cc Brushcutter View Diagrams & Manuals
RY30260B 30cc Brushcutter View Diagrams & Manuals
RY30530 30cc String Trimmer and Brushcutter View Diagrams & Manuals
RY30550 30cc String Trimmer and Brushcutter View Diagrams & Manuals
RY30570 30cc String Trimmer and Brushcutter View Diagrams & Manuals
RY30931 30 cc String Trimmer and Brushcutter View Diagrams & Manuals
RY30951 30cc String Trimmer and Brushcutter View Diagrams & Manuals
RY30971 30cc String Trimmer and Brushcutter View Diagrams & Manuals
RY39500 26cc Hedge Trimmer View Diagrams & Manuals
RY52014 TP30 Gas Pruner View Diagrams & Manuals
RY52502 Gas Pruner View Diagrams & Manuals
RY52504 Gas Pruner View Diagrams & Manuals
RY52903 Gas Pruner View Diagrams & Manuals
RY52905 Gas Pruner View Diagrams & Manuals
RY26500 Trimmer View Diagrams & Manuals
CS30 (RY26500) Trimmer View Diagrams & Manuals
RY26901 Trimmer View Diagrams & Manuals
RY26520 Trimmer View Diagrams & Manuals
RY26921 Trimmer View Diagrams & Manuals
RY26540 Brush Cutter View Diagrams & Manuals
RY26941 Brush Cutter View Diagrams & Manuals
RY26000 26cc Power Head View Diagrams & Manuals
RY09600 Backpack Blower View Diagrams & Manuals
RY09605 Backpack Blower View Diagrams & Manuals
RY30963 30cc String Trimmer View Diagrams & Manuals
RY30943 30cc String Trimmer View Diagrams & Manuals
RY30923 30cc String Trimmer View Diagrams & Manuals
RY30562 30cc String Trimmer View Diagrams & Manuals
RY30542 30cc String Trimmer View Diagrams & Manuals
RY30522 30cc String Trimmer View Diagrams & Manuals
RY52604 Gas Pruner View Diagrams & Manuals
RY52907 Gas Pruner TP26 View Diagrams & Manuals
TP26 TP26 Gas Pruner View Diagrams & Manuals
RY09701 Backpack Blower View Diagrams & Manuals
RY52502 (TP30) Gas Pruner View Diagrams & Manuals
RY52604 (TP26) Gas Pruner View Diagrams & Manuals
RY52903 (TP30) Gas Pruner View Diagrams & Manuals
RY52905 (TP30) Gas Pruner View Diagrams & Manuals
RY52504 (TP30) Gas Pruner View Diagrams & Manuals
RY52907 (TP26) Gas Pruner View Diagrams & Manuals
RY30160 30cc Brushcutter View Diagrams & Manuals

Ridgid

RY09701 Backpack Blower View Diagrams & Manuals

Homelite

UT32650 Straight Shaft String Trimmer View Diagrams & Manuals
UT-21004 Mightylite String Trimmer View Diagrams & Manuals
UT-21044 Mightylite String Trimmer View Diagrams & Manuals
UT-29005 Mightylite String Trimmer View Diagrams & Manuals
UT-29045 Mightylite String Trimmer View Diagrams & Manuals
UT21006 Trimmer View Diagrams & Manuals
UT29007 Trimmer View Diagrams & Manuals
UT21046 Trimmer View Diagrams & Manuals
UT29047 Trimmer View Diagrams & Manuals
RY30140 30cc String Trimmer View Diagrams & Manuals
RY30220 30cc String Trimmer View Diagrams & Manuals
RY30160 30cc Brushcutter View Diagrams & Manuals
RY30220A 30cc String Trimmer View Diagrams & Manuals
RY30240B 30cc String Trimmer View Diagrams & Manuals
RY30220B 30cc String Trimmer View Diagrams & Manuals
RY30240 30cc String Trimmer View Diagrams & Manuals
RY30260B 30cc Brushcutter View Diagrams & Manuals
RY30570 30cc String Trimmer And Brushcutter View Diagrams & Manuals
RY30931 30cc String Trimmer And Brushcutter View Diagrams & Manuals
RY30522 30cc String Trimmer View Diagrams & Manuals
RY30550 30cc String Trimmer And Brushcutter View Diagrams & Manuals
RY30542 30cc String Trimmer View Diagrams & Manuals
RY30530 30cc String Trimmer And Brushcutter View Diagrams & Manuals
RY30562 30cc Brushcutter View Diagrams & Manuals
RY30260 30cc Brushcutter View Diagrams & Manuals
Show More Compatible Models
Don't see yours? Try searching our site for :

This item works with the following types of products:

  • Trimmer Parts
  • Hedge Trimmer Parts
  • Pruner Parts
  • Blower Parts

This part replaces obsolete part #: 308054004, 308054012

Customer Part Reviews ?

4.5
Average Rating (out of 5):
13 Reviews
Click to filter by ratings:
5 stars
11
4 stars
0
3 stars
1
2 stars
0
1 stars
1
  • Highest Rating
  • Most Recent
< PREV
  • 1
  • 2
NEXT >
  • Great part. Worked right a way.
    It was good condition, It worked like new.
    Guest - November 13, 2023 Verified Purchase
    Easy to replace. Started right up. Happy.
    Part arrived late. Spoke to lovely and helpful rep from e rep. Got part . was just right . hedge trimmer now runs great.
    Guest - November 8, 2023 Verified Purchase
    Spot on
    The Carb was correct and O.E. not a clone. Worked exactly as expected no issues. Seamless purchase through and through.
    Guest - April 24, 2023 Verified Purchase
    Business As Usual--Really Good!
    Excellent parts identifier page. Quick delivery, O.E. parts. What's not to like? Not my first order with eReplacementParts.
    Guest - April 4, 2023 Verified Purchase
    Easy Carburator Replacement
    The part arrive quickly and worked great as it made my gas trimmer so much easier to start.
    Guest - January 27, 2023 Verified Purchase
    great part exact replacement.
    Replacement parts support was able to ship exactly the part i needed. arrived on time cost was reasonable.
    Guest - October 14, 2021 Verified Purchase
    Right part, quick delivery.
    thanks for the great service
    Guest - May 17, 2020 Verified Purchase
    Easy repair thank you for having the part we needed
    The carburetor was exactly the right part. I didn't have any problems with ordering or receiving the part.even the web site was easy to use. Thank you!
    Guest - May 7, 2020 Verified Purchase
    Easy repair. Part fit perfectly.
    The part was correct. Tutorial on carburator helped to ensure gas lines were attached correctly the first time.
    Guest - October 12, 2019 Verified Purchase
    Easy repair, stopped all gas leaks
    The part matched the old one and works great. My weed whacker now starts and runs well.
    Jacob - August 7, 2019 Verified Purchase
    t
    t
    t - t days ago Verified Purchase
    eReplacementParts Team
    t

    Questions & Answers ?

    Our customer Service team is at the ready daily to answer your part and product questions.

    photo of team member
    Ask our Team

    We have a dedicated staff with decades of collective experience in helping customers just like you purchase parts to repair their products.

    Does this fit my product?

    Questions & Answers for Carburetor Assembly


    can we purchase the primer bulb plate separately? Just the plate and bulb to prime the engine
    Linda for model number 52014 asked on 2023-11-22
    Hi Linda, Thank you for your question. The bulb is only sold with the carburetor assembly, part number 308054013. We hope this helps!
    eReplacementParts Team November 22, 2023
    Can you purchase the choke lever separately for model RY30550 SS30?
    Alex for model number RY30550 SS30 asked on 2022-03-17
    Hello Alex, thank you for your question. The choke lever is only sold with the Carburetor as an assembly. If you need help placing an order, customer service is open 7 days a week. Please feel free to give us a call. We look forward to hearing from you.
    eReplacementParts Team March 17, 2022

    Customer Repair Instructions ?

    All our customer repair instructions are solicited directly from other customers just like you who have purchased and replaced this exact part.

    Easy 15-30 minutes (48 rated repairs)?

    Unit would start but stalled as I appiled throttel Carb on unit was 8 years old. I chose to replace it Rather than rebuild.

    William - November 20, 2015
    👍 40 of 48 people found this instruction helpful
    Tool Type

    Trimmer

    Difficulty

    Medium

    Time

    30-60 minutes

    Tools Used

    Screwdriver, Socket set, Carb. Adj. Tool, Long nose pliers, Razor Blade

    Empty fuel tank. Removed old carb and spark plug with socket wrench Removed old fuel lines and replaced with new fuel lines and fuel filter. Also replaced spark plug. Cut an angle on Fuel lines to insert them in the fuel tank. Used the extra long long nose pliers to pull gas lines in. Pulled the fuel line input to carb out of the tank to attach the fuel filter. Adjusted Fuel lines to desired length then cut. Attached Carb to Weed eater. Attached Fuel lines to carb. Put on new spark plug.
    Filled gas tank. primed and it started but was running rough. Had to do some minor adjustments on the carb (Both The L and H needles) it runs as well as I can expect it to.

    Note. I applied a drop of 3-in One oil around my gas line to insert them in the gas tank.
    Did you find this story helpful?
    Thanks for voting and helping fellow customers!

    Trimmer would not run at full speed and would not idle

    Ed - May 8, 2016
    👍 19 of 22 people found this instruction helpful
    Tool Type

    Hedge Trimmer

    Difficulty

    Easy

    Time

    15-30 minutes

    Tools Used

    Screwdriver, Nutdriver

    Store where I bought it wanted a fee to diagnose the problem, an hourly charge to make the repair and $75 parts charge if it needed a new carb. It was going to cost $75-100 for the repair.
    It took me less than 30 minutes to remove the carb and install the new one. It started immediately and has run perfectly since.
    All you have to do is to remove the air filter base,by removing the two nuts. Remove the fuel lines and throttle from the old carburetor box, then remove it and the old carburetor gasket. Install the new gasket then the new carburetor, then hook up the fuel line to the carburetor and the throttle. Then install the air filter base and tighten up the two nuts.
    Thank you
    Did you find this story helpful?
    Thanks for voting and helping fellow customers!

    Replaced carburetor.

    Ray - January 31, 2016
    👍 18 of 21 people found this instruction helpful
    Tool Type

    Trimmer

    Difficulty

    Easy

    Time

    Less than 15 minutes

    Tools Used

    Socket set

    Remove air filter, remove fuel lines from carburetor. (Remember where the lines are connected) Remove old carburetor and gasket. Place new gasket and new carburetor on mounting bolts. Install the fuel lines, Then the air filter. Done.
    Did you find this story helpful?
    Thanks for voting and helping fellow customers!

    carburetor was clogged and not working.

    Joey - June 21, 2016
    👍 9 of 11 people found this instruction helpful
    Tool Type

    Trimmer

    Difficulty

    Medium

    Time

    30-60 minutes

    Tools Used

    Screwdriver, Nutdriver

    I removed the two screws holding the carburetor. I then disconnected the fuel lines and removed the old carburetor from the trimmer. I replaced the old carburetor gasket with a new one and installed a new carburetor. I reconnect ed the fuel lines onto the new carburetor, making sure they are in correct order. I put the two screws back and fastened them securely. I put the air filter cover back on and the job was complete. A few adjustments to the idle screw and the job was complete.
    Did you find this story helpful?
    Thanks for voting and helping fellow customers!

    Carburetor shot

    Jim - March 13, 2017
    👍 4 of 5 people found this instruction helpful
    Tool Type

    Blower

    Difficulty

    Easy

    Time

    15-30 minutes

    Tools Used

    Nutdriver

    Remove the air filter cover and filter
    Pulled the fuel lines and the throttle off of the carburetor
    Remove the two nuts holding the air filter base and the carburetor
    Removed the base and the carburetor
    Installed the new carburetor and air base on the screws and tightened the nuts
    Hooked up the fuel lines and the throttle
    Installed the air filter and cover
    Did you find this story helpful?
    Thanks for voting and helping fellow customers!

    Carburetor

    Kenneth - September 1, 2017
    👍 3 of 4 people found this instruction helpful
    Tool Type

    Trimmer

    Difficulty

    Easy

    Time

    15-30 minutes

    Tools Used

    Screwdriver, Nutdriver

    Removed the air cleaner
    Removed the two nuts that hold the carburetor
    Removed the gas lines and the throttle from the old carburetor
    Installed the lines and throttle on the new carburetor
    Placed it on the screws and tightened the nuts down
    Put on the air cleaner
    Did you find this story helpful?
    Thanks for voting and helping fellow customers!

    Engine would not stay running, fuel line rotted from ethenal

    Clarence - May 9, 2016
    👍 1 of 1 people found this instruction helpful
    Tool Type

    Trimmer

    Difficulty

    Easy

    Time

    Less than 15 minutes

    Tools Used

    Nutdriver, Fuel line wire puller

    Watched eReplacementparts video, piece of cake. Started and stayed running on first try
    Did you find this story helpful?
    Thanks for voting and helping fellow customers!

    Blower would not stay running

    Neal - July 3, 2018
    Tool Type

    Blower

    Difficulty

    Easy

    Time

    15-30 minutes

    Tools Used

    Socket set

    Removed the filter
    Removed two nut that hold carb in place
    Put new carb on then, put it back together
    Did you find this story helpful?
    Thanks for voting and helping fellow customers!

    Would not stay running without manually playing with the choke lever. Had been run with no air cleaner installed.

    Robert - July 2, 2018
    Tool Type

    Trimmer

    Difficulty

    Easy

    Time

    15-30 minutes

    Tools Used

    Screwdriver, Pliers

    Removed two bolts holding the air cleaner base and carburetor.
    Disconnected the two fuel lines and throttle cable.
    Cleaned old gasket off.
    Placed bolts back through the air cleaner plate, the new carburetor and new gasket and installed with gas lines and throttle cable.
    Machine started well and ran well.
    Still need more parts, unrelated to this repair.
    Did you find this story helpful?
    Thanks for voting and helping fellow customers!

    Robert - May 23, 2018
    Tool Type

    Edger

    Difficulty

    Easy

    Time

    15-30 minutes

    Tools Used

    Socket set, Torx driver

    If you took small engine repair in high school, finding the problem will be a breeze.
    Diagnosed that the carburetor was the problem, and replaced with replacement unit.
    Runs great now. The complete carburetor was only a few bucks more than the rebuild kit, so I took the easy way.
    Did you find this story helpful?
    Thanks for voting and helping fellow customers!

    OEM stands for Original Equipment Manufacturer and means the part you’re buying is sourced directly from the manufacturer who made your product. At eReplacementParts, we sell only genuine OEM parts, guaranteeing the part you’re purchasing is of better design and of higher quality than aftermarket parts.

    Our product descriptions are a combination of data sourced directly from the manufacturers who made your product as well as content researched and curated by our content & customer service teams. This content is edited and reviewed internally before being made public to customers.

    Our customer service team are at the ready daily to answer your part and product questions. We have a dedicated staff with decades of collective experience in helping customers just like you purchase parts to repair their products.

    All our part reviews are solicited directly from other customers who have purchased this exact part. While we moderate these reviews for profanity, offensive language or personally identifiable information, these reviews are posted exactly as submitted and no alterations are made by our team.

    All our customer repair instructions are solicited directly from other customers just like you who have purchased and replaced this exact part. While we moderate these reviews for profanity, offensive language or personally identifiable information, these reviews are posted exactly as submitted and no alterations are made by our team.

    Based on data from past customer purchasing behaviors, these parts are most commonly purchased together along with the part you are viewing. These parts may be necessary or helpful to replace to complete your current repair.

    All our installation videos are created and produced in collaboration with our in-house repair technician, Mark Sodja, who has helped millions of eReplacementParts customers over the last 13 years repair their products. Mark has years of experience in selling and repairing both commercial and residential products with a specialty in gas-powered equipment.

    This data is collected from customers who submitted a repair instruction after replacing this exact part. Customers can rate how easy the repair was to complete and how long it took. We aggregate this data to provide a repair rating that allows customers to quickly determine the difficulty and time needed to perform their own repair.

    eReplacementParts.com
    7174 South 400 West
    Suite 5
    Midvale, UT 84047
    visa mastercard discover american express PayPal