eReplacementParts.com
877-346-4814
Black and Decker Parts
Repair Parts Home
  
Power Tool Parts
  
Black and Decker Parts
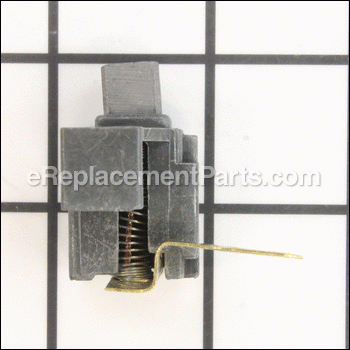
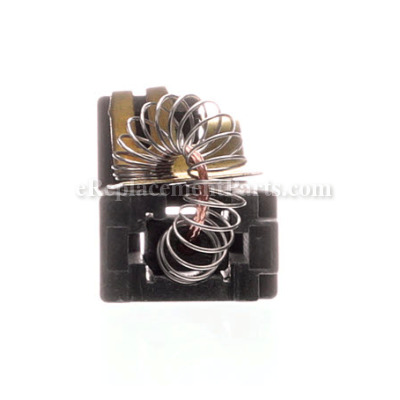
  132254-07 Carbon Brush With Holder

Carbon Brush With Holder 132254-07

OEM part for: DeWALT, Black and Decker

Part Number: 132254-07


Install
Videos!
Carbon Brush With Holder - 132254-07:DeWALT 360 View
Carbon Brush With Holder - 132254-07:DeWALTCarbon Brush With Holder - 132254-07:DeWALTCarbon Brush With Holder - 132254-07:DeWALT 360 View
In Stock
Order within the next 3 hours and your part ships today!
Easy 15-30 minutes (33 rated repairs)?
OEM: Original Equipment Manufacturer ?
DeWALTBlack and Decker
Does this d-block d-md-none fit my product?

Product Description ?

Genuine Dewalt replacement part, this item is sold individually.
It is used on all the tools shown below.

• Worn brushes are often the cause of a poorly running motor
• Replacing brushes can fix an intermittent motor
• New brushes can restore a motor’s electric braking


Carbon motor brushes are one of the most commonly replaced power tool components. Because carbon brushes are wear items, meaning that through friction and use they will gradually wear away, they will eventually require replacement. Worn brushes are common causes of intermittent motor function, reduced electric braking, and reduced motor power. A worn out brush will often be worn down near the wire lead and may be cracked, pitted, or burned. When replacing carbon brushes, be sure to also inspect your armature for burns, cracks, or other damage which indicates a larger motor problem.

  • Classification: Part
  • Weight: 0.01 lbs.
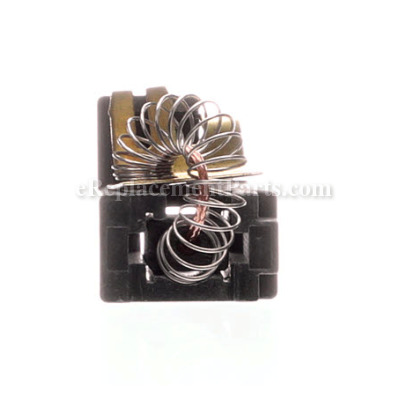
  • Also Known As: Motor Brush and Holder
  • Shipping: Ships Worldwide

Frequently Purchased Together ?

Compatibility

This part will fit the following 94 machines

Black and Decker

1701 Type 1 Miter Saw View Diagrams & Manuals
7715 Type 1 Miter Saw View Diagrams & Manuals
7715 Type 2 Miter Saw View Diagrams & Manuals
7715 Type 3 Miter Saw View Diagrams & Manuals
1701-1 Type 1 Miter Saw View Diagrams & Manuals
1710 Type 1 Miter Saw View Diagrams & Manuals
1710 Type 2 Miter Saw View Diagrams & Manuals
1710 Type 3 Miter Saw View Diagrams & Manuals
1710 Type 4 Miter Saw View Diagrams & Manuals
LE750 Type 1 EDGE HOG 2-in-1 Landscape Edger View Diagrams & Manuals
LE750 Type 2 EDGE HOG 2-in-1 Landscape Edger View Diagrams & Manuals
LE750 Type 3 EDGE HOG 2-in-1 Landscape Edger View Diagrams & Manuals
LE750 Type 4 EDGE HOG 2-in-1 Landscape Edger View Diagrams & Manuals
82410-04 Type 1 Blower / Vacuum View Diagrams & Manuals
82410 Type 1 Blower / Vacuum - Basic View Diagrams & Manuals
82410 Type 2 Blower / Vacuum - Basic View Diagrams & Manuals
BV1000 Type 1 Vacuum N Mulch View Diagrams & Manuals
BV1000 Type 3 Vacuum N Mulch View Diagrams & Manuals
BV2000 Type 1 Super Vacuum N Mulch View Diagrams & Manuals
BV2000 Type 3 Super Vacuum N Mulch View Diagrams & Manuals
BV200 Type 1 Blower / Vacuum View Diagrams & Manuals
BV200 Type 4 Blower / Vacuum View Diagrams & Manuals
BV300-04 Type 1 Vacuum N Mulch Canada View Diagrams & Manuals
BV300-04 Type 4 Vacuum N Mulch Canada View Diagrams & Manuals
BV300 Type 1 Blower / Vacuum View Diagrams & Manuals
BV300 Type 4 Blower / Vacuum View Diagrams & Manuals
BV400 Type 1 Blower / Vacuum View Diagrams & Manuals
BV400 Type 4 Blower / Vacuum View Diagrams & Manuals
BV500 Type 1 Blower / Vacuum View Diagrams & Manuals
BV500 Type 3 Blower / Vacuum View Diagrams & Manuals
3027-09 Type 3 7 1/4 Saw Cat Circular Saw View Diagrams & Manuals
3027-09 Type 4 7 1/4 Saw Cat Circular Saw View Diagrams & Manuals
3027-09 Type 5 7 1/4 Saw Cat Circular Saw View Diagrams & Manuals
3028 Type 1 7 1/4 Circular Saw View Diagrams & Manuals
7308 Type 4 7 1/4 Circular Saw View Diagrams & Manuals
7308 Type 5 7 1/4 Circular Saw View Diagrams & Manuals
7308 Type 6 7 1/4 Circular Saw View Diagrams & Manuals
7308 Type 7 7 1/4 Circular Saw View Diagrams & Manuals
7308 Type 8 7 1/4 Circular Saw View Diagrams & Manuals
7358-04 Type 1 7 1/4 Circular Saw View Diagrams & Manuals
7358 Type 1 2 Horse Power Circular Saw View Diagrams & Manuals
7359 Type 1 Circular Saw View Diagrams & Manuals
7359 Type 2 Circular Saw View Diagrams & Manuals
7359 Type 3 Circular Saw View Diagrams & Manuals
7360 Type 1 11 Amp Circular Saw View Diagrams & Manuals
7391 Type 1 Circular Saw View Diagrams & Manuals
7391 Type 2 Circular Saw View Diagrams & Manuals
7391 Type 3 Circular Saw View Diagrams & Manuals
7391 Type 4 Circular Saw View Diagrams & Manuals
7392 Type 1 2 Horse Power Circular Saw View Diagrams & Manuals
7392 Type 2 2 Horse Power Circular Saw View Diagrams & Manuals
7392 Type 3 2 Horse Power Circular Saw View Diagrams & Manuals
7392 Type 4 2 Horse Power Circular Saw View Diagrams & Manuals
7392 Type 5 2 Horse Power Circular Saw View Diagrams & Manuals
TS550 Type 1 3 Horse Power Circular Saw View Diagrams & Manuals
TS550 Type 2 3 Horse Power Circular Saw View Diagrams & Manuals
TV500 Type 1 T.V. 1/3 Circular Saw View Diagrams & Manuals
TV500 Type 2 T.V. 1/3 Circular Saw View Diagrams & Manuals
TV500 Type 3 T.V. 1/3 Circular Saw View Diagrams & Manuals
LE400 Type 1 1-1/2 Horse Power Edger View Diagrams & Manuals
LE400 Type 2 1-1/2 Horse Power Edger View Diagrams & Manuals
LE500 Type 1 2 Horse Power Lawn Edger View Diagrams & Manuals
1701-04 Type 1 10 Miter Saw View Diagrams & Manuals
1703 Type 1 10 Miter Box Saw View Diagrams & Manuals
1703-1 Type 2 10 Miter Box Saw View Diagrams & Manuals
23481 Type 1 Miter Saw View Diagrams & Manuals
23481 Type 2 Miter Saw View Diagrams & Manuals
23482 Type 2 Miter Saw View Diagrams & Manuals
28701 Type 1 Miter Saw View Diagrams & Manuals
28703 Type 1 10 Mitre Saw View Diagrams & Manuals
7390 Type 8 Circular Saw View Diagrams & Manuals
7390 Type 7 Circular Saw View Diagrams & Manuals
7390 Type 6 Circular Saw View Diagrams & Manuals
7390 Type 5 Circular Saw View Diagrams & Manuals
LE750 Type 5 Edge Hog View Diagrams & Manuals
EH1000 Type 5 12 AMP Lawn Edger View Diagrams & Manuals
7359-B3 (Type 2) 7-1/4 Circular Saw View Diagrams & Manuals
7359-B3 (Type 3) 7-1/4 Circular Saw View Diagrams & Manuals
7359-B3 (Type 4) 7-1/4 Circular Saw View Diagrams & Manuals
7360K (Type 1) 011274 11amp Cir.Saw Kit View Diagrams & Manuals
7358-34 (Type 1) 7-1/4 Cir.Saw-Brazil View Diagrams & Manuals
7359-BR (Type 2) 7-1/4 Circular Saw Power Tool View Diagrams & Manuals
7359-BR (Type 3) 7-1/4 Circular Saw Power Tool View Diagrams & Manuals
7359-BR (Type 4) 7-1/4 Circular Saw Power Tool View Diagrams & Manuals
B7358 (Type 1) 2 H.P. Circular Saw Power Tool View Diagrams & Manuals
B7359 (Type 1) 2 1/3 Hp Circular Saw Power Tool View Diagrams & Manuals
B7359 (Type 2) 2 1/3 Hp Circular Saw Power Tool View Diagrams & Manuals
B7359 (Type 3) 2 1/3 Hp Circular Saw Power Tool View Diagrams & Manuals
79654 (Type 1) Edger Power Tool View Diagrams & Manuals

DeWALT

B7358 (Type 1) 2 H.P. Circular Saw View Diagrams & Manuals
B7359 (Type 1) 2 1/3 Hp Circular Saw View Diagrams & Manuals
B7359 (Type 2) 2 1/3 Hp Circular Saw View Diagrams & Manuals
B7359 (Type 3) 2 1/3 Hp Circular Saw View Diagrams & Manuals
1703 (Type 1) 10in Rotary Table Power Tool View Diagrams & Manuals
Show More Compatible Models
Don't see yours? Try searching our site for :

This item works with the following types of products:

  • Miter Saw Parts
  • Saw Parts
  • Edger Parts
  • Blower Parts
  • Vacuum Parts
  • Circular Saw Parts
  • Grass Trimmer Parts
  • Trimmer Parts

Customer Part Reviews ?

4.4
Average Rating (out of 5):
18 Reviews
Click to filter by ratings:
5 stars
14
4 stars
0
3 stars
3
2 stars
0
1 stars
1
  • Highest Rating
  • Most Recent
< PREV
  • 1
  • 2
NEXT >
  • Fast service good price
    My saw is working like new again. 30 bucks to repair a 250 dollar saw in about 30 minutes
    Robert - May 3, 2023 Verified Purchase
    Fast parts
    Found the correct part easily, it was the first one to come up. It was an exact replacement and the saw works great now.
    Guest - April 25, 2023 Verified Purchase
    Doing A Technical Job With “Ease”
    Hi there ! First I’d like to say Thank You to the Customer Service for making the whole process of fixing my 10” Miter Saw unbelievably easy ! Thank You ! I was amazed myself how simple it was to look up the parts, order them, recieve them so quickly and in 5 minutes my saw was up and running like new. I’ve used E-Replacement Parts before and the website is very clear on parts and how to do things ! You guys are always my first option on fixing anything from my outdoor equiptment to any of my appliances ! I don’t have a lot of money to have someone do it for me and believe me my savings are phenomenal ! Thank You Again You’re All Awesome !
    Guest - September 15, 2022 Verified Purchase
    The right part
    Installed these brushes and product worked great, until I found out the bushing that holds the shift was really worn and broke the brush. Otherwise, the brush was a great part, just look at the whole system too ensure one part caused the other part.
    Guest - May 13, 2022 Verified Purchase
    Surprised I found the part I needed to as so easy. Delivered when promised.
    It works! That’s all I needed!
    Anonymous - November 11, 2021 Verified Purchase
    Easy repair
    Works like new
    Guest - February 24, 2021 Verified Purchase
    Part fit perfectly.
    Fast shipping, great prices. Part was exactly what I needed. Would definitely recommend.
    Guest - February 15, 2021 Verified Purchase
    Easy to fit
    Parts arrived on time and a new lease of life on a 23-year old circular saw. I know most people would not even bother but there is absolutely no reason this saw will not go another five years at least. And while this is not my everyday saw, there are days when its lighter weight make it the first choice for cutting rafter ends and the like so long may it last.
    Guest - December 20, 2020 Verified Purchase
    Good experience, got the part that i needed
    This was my first time to use your company. It was a good experience, from the lady who took my order,(she was great, helpful , pleasant. knew her business ) to the timely delivery of my order. I received the exact part that I needed. When the need arises again I will call on you to help me out.
    Guest - October 13, 2020 Verified Purchase
    Easy repair--machine now works perfectly!
    The part was in perfect condition.
    Guest - June 22, 2020 Verified Purchase
    t
    t
    t - t days ago Verified Purchase
    eReplacementParts Team
    t

    Questions & Answers ?

    Our customer Service team is at the ready daily to answer your part and product questions.

    photo of team member
    Ask our Team

    We have a dedicated staff with decades of collective experience in helping customers just like you purchase parts to repair their products.

    Does this fit my product?

    Questions & Answers for Carbon Brush With Holder


    How do I know if the two brushes are bad? Thanks Joe
    Joe for model number 1710 type 3 asked on 2022-08-23
    Hello Joe, Thank you for the question. When the brushes need to be replaced they will be worn down and show wear and the unit may not start. We hope this helps, good luck with this repair!
    eReplacementParts Team August 23, 2022

    Customer Repair Instructions ?

    All our customer repair instructions are solicited directly from other customers just like you who have purchased and replaced this exact part.

    Easy 15-30 minutes (33 rated repairs)?

    Brushes worn out

    James - December 28, 2015
    👍 14 of 14 people found this instruction helpful
    Tool Type

    Circular Saw

    Difficulty

    Medium

    Time

    30-60 minutes

    Tools Used

    Screwdriver

    Disassemble saw and remove motor
    Disassemble motor
    Remove the rotor from motor and clean commutator segments with 600 flint paper. Place rotor in a vise between boards on each side of the rotor, take flint paper 1/2 inch by 4 inch and clean the commutator by pulling paper at each end in a half circle motion. also clean between each segment with a small pick tool. Remove worn brushes and replace with new ones.
    PS. Take pictures with phone as you do each step this may help when putting back together.
    Did you find this story helpful?
    Thanks for voting and helping fellow customers!

    B&D Edger, electric, would sometimes not start when warm. Probably depended on position of brushes on armature at instant switch pulled.

    Douglas - May 11, 2017
    👍 8 of 8 people found this instruction helpful
    Tool Type

    Grass Trimmer

    Difficulty

    Medium

    Time

    30-60 minutes

    Tools Used

    Screwdriver

    Removed end cover over mo (Note carefully how brush holders are positioned.) Pulled out two brush holders with carbon brushes. Replaced with new brush holders/brushes. This requires inserting contact point into contact grommet, then positioning holder with brush properly. (If not in proper position, cover will not close completely.) Replaced cover.
    Did you find this story helpful?
    Thanks for voting and helping fellow customers!

    Leaf blower was running erratically and cutting out

    Robert - October 7, 2016
    👍 3 of 3 people found this instruction helpful
    Tool Type

    Blower

    Difficulty

    Medium

    Time

    15-30 minutes

    Tools Used

    Screwdriver

    1. Remover screws to separate two halves of blower housing.
    2. Remove each brush/holder assembly by gently angling it out of the locating bosses (molded into the housing) and sliding the electrical connectors out of their slots.
    3. Confirm the new ones match the existing brushes and that they move freely within the housings. This is a good time to clean and lubricate moving parts and switches.
    4. Install new brushes by first locating the electrical connectors into the appropriate slots and then angling the brush housings into the locating bosses. (Replace the brushes in pairs - no need to do this again in a few months.)
    5. Carefully reassemble the blower housing halves. Watch that the rubber positioning bumpers don't fall out of their holes in the housing when positioning the upper half. (They are probably hardened over time and no longer snug. If they tend to fall out, a tiny bit of rubber cement or silicon will hold them in place.)
    6. Replace all screws. Tighten snugly. Do not overtighten!
    7. Test.
    Did you find this story helpful?
    Thanks for voting and helping fellow customers!

    The brushes were bad

    Randy - July 28, 2016
    👍 4 of 5 people found this instruction helpful
    Tool Type

    Miter Saw

    Difficulty

    Easy

    Time

    Less than 15 minutes

    Tools Used

    Screwdriver

    I just pulled out the bad brushes and put in the new ones
    Did you find this story helpful?
    Thanks for voting and helping fellow customers!

    Motor wouldn't run

    Dennis - July 30, 2016
    👍 3 of 3 people found this instruction helpful
    Tool Type

    Hedge Trimmer

    Difficulty

    Medium

    Time

    15-30 minutes

    Tools Used

    Screwdriver

    1. Removed the cover for the brushes.
    2. Remove the brushes by pulling them out with your fingers.
    3. Replace brushes, being careful not to damage the brush.
    4. Replace cover.
    Did you find this story helpful?
    Thanks for voting and helping fellow customers!

    Worn out brushes

    Richard - May 9, 2016
    👍 3 of 3 people found this instruction helpful
    Tool Type

    Circular Saw

    Difficulty

    Easy

    Time

    Less than 15 minutes

    Tools Used

    Screwdriver

    Removed end of motor. Disconnect the terminals from the brush assembly. Remove brush assembly. Reassembled Saw works great
    Did you find this story helpful?
    Thanks for voting and helping fellow customers!

    Carbon brush broken

    Steven - July 28, 2018
    👍 1 of 1 people found this instruction helpful
    Tool Type

    Trimmer

    Difficulty

    Easy

    Time

    Less than 15 minutes

    Tools Used

    Screwdriver

    1) Removed screws from motor housing.
    2) Removed old carbon brushes. (note orientation of old brushes)
    3) Install new brushes.
    4) Replaced motor covering.
    Did you find this story helpful?
    Thanks for voting and helping fellow customers!

    Tool needed new motor brushes

    Charles - June 6, 2018
    👍 1 of 1 people found this instruction helpful
    Tool Type

    Miter Saw

    Difficulty

    Easy

    Time

    15-30 minutes

    Tools Used

    Screwdriver

    Removed end vent cover over brush compartment
    Removed rear motor shaft bearing retainer
    Removed old brushes
    Inserted new brushes
    Lightly greased inside of shaft bushing and replaced rear motor shaft bearing retainer
    Replaced end vent cover over brush compartment
    Did you find this story helpful?
    Thanks for voting and helping fellow customers!

    Blower stopped running mid-job.

    Donald - April 19, 2017
    👍 1 of 1 people found this instruction helpful
    Tool Type

    Blower

    Difficulty

    Easy

    Time

    Less than 15 minutes

    Tools Used

    , Torx

    1. Removed screws from the case with Torx; putting screws in the zip bag.
    2. Removed brushes, confirming the failure.
    3. Replaced brushes confirming ease of install--brushes fit into the connector.
    4. Ordered new set of brushes (2).
    5. Upon arrival of brushes, did steps 2 & 3, then.
    6. Closed case and re-installed screws.
    7. Tested repair.
    Did you find this story helpful?
    Thanks for voting and helping fellow customers!

    Miter saw brushes were bad

    Robert - September 10, 2018
    Tool Type

    Circular Saw

    Difficulty

    Medium

    Time

    15-30 minutes

    Tools Used

    Screwdriver, Pliers

    Removed cover of motor to access the brushes. Was a little tricky to install new brushes Take your time and pay attention how it comes apart
    Did you find this story helpful?
    Thanks for voting and helping fellow customers!

    OEM stands for Original Equipment Manufacturer and means the part you’re buying is sourced directly from the manufacturer who made your product. At eReplacementParts, we sell only genuine OEM parts, guaranteeing the part you’re purchasing is of better design and of higher quality than aftermarket parts.

    Our product descriptions are a combination of data sourced directly from the manufacturers who made your product as well as content researched and curated by our content & customer service teams. This content is edited and reviewed internally before being made public to customers.

    Our customer service team are at the ready daily to answer your part and product questions. We have a dedicated staff with decades of collective experience in helping customers just like you purchase parts to repair their products.

    All our part reviews are solicited directly from other customers who have purchased this exact part. While we moderate these reviews for profanity, offensive language or personally identifiable information, these reviews are posted exactly as submitted and no alterations are made by our team.

    All our customer repair instructions are solicited directly from other customers just like you who have purchased and replaced this exact part. While we moderate these reviews for profanity, offensive language or personally identifiable information, these reviews are posted exactly as submitted and no alterations are made by our team.

    Based on data from past customer purchasing behaviors, these parts are most commonly purchased together along with the part you are viewing. These parts may be necessary or helpful to replace to complete your current repair.

    All our installation videos are created and produced in collaboration with our in-house repair technician, Mark Sodja, who has helped millions of eReplacementParts customers over the last 13 years repair their products. Mark has years of experience in selling and repairing both commercial and residential products with a specialty in gas-powered equipment.

    This data is collected from customers who submitted a repair instruction after replacing this exact part. Customers can rate how easy the repair was to complete and how long it took. We aggregate this data to provide a repair rating that allows customers to quickly determine the difficulty and time needed to perform their own repair.

    eReplacementParts.com
    7174 South 400 West
    Suite 5
    Midvale, UT 84047
    visa mastercard discover american express PayPal