eReplacementParts.com
877-346-4815
Ridgid Parts
Repair Parts Home
  
Power Tool Parts
  
Ridgid Parts
  290069406 Assembly Brush

Assembly Brush 290069406

OEM part for: Ridgid, Ryobi

Part Number: 290069406


Install
Videos!
Assembly Brush - 290069406:Ridgid 360 View
Assembly Brush - 290069406:RidgidAssembly Brush - 290069406:RidgidAssembly Brush - 290069406:Ridgid 360 View
Usually ships in 7 - 12 business days
Leaves our warehouse within
7 - 12 business days
Easy Less than 15 minutes (4 rated repairs)?
OEM: Original Equipment Manufacturer ?
RidgidRyobi
Does this d-block d-md-none fit my product?

Product Description ?

Genuine Ridgid replacement part, this item is sold individually.
2 of these Brushes are needed for a set.
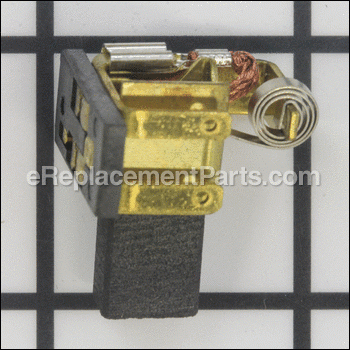
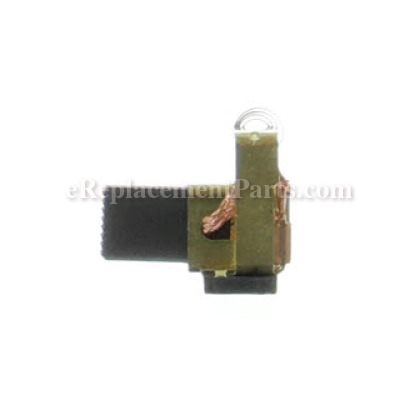
This Brush includes the Brush, Brush Holder, Brush Spring and plug in terminal.
It is always best to replace both brushes, even if only one is worn.

Worn brushes frequently are the cause behind a motor running poorly.
Replacing brushes can fix a motor that’s operating intermittently.
New brushes can restore a motor’s electric braking.

Carbon brushes are one of the most commonly replaced power tool parts. This is because carbon brushes are wear items, meaning that through friction and use they will gradually wear away until they need replacing. Worn brushes are a common causes of intermittent motor function, reduced electric braking and reduced motor power. A worn-out brush will often be worn down near to the wire lead and can be cracked, pitted, or burned. When replacing carbon brushes, be sure to inspect your armature for burns, cracks, or other damage which can indicate larger motor problems.

  • Classification: Part
  • Weight: 0.11 lbs.
  • Shipping: Ships Worldwide

Frequently Purchased Together ?

Compatibility

This part will fit the following 13 machines

Ridgid

R1001 Angle Grinder View Diagrams & Manuals
R3121 Orbital Jig Saw View Diagrams & Manuals
R5011 1/2" Hammer Drill View Diagrams & Manuals
R7110 1/2" Drill View Diagrams & Manuals
R7111 1/2" Drill View Diagrams & Manuals
R5013 1/2" Hammer Drill View Diagrams & Manuals
R3400 (33223) Fuego 5 in. Fiber Cement Saw View Diagrams & Manuals
R7122 1/2-In. Spade Handle Drill View Diagrams & Manuals
R3401 Fiber Cement Saw View Diagrams & Manuals
R3402 Fiber Cement Saw View Diagrams & Manuals
R3400 Fiber Cement Saw View Diagrams & Manuals

Ryobi

NT1HD 1/2 in. Hammer Drill View Diagrams & Manuals
NT1D 1/2 in. Drill View Diagrams & Manuals
Show More Compatible Models
Don't see yours? Try searching our site for :

This item works with the following types of products:

  • Grinder Parts
  • Jig saw Parts
  • Saw Parts
  • Drill Parts
  • Hammer Drill Parts

This part replaces obsolete part #: 290069080

Repair Videos ?

Watch the Repair Video for Assembly Brush

Customer Part Reviews ?

5
Average Rating (out of 5):
4 Reviews
Click to filter by ratings:
5 stars
4
4 stars
0
3 stars
0
2 stars
0
1 stars
0
  • Highest Rating
  • Most Recent
< PREV
  • 1
NEXT >
  • A+++ seller
    I got what I needed with no problems. It fit great! I’ll be order again someday because of speedy shipment . Thanks
    Kent - January 10, 2023 Verified Purchase
    Worked great.
    Great part, 20 year old grinder working like new now. Easy to use site and fast shipping.
    Guest - May 26, 2022 Verified Purchase
    worked fine
    arrived quickly
    Guest - October 26, 2020 Verified Purchase
    Back on service
    The parts arrived before I remove my drill from bench. It was a job of remove old part and instal the new received. Just fit perfectly. Ereplacementparts was my best choice to get my parts. Will be doing another order soon. Thanks to ereplacement parts team.
    Luis - September 3, 2019 Verified Purchase
    t
    t
    t - t days ago Verified Purchase
    eReplacementParts Team
    t

    Questions & Answers ?

    Our customer Service team is at the ready daily to answer your part and product questions.

    photo of team member
    Ask our Team

    We have a dedicated staff with decades of collective experience in helping customers just like you purchase parts to repair their products.

    Does this fit my product?

    Questions & Answers for Assembly Brush


    No questions have been asked yet

    Customer Repair Instructions ?

    All our customer repair instructions are solicited directly from other customers just like you who have purchased and replaced this exact part.

    Easy Less than 15 minutes (4 rated repairs)?

    Stopped working.

    John - May 2, 2018
    👍 2 of 2 people found this instruction helpful
    Tool Type

    Hammer Drill

    Difficulty

    Easy

    Time

    Less than 15 minutes

    Tools Used

    Screwdriver, Pliers

    Replaced the brushes. Works again!
    Did you find this story helpful?
    Thanks for voting and helping fellow customers!

    Wouldn’t run—brush assembly had broken when drill was dropped.

    Gregory - May 10, 2023
    Tool Type

    Hammer Drill

    Difficulty

    Easy

    Time

    Less than 15 minutes

    Tools Used

    Screwdriver, Nutdriver

    1. Opened the drill casing
    2. Removed the screw holding the brush and disconnected the wires
    3. Installed the new brushes and reconnected the wires
    4. Put the drill body back together
    5. …and Bob’s your uncle
    Did you find this story helpful?
    Thanks for voting and helping fellow customers!

    Ball bearing broke

    Sergio - February 12, 2020
    Tool Type

    Drill

    Difficulty

    Easy

    Time

    15-30 minutes

    Tools Used

    Screwdriver, Pliers

    Open the case and change the parts that s it
    Did you find this story helpful?
    Thanks for voting and helping fellow customers!

    Excessive sparking

    Allan - November 7, 2018
    Tool Type

    Hammer Drill

    Difficulty

    Easy

    Time

    Less than 15 minutes

    Tools Used

    Screwdriver, Pliers, T20 Torque and Philips, Long Nose Pliers

    1. Stop and disconnect the drill when sparking is evident.
    2. Disassemble the plastic handle shell. Seven T20 torque head screws.
    3. With Philips screwdriver remove the two "T" shaped plastic brush holder stays.
    4. Disconnect each holder wire connector and note the holder, wire and connector placement.
    5. Remove each brush/holder assembly using long nosed pliers.
    6. Place the new brushes with holders in their slots.
    7. Push on the electrical connectors and rout the wires as noted in step 4.
    8. Install the "T" stays and holder screws.
    9. Carefully reassemble the plastic handle shells. No pinched wires.
    10. Test.

    Did you find this story helpful?
    Thanks for voting and helping fellow customers!

    OEM stands for Original Equipment Manufacturer and means the part you’re buying is sourced directly from the manufacturer who made your product. At eReplacementParts, we sell only genuine OEM parts, guaranteeing the part you’re purchasing is of better design and of higher quality than aftermarket parts.

    Our product descriptions are a combination of data sourced directly from the manufacturers who made your product as well as content researched and curated by our content & customer service teams. This content is edited and reviewed internally before being made public to customers.

    Our customer service team are at the ready daily to answer your part and product questions. We have a dedicated staff with decades of collective experience in helping customers just like you purchase parts to repair their products.

    All our part reviews are solicited directly from other customers who have purchased this exact part. While we moderate these reviews for profanity, offensive language or personally identifiable information, these reviews are posted exactly as submitted and no alterations are made by our team.

    All our customer repair instructions are solicited directly from other customers just like you who have purchased and replaced this exact part. While we moderate these reviews for profanity, offensive language or personally identifiable information, these reviews are posted exactly as submitted and no alterations are made by our team.

    Based on data from past customer purchasing behaviors, these parts are most commonly purchased together along with the part you are viewing. These parts may be necessary or helpful to replace to complete your current repair.

    All our installation videos are created and produced in collaboration with our in-house repair technician, Mark Sodja, who has helped millions of eReplacementParts customers over the last 13 years repair their products. Mark has years of experience in selling and repairing both commercial and residential products with a specialty in gas-powered equipment.

    This data is collected from customers who submitted a repair instruction after replacing this exact part. Customers can rate how easy the repair was to complete and how long it took. We aggregate this data to provide a repair rating that allows customers to quickly determine the difficulty and time needed to perform their own repair.

    eReplacementParts.com
    7174 South 400 West
    Suite 5
    Midvale, UT 84047
    visa mastercard discover american express PayPal