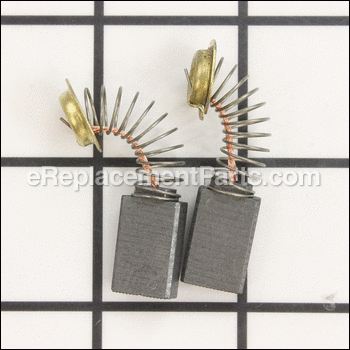
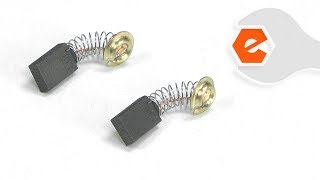
Set of 2 Carbon Brushes with wire leads and brush springs attached. The set contains genuine Makita replacement parts, and comes packaged in a Makita retail box.
This brush set will fit the Makita tools listed at the bottom of the page.
• Worn brushes are often the cause of a poorly running motor • Replacing brushes can fix an intermittent motor • New brushes can restore a motor’s electric braking
Carbon motor brushes are one of the most commonly replaced power tool components. Because carbon brushes are wear items, meaning that through friction and use they will gradually wear away, they will eventually require replacement. Worn brushes are common causes of intermittent motor function, reduced electric braking, and reduced motor power. A worn out brush will often be worn down near the wire lead and may be cracked, pitted, or burned. When replacing carbon brushes, be sure to also inspect your armature for burns, cracks, or other damage which indicates a larger motor problem.
I can always count on them to have the parts that I need
Lawrence - May 6, 2022
Verified Purchase
worked as expected
fast service
Guest - August 10, 2020
Verified Purchase
Fast shipping, great packaging
Great pricing, right product, delivered faster than expected. Ordering is easy and shipping is faster than others I’ve used.
Stephen - November 7, 2019
Verified Purchase
Good value
Fast delivery. Good value.
Guest - October 4, 2019
Verified Purchase
super easy
Received our parts fast. Popped them in, and went to work. thanks
Guest - June 15, 2019
Verified Purchase
Umm.. That wrong part was sent by mistake? Not the Carbon Brush set. Another part. Not sure. Def wrong part, but mistake.
The parts we received in good shape, but a bit slow. Maybe cause of the holidays. Also, I received one of the parts incorrectly. Could of been an honest
mistake. Wrong numbers posted.
The representative at eReplacementParts, was AWSOME!! super helpfull. Great Customer service. Thanks.
Guest - January 29, 2020
Verified Purchase
It does what it does.
It's a carbon brush. One got old. I bought a new one. Inundating my email over and over for reviews and technical details is more annoying than helpful. There is nothing you can do to inflate the quality or relative importance of a motor brush. If you need one, you buy one. I like eReplacementparts well enough. Don't spoil it.
Ask our experts a question about this part and we will respond as soon as we can.
Thank you for your question!
Our experts will get back to you as soon as they can.
Questions & Answers for Carbon Brush Set
What is the thickness & width & length of this 303 carbon brush?
Garyasked on 2022-02-07
Hello Gary, Thank you for the question. The CB303 Carbon Brush set is 19mm Length x 11mm Width x 5mm Thickness. If you need help placing an order, customer service is open 7 days a week. Please feel free to give us a call. We look forward to hearing from you!
Remove both the head and open the handle, take brushes out then slide armature out and use a bearing puller to remove bearings and tap new ones on using a deep well socket the same size if the inner race of the bearing and a rubber mallet to drive on. Then put in new brushes and close the tool up..
Remove the belt cover and the old belt
Install the new belt on the pulleys
Remove the brush caps and the old brushes
Install the new brushes, then replace the brush caps
1. Remove the brush caps with a screwdriver.
2. Remove the brushes from the tool
3. Install the new brush in the tool
4. Replace the brush caps with the screwdriver
Did you find this story helpful?
Thanks for voting and helping fellow customers!
Pushes in caps were missing when I got it on the auction
I went ahead and opened everything t and its good so I bought the brushes and cap install them then went back to the cord with my own meter pulled the switch for turning the machine on and then it ohm out good so I went ahead and plugged it in and have a great makita beltsander
1. Took apart black and decker 9 amp grinder.. took pics with phone for trigger button and hold down pin. Also taking notes of length screws and where.
2. Gently separated handle (2 pieces). Took more pics. Analysed damage. Removed brushes by removing black flat caps, lifted torsional spring and lifter them out. Also spray cleaned the insides and all vents wiping everything clean from grit and whatever that black stuff is..
3. Slid out motor, brake cleaned off dust and grim. 600 grit sand paper on brush area very lightly to clean. Removed old bearing with vise by gently twisting it off.
4. Added the rubber ribbed boot then bearing on motor assembly.
5. Slid motor assembly back in making sure bearing-boot assembly was completely inside its support.
6. Raised each torsional spring sliding the brush in with wire facing the slotted end to float freely. Then let the spring down on top of the brush.. then the black plastic protective cap on the brush assembly.
7. The trigger lever and locking button was tricky. The black push lock button goes in one of 2 ways. Most I would imagine would be similar such that placing it in the handle first, it should point strain up in alignment with trigger. The trigger fits in the one side with the black push button..which needs to be put in its place before securing it fully it on the motor assembly. Make sure the black plastic cap did not fall off in the process as it can (and dislodge preventing the 2 halves coming together tightly..do not force..it should slowly come together with gentle persuasion).
8. Making sure no wires where hanging loose and in their proper places and clearance slots.. move trigger switch into position into the handle half you have with the trigger.. Holding switch in place, check trigger operation for the on off clicking, then the black lock button that holds the trigger on-in..
9. Gently lower top half on..making sure the trigger pin pivot fits inside that half properly and with the switch still in its position. Also double checking no wires came loose and may be hanging outside the interior and may get caught up in the 2 halves coming together.
10. Screw back together and check trigger operation again. Pat yourself on your back..
11. Optional. Check grinder head pinion gear bearing.. Mine was good, I scrapped off the old grease and added high speed bearing gear grease to the pinion and crown gears in the head of the grinder..(4 screws from the top)..
12. Testing. It will take a few minutes for the brushes to set properly imo. Also, until the bearing grease in the head moves a bit, there will be a lot of drag. It goes away after a few seconds or so. fresh everthing. Grinder worked like brand new! Thanks eReplacementparts.com!!
Unplugged polisher, removed brush holder screw caps. Removed old brushes and replaced with new ones. Reinstalled caps. Tested polisher , worked great back to like new.
1. Remove the 2 brushes with screwdriver
2 replace brushes
Did you find this story helpful?
Thanks for voting and helping fellow customers!
Load More Install Stories
OEM stands for Original Equipment Manufacturer and means the part you’re buying is sourced directly from the manufacturer who made your product. At eReplacementParts, we sell only genuine OEM parts, guaranteeing the part you’re purchasing is of better design and of higher quality than aftermarket parts.
Our product descriptions are a combination of data sourced directly from the manufacturers who made your product as well as content researched and curated by our content & customer service teams. This content is edited and reviewed internally before being made public to customers.
Our customer service team are at the ready daily to answer your part and product questions. We have a dedicated staff with decades of collective experience in helping customers just like you purchase parts to repair their products.
All our part reviews are solicited directly from other customers who have purchased this exact part. While we moderate these reviews for profanity, offensive language or personally identifiable information, these reviews are posted exactly as submitted and no alterations are made by our team.
All our customer repair instructions are solicited directly from other customers just like you who have purchased and replaced this exact part. While we moderate these reviews for profanity, offensive language or personally identifiable information, these reviews are posted exactly as submitted and no alterations are made by our team.
Based on data from past customer purchasing behaviors, these parts are most commonly purchased together along with the part you are viewing. These parts may be necessary or helpful to replace to complete your current repair.
All our installation videos are created and produced in collaboration with our in-house repair technician, Mark Sodja, who has helped millions of eReplacementParts customers over the last 13 years repair their products. Mark has years of experience in selling and repairing both commercial and residential products with a specialty in gas-powered equipment.
This data is collected from customers who submitted a repair instruction after replacing this exact part. Customers can rate how easy the repair was to complete and how long it took. We aggregate this data to provide a repair rating that allows customers to quickly determine the difficulty and time needed to perform their own repair.