eReplacementParts.com
877-346-4814
DeWALT Parts
Repair Parts Home
  
Power Tool Parts
  
DeWALT Parts
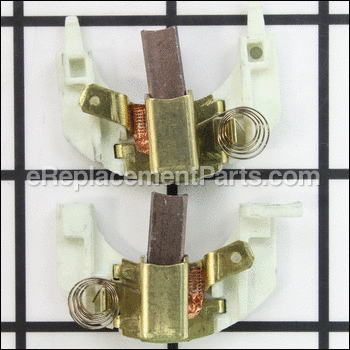
  N031214 Carbon Brush And Holder Set

Carbon Brush And Holder Set N031214

OEM part for: DeWALT

Part Number: N031214


Install
Videos!
Grid squares measure 1x1 inch
In Stock
Order within the next 12 hours and your part ships today!
Easy 15-30 minutes (26 rated repairs)?
OEM: Original Equipment Manufacturer ?
DeWALT
Does this d-block d-md-none fit my product?

Product Description ?

This is a genuine Dewalt replacement part, it is sold in a set of two.

• Worn brushes frequently are the cause behind a motor running poorly.
• Replacing brushes can fix a motor that’s operating intermittently.
• New brushes can restore a motor’s electric braking.


Carbon brushes are one of the most commonly replaced power tool parts. This is because carbon brushes are wear items, meaning that through friction and use they will gradually wear away until they need replacing. Worn brushes are a common causes of intermittent motor function, reduced electric braking and reduced motor power. A worn-out brush will often be worn down near to the wire lead and can be cracked, pitted, or burned. When replacing carbon brushes, be sure to inspect your armature for burns, cracks, or other damage which can indicate larger motor problems.

  • Classification: Part
  • Weight: 0.01 lbs.
  • Also Known As: Motor Brush and Holder Set
  • Shipping: Ships Worldwide

Compatibility

This part will fit the following 57 machines

DeWALT

DCD950 Type 1 18V XRP Hammer Drill View Diagrams & Manuals
DCD930 Type 1 14.4V Hammer Drill View Diagrams & Manuals
DCD920 Type 1 14.4V Drill/Driver View Diagrams & Manuals
DCD970 Type 1 18V Hammer Drill View Diagrams & Manuals
DCD985L2 Type 1 18V Hammer Drill View Diagrams & Manuals
DCD980L2 Type 1 20V Drill/Driver View Diagrams & Manuals
DCD980L2-AR Type 1 20V Max Premium Drill / Driver View Diagrams & Manuals
DCD985L2-AR Type 1 20V Max Premium Hammer Drill View Diagrams & Manuals
DCD985L2-B2 Type 1 20V Max Premium Hammer Drill View Diagrams & Manuals
DCD985L2-BR Type 1 20V Max Premium Hammer Drill View Diagrams & Manuals
DCD940KX Type 1 18V XRP Drill/Driver Kit View Diagrams & Manuals
DCD985B Type 1 20V Hammer Drill View Diagrams & Manuals
DCD970KL Type 1 18V Hammer Drill View Diagrams & Manuals
DCD970KL Type 2 18V Hammer Drill View Diagrams & Manuals
DCD950KX Type 1 18V Hammer Drill View Diagrams & Manuals
DCD950KX Type 2 18V Hammer Drill View Diagrams & Manuals
DCD950VX Type 1 18V Hammer Drill View Diagrams & Manuals
DCD950VX Type 2 18V Hammer Drill View Diagrams & Manuals
DCD960KL Type 1 18V Drill Driver View Diagrams & Manuals
DCD950B Type 1 18V Hammer Drill View Diagrams & Manuals
DCD950B Type 2 18V Hammer Drill View Diagrams & Manuals
DCD950B Type 3 18V Hammer Drill View Diagrams & Manuals
DCD970 Type 2 18V Hammer Drill View Diagrams & Manuals
DCD970 Type 3 18V Hammer Drill View Diagrams & Manuals
DCD930KX (Type 1) 1/2-In. Cordless Hammer Drill View Diagrams & Manuals
DCD930KX (Type 3) 1/2-In. Cordless Hammer Drill View Diagrams & Manuals
DCD910KX (Type 1) 12v Xrp Drill/Driver Kit View Diagrams & Manuals
DCD920KX (Type 1) 1/2-In. Cordless Drill View Diagrams & Manuals
DCD930VX (Type 1) 1/2-In. Cordless Hammer Drill View Diagrams & Manuals
DCD980M2 (Type 2) 20v Drill View Diagrams & Manuals
DCD985M2 (Type 2) 20v Hammerdrill View Diagrams & Manuals
DCD940KX (Type 2) Cordless Drill/Driver Power Tool View Diagrams & Manuals
DCD980L2-B2 (Type 2) Cordless Drill/Driver Power Tool View Diagrams & Manuals
DCD980L2-BR (Type 2) Cordless Drill/Driver Power Tool View Diagrams & Manuals
DCD930KX-AR (Type 1) Hammer Drill Power Tool View Diagrams & Manuals
DCD930KX-AR (Type 2) Hammer Drill Power Tool View Diagrams & Manuals
DCD930KX-B2 (Type 1) Hammer Drill Power Tool View Diagrams & Manuals
DCD930KX-B2 (Type 2) Hammer Drill Power Tool View Diagrams & Manuals
DCD930KX-BR (Type 1) Hammer Drill Power Tool View Diagrams & Manuals
DCD930KX-BR (Type 2) Hammer Drill Power Tool View Diagrams & Manuals
DCD950KX-AR (Type 1) 18v Xrp Hammerdrill/Drill Power Tool View Diagrams & Manuals
DCD950KX-AR (Type 2) 18v Xrp Hammerdrill/Drill Power Tool View Diagrams & Manuals
DCD950KX-AR (Type 3) 18v Xrp Hammerdrill/Drill Power Tool View Diagrams & Manuals
DCD950KX-B2 (Type 1) 18v Xrp Hammerdrill/Drill Power Tool View Diagrams & Manuals
DCD950KX-B2 (Type 2) 18v Xrp Hammerdrill/Drill Power Tool View Diagrams & Manuals
DCD950KX-B2 (Type 3) 18v Xrp Hammerdrill/Drill Power Tool View Diagrams & Manuals
DCD950KX-BR (Type 1) 18v Xrp Hammerdrill/Drill Power Tool View Diagrams & Manuals
DCD950KX-BR (Type 2) 18v Xrp Hammerdrill/Drill Power Tool View Diagrams & Manuals
DCD950KX-BR (Type 3) 18v Xrp Hammerdrill/Drill Power Tool View Diagrams & Manuals
DCD950KX (Type 3) 18v Xrp Hammerdrill/Drill Power Tool View Diagrams & Manuals
DCD950VX (Type 3) Hammer Drill Power Tool View Diagrams & Manuals
DCD970KL (Type 3) Cordless Drill/Driver Power Tool View Diagrams & Manuals
DCD985B (Type 2) 20v Hammerdrill Power Tool View Diagrams & Manuals
DCD985L2-AR (Type 2) Cordless Drill/Driver Power Tool View Diagrams & Manuals
DCD985L2-B2 (Type 2) Cordless Drill/Driver Power Tool View Diagrams & Manuals
DCD985L2-BR (Type 2) Cordless Drill/Driver Power Tool View Diagrams & Manuals
DCD985L2 (Type 2) Cordless Drill/Driver Power Tool View Diagrams & Manuals
Show More Compatible Models
Don't see yours? Try searching our site for :

This item works with the following types of products:

  • Drill Parts
  • Hammer Drill Parts

This part replaces obsolete part #: N031214SV, N022272, N022271

Repair Videos ?

Watch the Repair Video for Carbon Brush And Holder Set
Articles:
Accessing the brushes in DeWalt DCD series drill can be tricky. This article will help make this repair a cinch. ...
November 09, 2012

Customer Part Reviews ?

5
Average Rating (out of 5):
18 Reviews
Click to filter by ratings:
5 stars
18
4 stars
0
3 stars
0
2 stars
0
1 stars
0
  • Highest Rating
  • Most Recent
< PREV
  • 1
  • 2
NEXT >
  • Easy install
    Product arrived just as described and as shown. Very pleased
    Guest - April 8, 2023 Verified Purchase
    Maybe other problems
    Replaced my worn out brushes and still had to take the drill to a repair center to get repaired
    Guest - August 22, 2022 Verified Purchase
    Great part
    The part match and my drill is working again thank a lot
    Guest - July 28, 2022 Verified Purchase
    Perfect Fit
    The new brushes were a perfect fit and seem to have cured the intermittent starting problem I'd been having. Old brushes were just too short to make solid contact on the armature. Drill was about 7 years old...
    Guest - January 14, 2022 Verified Purchase
    Great
    Arrive quickly extremely happy with the service
    Guest - June 17, 2021 Verified Purchase
    Ordered a few different things over the years
    Exactly what I needed.
    Brian - April 26, 2021 Verified Purchase
    easy repair
    fit perfectly in my hand grinder
    Guest - February 3, 2021 Verified Purchase
    Dewalt parts
    The parts arrived on time and were an exact match, so nice not to have to send something back.
    Guest - October 21, 2020 Verified Purchase
    Fixed it.
    The old brushes where so worn short that they no longer made contact with the commutator most of the time. It would not turn on without holding it at just the right angle or tapping it in just the right place. Put the new brushes in, and now it works fine. Very easy to do. Just needed two different star tip screw drivers to open up the drill/screw gun. The how-to video that ereplacementparts.com provided was spot on. The "carbon brush and holder set" comes with the set of two brush assemblies. Each one of the two assemblies is different from the other. So ya, Part Number: N031214 comes with both bushes, as two pieces. One part as two pieces. I found that a little confusing. Model: DeWalt DCD985 1/2" (13mm) CORDLESS DRILL/DRIVER/HAMMERDRILL 20vMAX / LITHIUM ION
    Guest - October 12, 2020 Verified Purchase
    Easy repair
    Perfect fit and my drill is working like new
    Guest - August 31, 2020 Verified Purchase
    t
    t
    t - t days ago Verified Purchase
    eReplacementParts Team
    t

    Questions & Answers ?

    Our customer Service team is at the ready daily to answer your part and product questions.

    photo of team member
    Ask our Team

    We have a dedicated staff with decades of collective experience in helping customers just like you purchase parts to repair their products.

    Does this fit my product?

    Questions & Answers for Carbon Brush And Holder Set


    DeWALT Dcd985 the same as a dcd985b. Wanting motor brushes
    Alan for model number Dcd985 asked on 2022-11-30
    Hello Alan, Thank you for contacting us. We have researched the model you have provided and have found the part you are looking for is Part Number:N031214. We hope this helps, good luck with this repair!
    eReplacementParts Team November 30, 2022
    My drill started to smoke. Turned it off. Now when the trigger is activated it makes a high pitch warning sound. What's wrong?
    Brian for model number DCD985 Type 2 asked on 2022-02-08
    Hello Brian, Thank you for your inquiry. We have included a link to our troubleshooting video on how to diagnose a drill that is smoking or sparking. Good luck with your repair. https://www.youtube.com/watch?v=3zuWjif_gGM
    eReplacementParts Team February 08, 2022

    Customer Repair Instructions ?

    All our customer repair instructions are solicited directly from other customers just like you who have purchased and replaced this exact part.

    Easy 15-30 minutes (26 rated repairs)?

    Intermittent power and sometimes no power

    Don - February 24, 2016
    👍 8 of 8 people found this instruction helpful
    Tool Type

    Hammer Drill

    Difficulty

    Medium

    Time

    30-60 minutes

    Tools Used

    Screwdriver, t10 torx bit screwdriver

    After carefully removing the torx screws holding the two haves of the plastic drill casing together carefully separate the two halves with thin screwdriver making sure you have also removed the four torx screws holding the the metal drill assembly to the unit. You will need to remove the two top bearing cap retainers two remove the motor.Once apart you can now remove the top set of brushes and the electric motor assembly out of the drill. The lower brush assembly is now ready for removal gently remove this unit by using a small screwdriver and pushing on it through the air exhaust slots on the outside of the unit. At this point you will need to clean the armature on the motor where the brushes make contact, because there is probably a glaze on this area. 3m Scotch Brite works well for this job. When reinstalling the motor assembly make sure the flat areas of the electric motor assembly are in alignment with the plastic drill case or the drill with not close back together correctly. Installing the brushes is easy just plug and play set up and reinstall your bearing caps and you are almost done. Reinstall all the torx screws holding the two case halves together and you should be good to go. Hope this helps.
    Did you find this story helpful?
    Thanks for voting and helping fellow customers!

    Bad brushes

    Travis - September 5, 2017
    👍 2 of 2 people found this instruction helpful
    Tool Type

    Cordless Drill

    Difficulty

    Medium

    Time

    Less than 15 minutes

    Tools Used

    Screwdriver, Star tip screwdriver

    Removed all visible star tip screws from handle and drill head. Then removed right side of handle to expose inner workings of drill casing. Removed two screws from rear and two from front drill motor mounting brackets, once removed drill head came out with very little for giving access to brush on left side of drill. There is a right and a left brush, if installed improperly wire terminal will be on the top side of drill and will not be in proper location. Once brushes were install and wires fastened to brushes drill head and motor was put back into place (magnet for drill motor must be seated properly into case or bracket mount will bind the motor, rotate until you feel it seat in) once drill motor brackets are in and screws tighten, drill handle goes back on pretty easy just be careful if you have a handle guide light that it and brush wiring are back in proper grooves before closing the handle together and tightening screws! Would be a very easy repair to do again!
    Did you find this story helpful?
    Thanks for voting and helping fellow customers!

    The old brushes were crumbling.

    Vic - December 15, 2015
    👍 4 of 6 people found this instruction helpful
    Tool Type

    Cordless Drill

    Difficulty

    Easy

    Time

    15-30 minutes

    Tools Used

    Screwdriver, Pliers

    Unscrew one side of drill using Torx screw driver, remove 4 more larger torx screws holding metal gearbox. Slightly separate gear box from handle, take off 1/2 of drill handle. Pull gearbox away from handle. Remove bearing saddles. Lift out motor. Remove brush holders - gently. Use pliers to pull connectors from brush assembly. Hook new brushes up and reverse the above process. Done!
    Did you find this story helpful?
    Thanks for voting and helping fellow customers!

    Brushes worn out

    james - December 7, 2017
    👍 1 of 1 people found this instruction helpful
    Tool Type

    Cordless Drill

    Difficulty

    Easy

    Time

    15-30 minutes

    Tools Used

    Screwdriver, torx driver

    Remove battery, Remove the 9 torx head screws from the hand grip and motor housing, Remove the 4 torx screws to separate the body of the drill, Use a screwdriver to separate the two half's, Be aware of a metal alignment clip just above the battery, It is just a matter of unplugging the old and plugging the new brush's , It is best to mark the position of the armature
    Did you find this story helpful?
    Thanks for voting and helping fellow customers!

    Drill did not operate

    Walter - July 30, 2017
    👍 1 of 1 people found this instruction helpful
    Tool Type

    Cordless Drill

    Difficulty

    Easy

    Time

    15-30 minutes

    Tools Used

    Screwdriver, Torx bit driver

    Watched Dewalt DCD drill series brush repair on ereplacement.com website. Life saver !

    https://www.youtube.com/watch?v=Vh83GJ3PPCA
    Did you find this story helpful?
    Thanks for voting and helping fellow customers!

    Completely inoperative

    TIM - October 17, 2016
    👍 1 of 1 people found this instruction helpful
    Tool Type

    Hammer Drill

    Difficulty

    Medium

    Time

    30-60 minutes

    Tools Used

    Pliers, torx driver

    Dissembled into two halves, exposing all electrical components.
    1. Variable speed switch appeared in good working order.
    2. Brush assembly (Brass) was green from corrosion and/or exposure to liquids of some sort. 3.Small female quick connectors also corroded.(ordered all new parts from here)
    4. Removed upper brush assy. by lifting off.
    5. Removed bearing retainer at both ends of armature. and lifted magnet and armature from frame.
    6. Used 4/0 (400grit) emery cloth to clean tarnish from copper commentator. Then removed old brush assembly from lower frame and replaced with new.
    7. Reversed order for assembly.
    8. TRICKY PARTS..... the magnet housing has small indention on bottom that must fit over "key" in base of lower half of frame. ALSO... the forward and reverse slide switch has notch that must align with top of trigger switch.
    Bought this "non-working For Parts only" 18 volt hammer drill on eBay for $9.99. installed a $13.00 switch and have a great drill that works just like new!! Took a chance and came out a winner. If its a quality tool, chances are you can get parts and fix it yourself!
    Did you find this story helpful?
    Thanks for voting and helping fellow customers!

    Would stop working

    Michael - August 9, 2016
    👍 1 of 1 people found this instruction helpful
    Tool Type

    Cordless Drill

    Difficulty

    Medium

    Time

    15-30 minutes

    Tools Used

    Screwdriver

    Took out the old brushes and replaced them with the new ones!
    Did you find this story helpful?
    Thanks for voting and helping fellow customers!

    armature burned out /brushes bad

    Robert - March 9, 2019
    Tool Type

    Hammer Drill

    Difficulty

    Easy

    Time

    15-30 minutes

    Tools Used

    Screwdriver, Torx head screwdrivers

    Repaired driver / drill with part supplied ! 30 minute repair
    Did you find this story helpful?
    Thanks for voting and helping fellow customers!

    Brush Set

    Glenn - January 8, 2019
    Tool Type

    Cordless Drill

    Difficulty

    Easy

    Time

    30-60 minutes

    Tools Used

    Screwdriver, Pliers

    Very easy to take apart and to replace the brush set
    Did you find this story helpful?
    Thanks for voting and helping fellow customers!

    Armature overheated, tore up the brushes and holder

    Troy - December 29, 2018
    Tool Type

    Cordless Drill

    Difficulty

    Medium

    Time

    30-60 minutes

    Tools Used

    Screwdriver, Torx drivers

    1. Removed torx screws
    2. Separated driver end and housings
    3. Removed motor hold downs
    4. Removed assembly and replaced with new parts
    5. Reinstall all parts and test
    Did you find this story helpful?
    Thanks for voting and helping fellow customers!

    OEM stands for Original Equipment Manufacturer and means the part you’re buying is sourced directly from the manufacturer who made your product. At eReplacementParts, we sell only genuine OEM parts, guaranteeing the part you’re purchasing is of better design and of higher quality than aftermarket parts.

    Our product descriptions are a combination of data sourced directly from the manufacturers who made your product as well as content researched and curated by our content & customer service teams. This content is edited and reviewed internally before being made public to customers.

    Our customer service team are at the ready daily to answer your part and product questions. We have a dedicated staff with decades of collective experience in helping customers just like you purchase parts to repair their products.

    All our part reviews are solicited directly from other customers who have purchased this exact part. While we moderate these reviews for profanity, offensive language or personally identifiable information, these reviews are posted exactly as submitted and no alterations are made by our team.

    All our customer repair instructions are solicited directly from other customers just like you who have purchased and replaced this exact part. While we moderate these reviews for profanity, offensive language or personally identifiable information, these reviews are posted exactly as submitted and no alterations are made by our team.

    Based on data from past customer purchasing behaviors, these parts are most commonly purchased together along with the part you are viewing. These parts may be necessary or helpful to replace to complete your current repair.

    All our installation videos are created and produced in collaboration with our in-house repair technician, Mark Sodja, who has helped millions of eReplacementParts customers over the last 13 years repair their products. Mark has years of experience in selling and repairing both commercial and residential products with a specialty in gas-powered equipment.

    This data is collected from customers who submitted a repair instruction after replacing this exact part. Customers can rate how easy the repair was to complete and how long it took. We aggregate this data to provide a repair rating that allows customers to quickly determine the difficulty and time needed to perform their own repair.

    eReplacementParts.com
    7174 South 400 West
    Suite 5
    Midvale, UT 84047
    visa mastercard discover american express PayPal