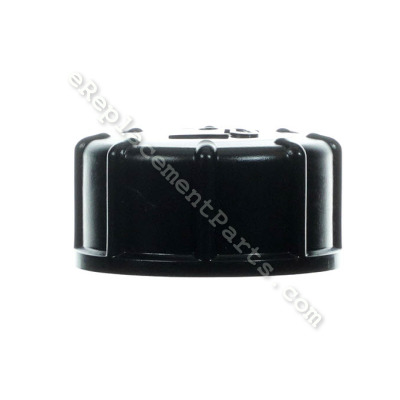


This cap is an authentic replacement part manufactured by Honda. It is commonly used in small engines. This black cap is designed to seal the opening of the fuel tank to prevent gasoline from spilling or leaking. It is made of plastic, and it should be replaced if it is cracked or damaged. It is sold individually.
Cap Assembly, Fuel Tank 17620-ZM3-073
OEM part for: Honda
Part Number: 17620-ZM3-073
$13.25
In Stock
Jump To:
Frequently Purchased Together ?


Compatibility
This part will fit the following 82 machines
Honda
GX31 (Type SA)(VIN# GCAG-1000001-2099999) Small Engine View Diagrams & Manuals
GX31 (Type SA2)(VIN# GCAG-1000001-2099999) Small Engine View Diagrams & Manuals
GX31 (Type SA2/A)(VIN# GCAG-2100001-9999999) Small Engine View Diagrams & Manuals
GX31 (Type SA5)(VIN# GCAG-1000001-2099999) Small Engine View Diagrams & Manuals
GX31 (Type SCMS/A)(VIN# GCAG-2100001-9999999) Small Engine View Diagrams & Manuals
GX31 (Type STW2)(VIN# GCAG-1000001-2099999) Small Engine View Diagrams & Manuals
GX31 (Type SAT)(VIN# GCAG-1000001-2099999) Small Engine View Diagrams & Manuals
GX31 (Type STW2/A)(VIN# GCAG-2100001-9999999) Small Engine View Diagrams & Manuals
GX31 (Type SAT/A)(VIN# GCAG-2100001-9999999) Small Engine View Diagrams & Manuals
GX31 (Type TA2)(VIN# GCAG-1000001-2099999) Small Engine View Diagrams & Manuals
GX31 (Type SAT5)(VIN# GCAG-1000001-2099999) Small Engine View Diagrams & Manuals
GX31 (Type TA2/A)(VIN# GCAG-2100001-9999999) Small Engine View Diagrams & Manuals
GX31 (Type SCMS)(VIN# GCAG-1000001-2099999) Small Engine View Diagrams & Manuals
GX31 (Type TAP)(VIN# GCAG-1000001-2099999) Small Engine View Diagrams & Manuals
GX31 (Type TAP/A)(VIN# GCAG-2100001-9999999) Small Engine View Diagrams & Manuals
GX35 (Type SA2)(VIN# GCACM-1000001-1099999) Small Engine View Diagrams & Manuals
GX35 (Type SA2A)(VIN# GCACM-1100001-9999999) Small Engine View Diagrams & Manuals
GX35 (Type SAT)(VIN# GCACM-1000001-1099999) Small Engine View Diagrams & Manuals
GX35 (Type SATA)(VIN# GCACM-1100001-9999999) Small Engine View Diagrams & Manuals
GX22 (Type SAT)(VIN# GCAF-1000001-1399999) Small Engine View Diagrams & Manuals
GX22 (Type SAT/A)(VIN# GCAF-1400001-9999999) Small Engine View Diagrams & Manuals
GX22 (Type SAT5)(VIN# GCAF-1000001-1399999) Small Engine View Diagrams & Manuals
GX22 (Type TA)(VIN# GCAF-1000001-1399999) Small Engine View Diagrams & Manuals
GX22 (Type TA2)(VIN# GCAF-1000001-1399999) Small Engine View Diagrams & Manuals
GX22 (Type TA2/A)(VIN# GCAF-1400001-9999999) Small Engine View Diagrams & Manuals
GX22 (Type SA)(VIN# GCAF-1000001-1399999) Small Engine View Diagrams & Manuals
GX22 (Type SA2)(VIN# GCAF-1000001-1399999) Small Engine View Diagrams & Manuals
GX22 (Type SA2/A)(VIN# GCAF-1400001-9999999) Small Engine View Diagrams & Manuals
GX22 (Type SA5)(VIN# GCAF-1000001-1399999) Small Engine View Diagrams & Manuals
GX25 (Type SA2/A)(VIN# GCAAM-1200001-9999999) Small Engine View Diagrams & Manuals
GX25 (Type SAM2)(VIN# GCAAM-1200001-9999999) Small Engine View Diagrams & Manuals
GX25 (Type SAT/A)(VIN# GCAAM-1200001-9999999) Small Engine View Diagrams & Manuals
GX25 (Type TA/A)(VIN# GCAAM-1200001-9999999) Small Engine View Diagrams & Manuals
GX25 (Type TA2/A)(VIN# GCAAM-1200001-9999999) Small Engine View Diagrams & Manuals
GX25 (Type WA/A)(VIN# GCAAM-1200001-9999999) Small Engine View Diagrams & Manuals
GX25N (Type T3)(VIN# GCADK-1000001-9999999) Small Engine View Diagrams & Manuals
GX25N (Type TZ3)(VIN# GCAVK-1000001-9999999) Small Engine View Diagrams & Manuals
GX25N (Type TZR3)(VIN# GCAVK-1000001-9999999) Small Engine View Diagrams & Manuals
GX25NT (Type SMTD)(VIN# GCART-1000001) Small Engine View Diagrams & Manuals
GX25NT (Type T3)(VIN# GCART-1000001) Small Engine View Diagrams & Manuals
FG100 (Type A)(VIN# FZCV-6000001 to FZCV-9999999) Rototiller View Diagrams & Manuals
FG100 (Type A1)(VIN# FZCV-6000001 to FZCV-9999999) Rototiller View Diagrams & Manuals
FG100 (Type A1/A)(VIN# FZCV-6000001 to FZCV-9999999) Rototiller View Diagrams & Manuals
FG110 (Type A)(VIN# FAAA-1000001 to FAAA-1199999) Rototiller View Diagrams & Manuals
FG110 (Type AT)(VIN# FAAA-1000001 to FAAA-1199999) Rototiller View Diagrams & Manuals
FG110K1 (Type AT)(VIN# FAAA-1200001) Rototiller View Diagrams & Manuals
HHE31C (Type A)(VIN# MABA-1000001 TO MABA-9999999) Stick Edger View Diagrams & Manuals
HHE31C (Type A/A)(VIN# MABA-1000001 TO MABA-9999999) Stick Edger View Diagrams & Manuals
HHT25S (Type LTA)(VIN# HAFA-1000001 to HAFA-9999999) Trimmer/Brush Cutter View Diagrams & Manuals
HHT25S (Type LTA/A)(VIN# HAFA-1000001 to HAFA-9999999) Trimmer/Brush Cutter View Diagrams & Manuals
HHT25S (Type LTAT)(VIN# HAFA-1000001) Trimmer/Brush Cutter View Diagrams & Manuals
HHT31S (Type LTA)(VIN# HADA-1000001 to HADA-9999999) Trimmer/Brush Cutter View Diagrams & Manuals
HHT31S (Type LTA/A)(VIN# HADA-1000001 to HADA-9999999) Trimmer/Brush Cutter View Diagrams & Manuals
HHT31S (Type UNBA)(VIN# HABA-1000001 to HABA-9999999) Trimmer/Brush Cutter View Diagrams & Manuals
HHT31S (Type UNBA/A)(VIN# HABA-1000001 to HABA-9999999) Trimmer/Brush Cutter View Diagrams & Manuals
HHT35S (Type LTAT)(VIN# HAGA-1000001) Trimmer/Brush Cutter View Diagrams & Manuals
HHT35S (Type UKAT)(VIN# HAHA-1000001) Trimmer/Brush Cutter View Diagrams & Manuals
UMK422 (LNA) Trimmer/Brush Cutter View Diagrams & Manuals
GX35 (Type SA2/A)(VIN# GCACM-1100001-9999999) Engine View Diagrams & Manuals
GX35 (Type SAT/A)(VIN# GCACM-1100001-9999999) Engine View Diagrams & Manuals
GX25NT (Type HAT)(VIN# GCART-1000001-9999999) Engine View Diagrams & Manuals
GX25NT (Type S2)(VIN# GCART-1000001-9999999) Engine View Diagrams & Manuals
UMK422 (Type LNA)(VIN# GCAF-1000001-9999999) Trimmer / Brushcutter View Diagrams & Manuals
UMK422 (Type LTA)(VIN# GCAF-1000001-9999999) Trimmer / Brushcutter View Diagrams & Manuals
UMK422K1 (Type LNA)(VIN# GCAF-1000001-1399999) Trimmer / Brushcutter View Diagrams & Manuals
UMK422K1 (Type LTA)(VIN# GCAF-1000001-1399999) Trimmer / Brushcutter View Diagrams & Manuals
UMK431 (Type LNA)(VIN# GCAG-1000001-9999999) Trimmer / Brushcutter View Diagrams & Manuals
UMK431 (Type LTA)(VIN# GCAG-1000001-9999999) Trimmer / Brushcutter View Diagrams & Manuals
UMK431 (Type UNBA)(VIN# GCAG-1000001-9999999) Trimmer / Brushcutter View Diagrams & Manuals
UMK431K1 (Type LNA)(VIN# GCAG-1000001-2099999) Trimmer / Brushcutter View Diagrams & Manuals
UMK431K1 (Type LNA/A)(VIN# GCAG-2100001-9999999) Trimmer / Brushcutter View Diagrams & Manuals
UMK431K1 (Type LTA)(VIN# GCAG-1000001-2099999) Trimmer / Brushcutter View Diagrams & Manuals
UMK431K1 (Type LTA/A)(VIN# GCAG-2100001-9999999) Trimmer / Brushcutter View Diagrams & Manuals
UMK431K1 (Type UNBA)(VIN# GCAG-1000001-2099999) Trimmer / Brushcutter View Diagrams & Manuals
UMK431K1 (Type UNBA/A)(VIN# GCAG-2100001-9999999) Trimmer / Brushcutter View Diagrams & Manuals
WX10 (Type A1)(VIN# GCAG-1000001-2099999) Water Pump View Diagrams & Manuals
WX10 (Type A2)(VIN# GCAG-1000001-2099999) Water Pump View Diagrams & Manuals
WX10 (Type A4)(VIN# GCAG-1000001-2099999) Water Pump View Diagrams & Manuals
WX10 (Type A4/A)(VIN# GCAG-2100001-9999999) Water Pump View Diagrams & Manuals
WX10K1 (Type A)(VIN# GCAAM-1200001-9999999) Water Pump View Diagrams & Manuals
WX10K1 (Type AT)(VIN# GCALT-1000001-9999999) Water Pump View Diagrams & Manuals
WX10T (Type A)(VIN# GCALT-1000001-9999999) Water Pump View Diagrams & Manuals
Show More Compatible Models
This item works with the following types of products:
- Engine Parts
- Edger Parts
- Trimmer Parts
This part replaces obsolete part #: 17620-ZM3-043 (Serial# (1000001-9999999)), 17620-ZM3-063 (Serial# (1000001-9999999)), 17620-ZM3-053 (Serial# (1000001-9999999)), 17620-ZM3-063, 17620-ZM3-043, 17620-ZM3-053
Customer Part Reviews ?
Average Rating (out of 5):
Click to filter by ratings:
5 stars
3
4 stars
0
3 stars
0
2 stars
0
1 stars
1
< PREV
- 1
Fast service and right part. Awesome. Would use your site again, and let my friends know
Awesome service right part. I will tell my friends. Right part thanks
Guest -
October 8, 2021
Verified Purchase
gas cap
Very fast service and it was the right part first time.
Guest -
August 2, 2021
Verified Purchase
Good service thank you.
Was the part I needed and arrived quickly. But now I have no excuse for not working.
Guest -
June 24, 2020
Verified Purchase
Fraud Site??
3 weeks still have not received it...
Guest -
May 16, 2019
Verified Purchase
eReplacementParts Team
Hi Nathan,
Thank you for your review. Please accept our apologies that you have not yet received your order. We have responded to you privately regarding this situation.
t
t
t -
t days ago
Verified Purchase
eReplacementParts Team
t
Questions & Answers ?
Our customer Service team is at the ready daily to answer your part and product questions.

Ask our Team
We have a dedicated staff with decades of collective experience in helping customers just like you purchase parts to repair their products.
Does this fit my product?Questions & Answers for Cap Assembly, Fuel Tank
Need to know where to find the model # of the engine to procure the muffler & gas cap for this Honda Overhead Cam self propelled lawnmower.
Dan
for model number 12A568Q034
asked on 2022-03-09
Hello Dan, Thank you for the question. Normally the model numbers are stamped directly into the blower housing, muffler heat shield, or a few inches above the spark plug. If you need help placing an order, customer service is open 7 days a week. Please feel free to give us a call. We look forward to hearing from you!
eReplacementParts Team March 09, 2022
Customer Repair Instructions ?
All our customer repair instructions are solicited directly from other customers just like you who have purchased and replaced this exact part.
Engine ran poorly, Stalled after half an hour run time. (Gas cap failed to breathe, engine drew vacuum in tank after running for a while)
Anthony - June 26, 2016
👍 3 of 3 people found this instruction helpful
Tool Type
Edger
Difficulty
Medium
Time
15-30 minutes
Tools Used
Wrench Set
1) Removed and replaced sponge air filter.
2) Removed and replaced spark plug
3) Removed and replaced gas cap
Please note this was on a mantis garden tiller, not edger, but that option is not available.
2) Removed and replaced spark plug
3) Removed and replaced gas cap
Please note this was on a mantis garden tiller, not edger, but that option is not available.
Did you find this story helpful?
Thanks for voting and helping fellow customers!
Throttle arm broke off of the carburetor when I accidentally dropped the weed eater. So I had to replace the carburetor.
Cliff - May 1, 2022
Tool Type
Engine
Difficulty
Easy
Time
15-30 minutes
Tools Used
Pliers, Socket set, Allen wrench
1. Removed plastic engine cover and air filter box ( Allen wrench is required) .
2. Removed fuel lines ( supply and return) from carburetor connections
3. Removed carburetor ( two nuts)
4. Removed old gasket and replaced with new gasket.
5. Removed old oring off of old carburetor intake .
6. Put old oring ( probably would have gotten a new one if I had known about it ) on new carburetor.
7. Reverse first three steps .
Forgot to mention throttle cable removal from carburetor and reinstall. Very simple .
Primed and started on third pull . I also bought new gas tank grommet, fuel lines and filter but didn’t need to replace at this time . Sometimes the fuel lines are brittle so better safe than sorry.
Did you find this story helpful?
Thanks for voting and helping fellow customers!
The engine would not run well and would die out.
Doug - June 3, 2020
Tool Type
Engine
Difficulty
Easy
Time
15-30 minutes
Tools Used
Screwdriver, Pliers, Socket set
1. Removed air filter and cover.
2. Removed the old carburetor and gasket from the engine. Held on with 2 nuts.
3. Removed fuel lines and saved for re-installation.
4.Removed throttle cable.
5. Installed new gasket and new carburetor.
6. Installed the nuts back on to the bolts that go through the carburetor. Be careful to slide bolts completely through the carburetor. You may need pliers to pull it back through to its full extension.
6. Reinstalled the throttle cable.
7. Placed filter and cover back on.
8. Re-installed the fuel lines from the tank to the carburetor.
9. Primed the engine and then choked and restarted.
10. It ran perfectly and started first time every time for the rest of the day.
INstalled
Did you find this story helpful?
Thanks for voting and helping fellow customers!
Fuel lines and tank grommet was damaged by Ethanol in the fuel
David - April 14, 2019
Tool Type
Engine
Difficulty
Easy
Time
Less than 15 minutes
Tools Used
Pliers
Parts Used
Took the fuel line and return lines off the carburetor side and pushed the grommet out by reaching inside of rhe fule tank. Treated the new lines through the new grommet and attached the line to the carb and teinstallwd the fuel filter. The job took less than 5 minutes.
Did you find this story helpful?
Thanks for voting and helping fellow customers!
Needed new gas cap and spark plug
Clay - December 16, 2016
Tool Type
Engine
Difficulty
Easy
Time
Less than 15 minutes
Tools Used
Socket set
Easy enough to put the new gas cap on
Removed the old plug and gapped the new one at 0.026, then installed it
Removed the old plug and gapped the new one at 0.026, then installed it
Did you find this story helpful?
Thanks for voting and helping fellow customers!
OEM stands for Original Equipment Manufacturer and means the part you’re buying is sourced directly from the manufacturer who made your product. At eReplacementParts, we sell only genuine OEM parts, guaranteeing the part you’re purchasing is of better design and of higher quality than aftermarket parts.
Our product descriptions are a combination of data sourced directly from the manufacturers who made your product as well as content researched and curated by our content & customer service teams. This content is edited and reviewed internally before being made public to customers.
Our customer service team are at the ready daily to answer your part and product questions. We have a dedicated staff with decades of collective experience in helping customers just like you purchase parts to repair their products.
All our part reviews are solicited directly from other customers who have purchased this exact part. While we moderate these reviews for profanity, offensive language or personally identifiable information, these reviews are posted exactly as submitted and no alterations are made by our team.
All our customer repair instructions are solicited directly from other customers just like you who have purchased and replaced this exact part. While we moderate these reviews for profanity, offensive language or personally identifiable information, these reviews are posted exactly as submitted and no alterations are made by our team.
Based on data from past customer purchasing behaviors, these parts are most commonly purchased together along with the part you are viewing. These parts may be necessary or helpful to replace to complete your current repair.
All our installation videos are created and produced in collaboration with our in-house repair technician, Mark Sodja, who has helped millions of eReplacementParts customers over the last 13 years repair their products. Mark has years of experience in selling and repairing both commercial and residential products with a specialty in gas-powered equipment.
This data is collected from customers who submitted a repair instruction after replacing this exact part. Customers can rate how easy the repair was to complete and how long it took. We aggregate this data to provide a repair rating that allows customers to quickly determine the difficulty and time needed to perform their own repair.