
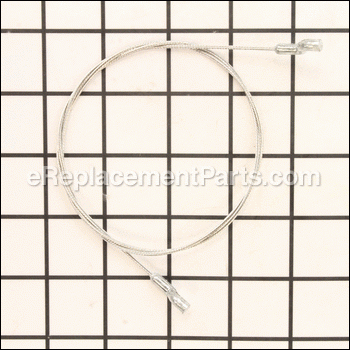
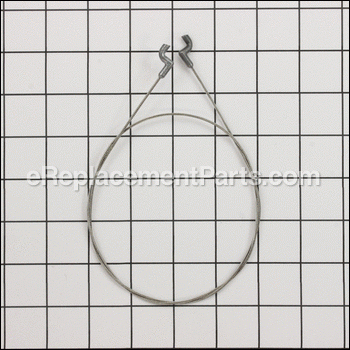

This is a genuine manufacturer-sourced part which is designed for use with Toro snowblowers. The clutch cable engages the deck. It is an identical replacement for a faulty or missing cable that was installed on a new unit. please make sure to check the appropriate diagrams of your model for the correct location and application of this part. Keep in mind this high-quality cable is sold individually.
Cable-clutch 117-9145
OEM part for: Toro
Part Number: 117-9145
$20.15
In Stock
Jump To:
Frequently Purchased Together ?

Compatibility
This part will fit the following 23 machines
Toro
38587 (311000001-311999999)(2011) Snowthrower View Diagrams & Manuals
38587 (310000001-310999999)(2010) Snowthrower View Diagrams & Manuals
38451 (313002000-313999999)(2013) 621 R Power Clear Snowblower View Diagrams & Manuals
38452 (313000001-313999999)(2013) 621 E Power Clear Snowblower View Diagrams & Manuals
38741 (315000001 - 315999999) Power Clear 721 R Snowthrower View Diagrams & Manuals
38742 (315000001 - 315999999) Power Clear 721 E Snowthrower View Diagrams & Manuals
38451 (312000001-312999999) 621 R Power Clear Snowblower View Diagrams & Manuals
38451 (313000001-313001999) 621 R Power Clear Snowblower View Diagrams & Manuals
38451 (314000001-314999999) 621 R Power Clear Snowblower View Diagrams & Manuals
38452 (312000001-312999999) 621 E Power Clear Snowblower View Diagrams & Manuals
38452 (314000001-314999999) 621 E Power Clear Snowblower View Diagrams & Manuals
38564 (314000001-314999999) Ccr 6053 Quick Clear Snowthrower, 2014 View Diagrams & Manuals
38587 (311000001-311020000) Snowthrower View Diagrams & Manuals
38587 (311020001-311999999) Snowthrower View Diagrams & Manuals
38593 (311000001-311999999) Power Clear Snowthrower, 2011 View Diagrams & Manuals
38741 (400000000-999999999) Power Clear 721 R Snowthrower View Diagrams & Manuals
38741 (316000001-316999999) Power Clear 721 R Snowthrower View Diagrams & Manuals
38742 (400000000-999999999) Power Clear 721 E Snowthrower View Diagrams & Manuals
38742 (316000001-316999999) Power Clear 721 E Snowthrower View Diagrams & Manuals
38564 (314000001-314999999)(2014) 38564, Ccr 6053 Quick Clear Snowthrower, 2014 (Sn 314000001-314999999) View Diagrams & Manuals
38593 (311000001-311999999)(2011) 38593, Power Clear Snowthrower, 2011 (Sn 311000001-311999999) View Diagrams & Manuals
38741 (315000001-315999999)(2015) 38741, Power Clear 721 R Snowthrower, 2015 (Sn 315000001-315999999) View Diagrams & Manuals
38742 (315000001-315999999)(2015) 38742, Power Clear 721 E Snowthrower, 2015 (Sn 315000001-315999999) View Diagrams & Manuals
Show More Compatible Models
This item works with the following types of products:
- Snowblower Parts
Customer Part Reviews ?
Average Rating (out of 5):
Click to filter by ratings:
5 stars
3
4 stars
1
3 stars
0
2 stars
0
1 stars
0
< PREV
- 1
Worked as expected
The part I ordered was "new" and installed easly on my snow blower. Thank you!!
Guest -
January 11, 2023
Verified Purchase
Great service!
I have ordered more than once from eReplacementParts and each time my order was accurate which was most important to me. I was able to install the parts myself which saved me a bunch of money. This is my first choice for part replacement. This company does a wonderful job!
Guest -
February 17, 2020
Verified Purchase
Easy repair, great part, quick delivery.
excellent fast service. Easy to order. snowblower is now working great. thanks for your help. if I have any other problems, I will be sure to order from your company. Have told others of your company. Alex
alex -
January 7, 2020
Verified Purchase
Very Pleased
Received the part quickly. I have not replaced it yet but it appears to be correct. Have not had snow since it broke.
Price was cheaper from U.S. with delivery than it was Canadian seller.
iGlobal -
March 31, 2020
Verified Purchase
t
t
t -
t days ago
Verified Purchase
eReplacementParts Team
t
Questions & Answers ?
Our customer Service team is at the ready daily to answer your part and product questions.

Ask our Team
We have a dedicated staff with decades of collective experience in helping customers just like you purchase parts to repair their products.
Does this fit my product?Questions & Answers for Cable-clutch
No questions have been asked yet
Customer Repair Instructions ?
All our customer repair instructions are solicited directly from other customers just like you who have purchased and replaced this exact part.
Clutch cable snapped in half.
Robert - January 5, 2017
👍 3 of 5 people found this instruction helpful
Tool Type
Snowblower
Difficulty
Easy
Time
15-30 minutes
Tools Used
Screwdriver, Socket set
Parts Used
Although this is a pretty simple repair, I had to perform my repair twice. The first time I failed to route the cable through the cable guide and it broke almost instantly. After reviewing the snowblower drawings more closely, I discovered the "hidden" (i say hidden because it is not obvious on the drawing or by visually inspecting the snow blower) cable guide. This time I removed the cable guide, one screw, routed the clutch cable through the guide, and reinstalled the guide. Everything is working fine.
Did you find this story helpful?
Thanks for voting and helping fellow customers!
End of clutch cable broke (pop metal) should be made out of steel !!
Steve - March 25, 2023
Tool Type
Snowblower
Difficulty
Medium
Time
30-60 minutes
Tools Used
Screwdriver, Pliers, Power Drill, Socket set, Wrench Set
Parts Used
Biggest problem l had was l just had a complete left knee replacement, l couldn't get on my hands and knees, end up putting the snowblower on the work bench, that worked out good !! That probably sound easy but picking up the snowblower feels like my new knee was going to pop out of my leg !! The new cable works great !!
Wish the ends of the cable was made out steel, instead pop metal !! Thanks
Wish the ends of the cable was made out steel, instead pop metal !! Thanks
Did you find this story helpful?
Thanks for voting and helping fellow customers!
The Handle clutch cable broke because the clutch cable guide's screw head had broken off and the clutch cable guide was lost in the snow.
Fred - February 6, 2019
👍 1 of 2 people found this instruction helpful
Tool Type
Snowblower
Difficulty
Easy
Time
30-60 minutes
Tools Used
Screwdriver, Socket set
Parts Used
(read all before attempting repair)
1. Remove the access panel, large pulley on the left and power belt. this gives you better access to hold the clutch cable guide so that you can keep the guide's locating peg in it's hole while screwing in the single phillips screw holding the part in the proper position.
2. The clutch cable should be threaded through and above the handle's opening to the body of the machine and fished out at the hole where the clutch cable guide is placed on the inside of the hole and and then the clutch cable should be threaded through the clutch cable guide into the "in" and "out" holes of the clutch cable guide before the clutch cable guide is attached to the machine with its screw.
3. Attach the clutch cable to the clutch assemblies far right upper hole so that there is no kinking and when the cable is pulled down, the clutch spring action is activated smoothly with no rubbing on any other surfaces with the cable.
4. Attach the other end of the cable to the handle and adjust as per the operator's manual.
5. Replace the power belt with it around all the pulleys first (again refer to manual's illustration) including the one that was removed and then replace the pulley that was removed using the bolt in the middle of the pulley.
6. Test the clutch handles action to be sure the clutch engages and disengages properly.
7. Replace the access panel.
8. Test with the engine running with the clutch handle forward to be sure the paddles stop and when the clutch handle is held down, the paddles spin.
Did you find this story helpful?
Thanks for voting and helping fellow customers!
OEM stands for Original Equipment Manufacturer and means the part you’re buying is sourced directly from the manufacturer who made your product. At eReplacementParts, we sell only genuine OEM parts, guaranteeing the part you’re purchasing is of better design and of higher quality than aftermarket parts.
Our product descriptions are a combination of data sourced directly from the manufacturers who made your product as well as content researched and curated by our content & customer service teams. This content is edited and reviewed internally before being made public to customers.
Our customer service team are at the ready daily to answer your part and product questions. We have a dedicated staff with decades of collective experience in helping customers just like you purchase parts to repair their products.
All our part reviews are solicited directly from other customers who have purchased this exact part. While we moderate these reviews for profanity, offensive language or personally identifiable information, these reviews are posted exactly as submitted and no alterations are made by our team.
All our customer repair instructions are solicited directly from other customers just like you who have purchased and replaced this exact part. While we moderate these reviews for profanity, offensive language or personally identifiable information, these reviews are posted exactly as submitted and no alterations are made by our team.
Based on data from past customer purchasing behaviors, these parts are most commonly purchased together along with the part you are viewing. These parts may be necessary or helpful to replace to complete your current repair.
All our installation videos are created and produced in collaboration with our in-house repair technician, Mark Sodja, who has helped millions of eReplacementParts customers over the last 13 years repair their products. Mark has years of experience in selling and repairing both commercial and residential products with a specialty in gas-powered equipment.
This data is collected from customers who submitted a repair instruction after replacing this exact part. Customers can rate how easy the repair was to complete and how long it took. We aggregate this data to provide a repair rating that allows customers to quickly determine the difficulty and time needed to perform their own repair.