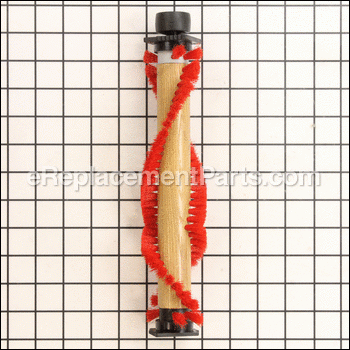

This Original OEM Wood Brushroll Assembly Includes: wood brushroll, red bristles, ball bearings, metal pulley, firm-fitting removable end caps. To keep your Oreck vacuum cleaner working at peak performance it is recommended to replace the Brushroll once a year.
Brush Roller O-016-1152
OEM part for: Oreck, Hoover
Part Number: O-016-1152
$39.48
Usually ships in 7 - 12 business days
7 - 12 business days
Jump To:
Frequently Purchased Together ?


Compatibility
This part will fit the following 80 machines
Oreck
XL2600HH 2000 Upright Vacuum Series View Diagrams & Manuals
XL2610HH 2000 Upright Vacuum Series View Diagrams & Manuals
XL2700HH 2000 Upright Vacuum Series View Diagrams & Manuals
XL2700RH 2000 Upright Vacuum Series View Diagrams & Manuals
XL2700RHY 2000 Upright Vacuum Series View Diagrams & Manuals
XL2800H2W 2000 Upright Vacuum Series View Diagrams & Manuals
XL2800H2B 2000 Upright Vacuum Series View Diagrams & Manuals
XL2800H2US 2000 Upright Vacuum Series View Diagrams & Manuals
XL2800HAY 2000 Upright Vacuum Series View Diagrams & Manuals
XL2540RH 2000 Upright Vacuum Series View Diagrams & Manuals
XL2320RH 2000 Upright Vacuum Series View Diagrams & Manuals
U2640RH 2000 Upright Vacuum Series View Diagrams & Manuals
U2510RH 2000 Upright Vacuum Series View Diagrams & Manuals
U2520RH 2000 Upright Vacuum Series View Diagrams & Manuals
U2530RH 2000 Upright Vacuum Series View Diagrams & Manuals
U2540RH 2000 Upright Vacuum Series View Diagrams & Manuals
XL2400RS 2000 Upright Vacuum Series View Diagrams & Manuals
U2420RSQ 2000 Upright Vacuum Series View Diagrams & Manuals
XL2330HS 2000 Upright Vacuum Series View Diagrams & Manuals
XL2330RS 2000 Upright Vacuum Series View Diagrams & Manuals
U2330RD 2000 Upright Vacuum Series View Diagrams & Manuals
U2740RD 2000 Upright Vacuum Series View Diagrams & Manuals
XL2250RS 2000 Upright Vacuum Series View Diagrams & Manuals
XL2260RS 2000 Upright Vacuum Series View Diagrams & Manuals
XL2500RH 2000 Upright Vacuum Series View Diagrams & Manuals
XL2500HH 2000 Upright Vacuum Series View Diagrams & Manuals
XL2200RS 2000 Upright Vacuum Series View Diagrams & Manuals
U2200RD 2000 Upright Vacuum Series View Diagrams & Manuals
XL2300RS 2000 Upright Vacuum Series View Diagrams & Manuals
XL2310RS 2000 Upright Vacuum Series View Diagrams & Manuals
U2310RSF 2000 Upright Vacuum Series View Diagrams & Manuals
U2310RD 2000 Upright Vacuum Series View Diagrams & Manuals
XL2450RH 2000 Upright Vacuum Series View Diagrams & Manuals
XL2000HH 2000 Upright Vacuum Series View Diagrams & Manuals
XL2100HH 2000 Upright Vacuum Series View Diagrams & Manuals
U2000HH 2000 Upright Vacuum Series View Diagrams & Manuals
XL2000RH 2000 Upright Vacuum Series View Diagrams & Manuals
XL2100RH 2000 Upright Vacuum Series View Diagrams & Manuals
XL2090RHM 2000 Upright Vacuum Series View Diagrams & Manuals
XL2070RH 2000 Upright Vacuum Series View Diagrams & Manuals
XL2090RSM 2000 Upright Vacuum Series View Diagrams & Manuals
XL2000RS 2000 Upright Vacuum Series View Diagrams & Manuals
XL2100RS 2000 Upright Vacuum Series View Diagrams & Manuals
U2250RS Classic Series View Diagrams & Manuals
XL3600HH 3000 Upright Series Vacuum View Diagrams & Manuals
XL3600RH 3000 Upright Series Vacuum View Diagrams & Manuals
XL3610HH 3000 Upright Series Vacuum View Diagrams & Manuals
U3700HH 3000 Upright Series Vacuum View Diagrams & Manuals
U3710HH 3000 Upright Series Vacuum View Diagrams & Manuals
U3770HH Silver Series Upright Vacuum View Diagrams & Manuals
U3771HH Silver Series Upright Vacuum View Diagrams & Manuals
U3760HH 3000 Series Vacuum View Diagrams & Manuals
U3720HG 3000 Series Vacuum View Diagrams & Manuals
U3720HR 3000 Series Vacuum View Diagrams & Manuals
XL3640HH 3000 Series Vacuum View Diagrams & Manuals
U3640RH 3000 Series Vacuum View Diagrams & Manuals
XL3800H2B 3000 Series Vacuum View Diagrams & Manuals
XL3900H2B 3000 Series Vacuum View Diagrams & Manuals
XL3910H2B 3000 Series Vacuum View Diagrams & Manuals
U3980H2B 3000 Series Vacuum View Diagrams & Manuals
U3990H2B 3000 Series Vacuum View Diagrams & Manuals
U4080H2B 4000 Series Upright Vacuum View Diagrams & Manuals
U4080H2R 4000 Series Upright Vacuum View Diagrams & Manuals
U4080H2Y 4000 Series Upright Vacuum View Diagrams & Manuals
U4070H2L 4000 Series Upright Vacuum View Diagrams & Manuals
U4090H2B 4000 Series Upright Vacuum View Diagrams & Manuals
U4090H2G 4000 Series Upright Vacuum View Diagrams & Manuals
U4090H2T 4000 Series Upright Vacuum View Diagrams & Manuals
U4090H2P 4000 Series Upright Vacuum View Diagrams & Manuals
U4490HH 4000 Series Upright Vacuum View Diagrams & Manuals
U4120H2B Intellashield Upright Vacuum View Diagrams & Manuals
U4120H2P Intellashield Upright Vacuum View Diagrams & Manuals
U4120H2R Intellashield Upright Vacuum View Diagrams & Manuals
U4150H2R Intellashield Gold Series Vacuum View Diagrams & Manuals
U4150H2P Intellashield Gold Series Vacuum Parts View Diagrams & Manuals
U4151H2G Intellashield Gold Series Vacuum Parts View Diagrams & Manuals
U2000EB 8lb. Upright Vacuum Cleaner View Diagrams & Manuals
XL9100HG Upright Vacuum View Diagrams & Manuals
U2000RB-1 Upright Endurolife V-Belt Vacuum View Diagrams & Manuals
Hoover
CH51012 Commercial Vacuum View Diagrams & Manuals
Show More Compatible Models
This item works with the following types of products:
- Vacuum Parts
This part replaces obsolete part #: 75104-02, 75930-03, 75202-01N, 75202-01, 75202-03
Customer Part Reviews ?
Average Rating (out of 5):
Click to filter by ratings:
5 stars
8
4 stars
1
3 stars
1
2 stars
0
1 stars
0
< PREV
- 1
Easy repair
Part was delivered in a timely fashion and was an exact fit. Very satisfied.
Guest -
December 1, 2023
Verified Purchase
Works like new
Easy repair, the sweeper works like new, parts were easy to find on the web site.
Dale -
July 21, 2023
Verified Purchase
Vacuum replacement
Exactly what I needed.
Guest -
October 19, 2022
Verified Purchase
easy repair
works grate
Frances -
July 19, 2022
Verified Purchase
Worked as expected
Part was new. Customer service was very helpful.
Guest -
October 9, 2019
Verified Purchase
works much better than old brush
brush for vacuum was easily installed
Guest -
September 30, 2019
Verified Purchase
Easy Repair - Great Price - Lightning Fast Shipping!
We ordered a brush roller for our Oreck XL. Installation was simple and our vacuum now purrs like a kitten and works like it's BRAND NEW!! We're thrilled!!
Guest -
May 6, 2019
Verified Purchase
Easy fix.
Part arrived in perfect condition and it took less than 10 minutes for my husband to install it. I'm assuming it will hold up well, as it appears to be identical to the original.
Guest -
May 3, 2019
Verified Purchase
Worked as expected. Shipping delay was worrisome.
Right part, right fit.
Guest -
August 25, 2020
Verified Purchase
Roller brush and belts.
Parts fit great. Vacuum works great again.
The problem I have is that I ordered May 18, 2019 and didnt receive my paid for order until June 08, 2019. When the item clearly shows in stock, it should shipped out within 2 or 3 days. Not weeks later.
I have purchased from e-replacement before and do not recall having to wait that long.
Please streamline or I will buy elsewhere.
Guest -
June 15, 2019
Verified Purchase
t
t
t -
t days ago
Verified Purchase
eReplacementParts Team
t
Questions & Answers ?
Our customer Service team is at the ready daily to answer your part and product questions.

Ask our Team
We have a dedicated staff with decades of collective experience in helping customers just like you purchase parts to repair their products.
Does this fit my product?Questions & Answers for Brush Roller
Does this really fit this vacuum?
Ali
for model number XL2100RHS
asked on 2023-12-12
Hello Ali, thank you for your question. Yes. The original is no longer made, and the manufacturer has replaced it with this one, so it does look different but functions the same. We hope this helps.
eReplacementParts Team December 12, 2023
Just want to be sure it fits 2100 xl commercial
Cheryl
for model number oreck xl 2100RHS
asked on 2023-04-20
Hi Cheryl,
Thank you for your question. Yes, this would be the correct brush roller for your vacuum. We hope this helps!
eReplacementParts Team April 20, 2023
I want the rod with brushes for oreck vacuum moder u4190h2 pd cost as soon as possible
Sharif
asked on 2023-02-20
Hello Sharif, Thank you for your inquiry. We have researched the model you have provided and have found the part you are looking for is O-016-1152. We hope this helps.
eReplacementParts Team February 20, 2023
Customer Repair Instructions ?
All our customer repair instructions are solicited directly from other customers just like you who have purchased and replaced this exact part.
Beater bar brushes were worn.
Thomas - November 28, 2017
👍 4 of 5 people found this instruction helpful
Tool Type
Vacuum
Difficulty
Medium
Time
15-30 minutes
Tools Used
Screwdriver
Parts Used
1. Removed 5 screws in the base of the vacuum and removed the base.
2. Removed the belt.
3. Removed the existing beater bar, making note of the orientation of the install.
4. Replaced the beater bar.
5. Replaced the belt. Be careful. I had the belt misaligned on the motor and ended up having to replace the belt.
6. Replaced the base and 5 screws.
2. Removed the belt.
3. Removed the existing beater bar, making note of the orientation of the install.
4. Replaced the beater bar.
5. Replaced the belt. Be careful. I had the belt misaligned on the motor and ended up having to replace the belt.
6. Replaced the base and 5 screws.
Did you find this story helpful?
Thanks for voting and helping fellow customers!
roller old and needed replaced
julian - February 1, 2019
👍 1 of 1 people found this instruction helpful
Tool Type
Vacuum
Difficulty
Easy
Time
Less than 15 minutes
Tools Used
Screwdriver
Parts Used
removed screws from bottom
Did you find this story helpful?
Thanks for voting and helping fellow customers!
Brushing vacuum wasn't picking up as well as it could. Worn down bristles
Patricia - November 7, 2018
👍 1 of 1 people found this instruction helpful
Tool Type
Vacuum
Difficulty
Medium
Time
Less than 15 minutes
Tools Used
Screwdriver
Parts Used
On the Oreck vacuum cleaner you have to unscrew 4 screws to take the bottom of plate off to reveal the brush and belt locations. Then the belt has to be taken off plus the damaged brush to put in a new one. Replacing the brush wasn't difficult, just line up the ends properly but getting the belt back on is very difficult because it is extremely tight. A woman would find this very hard to do because it has to be stretched to some degree and requires a lot of strength to do this.
Did you find this story helpful?
Thanks for voting and helping fellow customers!
Vacuum wasn't picking up debris consistently.
Abel - March 13, 2017
👍 1 of 1 people found this instruction helpful
Tool Type
Vacuum
Difficulty
Easy
Time
Less than 15 minutes
Tools Used
Screwdriver
Removed screws on bottom cover to access brush roller and belt. Easily removed brush roller and drive belt assembly and replaced both with new parts. Followed directions from users manual to proper direction of brush roller.
Did you find this story helpful?
Thanks for voting and helping fellow customers!
Needed brushes replaced
Herb - October 27, 2016
👍 1 of 1 people found this instruction helpful
Tool Type
Vacuum
Difficulty
Easy
Time
15-30 minutes
Tools Used
Screwdriver
Took the bottom cover off, snap the old brushes off, then snapped the new ones in.
Did you find this story helpful?
Thanks for voting and helping fellow customers!
Roller brush was worn
Mark - November 3, 2021
Tool Type
Vacuum
Difficulty
Easy
Time
Less than 15 minutes
Tools Used
Screwdriver, None
Parts Used
1)Removed bottom plate of vacuum.
2)Removed drive belt.
3)Removed old brush.
4)Positioned new brush in proper orientation.
5)Installed a new belt while I was at it.
6)Screwed bottom plate back on vacuum.
7)Glides and picks up debris much better
2)Removed drive belt.
3)Removed old brush.
4)Positioned new brush in proper orientation.
5)Installed a new belt while I was at it.
6)Screwed bottom plate back on vacuum.
7)Glides and picks up debris much better
Did you find this story helpful?
Thanks for voting and helping fellow customers!
Brush roller was wore out.
Patrick - March 3, 2021
Tool Type
Vacuum
Difficulty
Easy
Time
Less than 15 minutes
Tools Used
Screwdriver
Parts Used
Removed screws and old roller . Installed new with belt.
Did you find this story helpful?
Thanks for voting and helping fellow customers!
Roller brush bristles were worn down too low to brush carpet when vacuuming.
Richard - September 25, 2020
Tool Type
Vacuum
Difficulty
Easy
Time
Less than 15 minutes
Tools Used
Screwdriver
Parts Used
There are five screws holding the bottom base plate covering the brush roller assembly. Remove those and the bottom will lift off exposing the brush assembly. Lift the brush roller out of the slots and disengage from the drive belt. Clean and inspect the suction entry and surrounding area. Check belt for wear, but the recommendation From Oreck is to replace when changing brush roll due to stretching. Drop new brush roller into slot noting which position you want the brush roller to sit. There are two positions clearly marked on the roller end blocks, regular and special. Pull Drive belt onto the brush roller drive pulley. Check for even, flush fit in slots. Replace cover making sure all seals are in the proper slots around the front of the vacuum. Replace the five screws in the base plate. Test the vacuum on a rug or carpet. There should be nice, visible brush strokes on the surface being vacuumed.
Did you find this story helpful?
Thanks for voting and helping fellow customers!
Bearing on roller was froze.
Don - February 6, 2020
Tool Type
Vacuum
Difficulty
Easy
Time
Less than 15 minutes
Tools Used
Screwdriver
Parts Used
If i have to explain it you shouldn’t be doing it. Very simple.
Did you find this story helpful?
Thanks for voting and helping fellow customers!
The small ball bearing on the belt side of the beater brush failed.
Kathy - August 28, 2019
Tool Type
Vacuum
Difficulty
Easy
Time
Less than 15 minutes
Tools Used
Screwdriver
Parts Used
Unable to find a replacement bearing, I ordered the complete brush. Perfect fit OEM and reasonably priced!
Did you find this story helpful?
Thanks for voting and helping fellow customers!
Load More Install Stories
OEM stands for Original Equipment Manufacturer and means the part you’re buying is sourced directly from the manufacturer who made your product. At eReplacementParts, we sell only genuine OEM parts, guaranteeing the part you’re purchasing is of better design and of higher quality than aftermarket parts.
Our product descriptions are a combination of data sourced directly from the manufacturers who made your product as well as content researched and curated by our content & customer service teams. This content is edited and reviewed internally before being made public to customers.
Our customer service team are at the ready daily to answer your part and product questions. We have a dedicated staff with decades of collective experience in helping customers just like you purchase parts to repair their products.
All our part reviews are solicited directly from other customers who have purchased this exact part. While we moderate these reviews for profanity, offensive language or personally identifiable information, these reviews are posted exactly as submitted and no alterations are made by our team.
All our customer repair instructions are solicited directly from other customers just like you who have purchased and replaced this exact part. While we moderate these reviews for profanity, offensive language or personally identifiable information, these reviews are posted exactly as submitted and no alterations are made by our team.
Based on data from past customer purchasing behaviors, these parts are most commonly purchased together along with the part you are viewing. These parts may be necessary or helpful to replace to complete your current repair.
All our installation videos are created and produced in collaboration with our in-house repair technician, Mark Sodja, who has helped millions of eReplacementParts customers over the last 13 years repair their products. Mark has years of experience in selling and repairing both commercial and residential products with a specialty in gas-powered equipment.
This data is collected from customers who submitted a repair instruction after replacing this exact part. Customers can rate how easy the repair was to complete and how long it took. We aggregate this data to provide a repair rating that allows customers to quickly determine the difficulty and time needed to perform their own repair.