

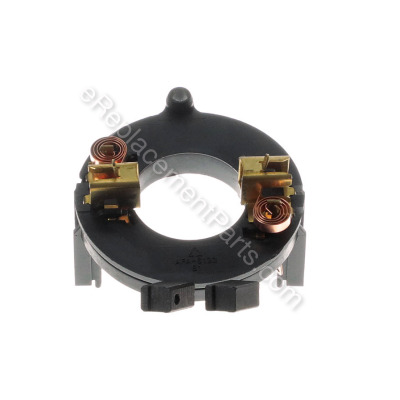

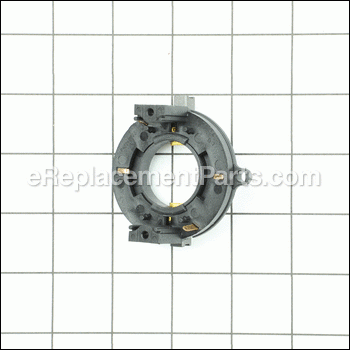
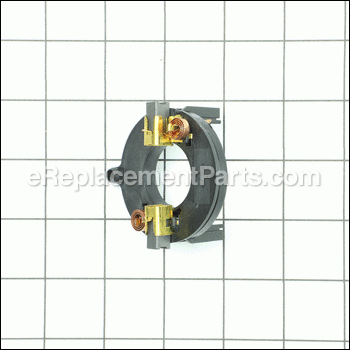

It is an authentic OEM supplied replacement item that is specially made for use with Dewalt and Black and Decker drills. Carbon brushes play an important role by conducting the current in electric power tools. It is a complete assembly which includes one durable plastic plate, two metal brush holders with springs and two carbon brushes with lead wires.
Brush Plate Assembly 5140092-63
OEM part for: DeWALT, Black and Decker
Part Number: 5140092-63
$11.73
In Stock
Compatibility
This part will fit the following 9 machines
Black and Decker
DR550 Type 1 Drill View Diagrams & Manuals
FS7000D Type 1 Drill View Diagrams & Manuals
DR650 Type 1 Drill View Diagrams & Manuals
DR550 Type 3 1/2 Drill/Driver View Diagrams & Manuals
DR650B (Type 2) 1/2 Hammer Drill View Diagrams & Manuals
DR650B (Type 3) 1/2 Hammer Drill View Diagrams & Manuals
DR550-B3LZ (Type 3) 1/2 Drill/Driver View Diagrams & Manuals
DR650K (Type 1) 1/2 Hammer Drill View Diagrams & Manuals
DR650 (Type 2) 1/2 Hammer Drill Power Tool View Diagrams & Manuals
Show More Compatible Models
This item works with the following types of products:
- Drill Parts
This part replaces obsolete part #: 639435-01, 639435-00
Customer Part Reviews ?
Average Rating (out of 5):
Click to filter by ratings:
5 stars
3
4 stars
1
3 stars
0
2 stars
0
1 stars
0
< PREV
- 1
Drill part
Part was correct and worked fine. Great service!
Douglas -
February 15, 2023
Verified Purchase
fit perfect and repaired my drill
fit great and was the right part ,shipping was quick
Bill -
July 21, 2019
Verified Purchase
Great product
It was exactly what I needed. I was a little concerned that I would not get the entire piece because the picture was not clear enough. Work d perfectly. Very happy.
Guest -
June 28, 2019
Verified Purchase
Good part expensive shipping
The part was fine fit perfectly and wasn't working condition The shipping cost was almost the cost of the part
Guest -
January 27, 2020
Verified Purchase
t
t
t -
t days ago
Verified Purchase
eReplacementParts Team
t
Questions & Answers ?
Our customer Service team is at the ready daily to answer your part and product questions.

Ask our Team
We have a dedicated staff with decades of collective experience in helping customers just like you purchase parts to repair their products.
Does this fit my product?Questions & Answers for Brush Plate Assembly
No questions have been asked yet
Customer Repair Instructions ?
All our customer repair instructions are solicited directly from other customers just like you who have purchased and replaced this exact part.
The drill would only operate in reverse. I found the wire to the brushes had burnt off upon taking it apart.
James - December 1, 2015
👍 3 of 4 people found this instruction helpful
Tool Type
Electric Drill
Difficulty
Medium
Time
15-30 minutes
Tools Used
Screwdriver, Needle nose pliers, torx screwdriver
Parts Used
Separated the drill. Removed the old brush assembly and installed the replacement. A bit difficult getting the wiring back in place after connecting them to the new bushing assembly. Be sure to get them back in their original place, or they will contact the spinning armature. Don't lose the circular trigger spring when separating the two halves of the drill, or your efforts will be for nothing. The drill works great now, and saved me from buying a new one.
Did you find this story helpful?
Thanks for voting and helping fellow customers!
Drill stopped working, on inspection found brush plate damaged.
colin - May 18, 2016
👍 1 of 2 people found this instruction helpful
Tool Type
Electric Drill
Difficulty
Easy
Time
15-30 minutes
Tools Used
Screwdriver, soldering iron
Parts Used
Remove all screws on drill body and gear box, pull gear box section towards chuck. Remove half of handle without the round trigger or lock button. When removing the other half be careful with the forward and reverse mechanism and spring, lift the coil up ,remove screws from brush plate remember to take note of the wires at the back brush plate. Use solder iron to remove them of the back of brush plate. When replacing the new brush plate push up the brushes to spring , replace brush plate and re- solder the wires. Replace all screws in brush plate to coil replace forward and reverse mechanism and spring, refit handle and all screws. and you are ready to go .
Did you find this story helpful?
Thanks for voting and helping fellow customers!
Brush assembly bad
Danny - February 13, 2016
👍 1 of 2 people found this instruction helpful
Tool Type
Electric Drill
Difficulty
Easy
Time
30-60 minutes
Tools Used
Screwdriver, Soldering iron
Parts Used
Remove screws from drill casing.Remove 2 screws holding brush assembly in the drill. Solder 2 wires on new brush assembly. Put drill back together.
Did you find this story helpful?
Thanks for voting and helping fellow customers!
Drill stopped and needed a new brush assembly
Jon - November 20, 2017
👍 0 of 1 people found this instruction helpful
Tool Type
Electric Drill
Difficulty
Easy
Time
15-30 minutes
Tools Used
Screwdriver, Soldering iron
Parts Used
Opened the drill. Unsoldered the wires to the brush assembly. Soldered the new assembly to the same wires and reassembled.
Did you find this story helpful?
Thanks for voting and helping fellow customers!
Not working, no power.
Enrique - March 8, 2017
👍 0 of 1 people found this instruction helpful
Tool Type
Electric Drill
Difficulty
Easy
Time
Less than 15 minutes
Tools Used
, Torx driver, soldering iron, soldering lead
Parts Used
1. Remove the torx screw.
2. Remove the trigger switch
3. Remove the armature
4. Unsolder the two wire using the soldering iron
5. Replace with the new carbon plate assembly,
6. Put the carbon brushes
7. Put the armature, but push outward the carbon first.
8. Assemble the drill and done.
2. Remove the trigger switch
3. Remove the armature
4. Unsolder the two wire using the soldering iron
5. Replace with the new carbon plate assembly,
6. Put the carbon brushes
7. Put the armature, but push outward the carbon first.
8. Assemble the drill and done.
Did you find this story helpful?
Thanks for voting and helping fellow customers!
OEM stands for Original Equipment Manufacturer and means the part you’re buying is sourced directly from the manufacturer who made your product. At eReplacementParts, we sell only genuine OEM parts, guaranteeing the part you’re purchasing is of better design and of higher quality than aftermarket parts.
Our product descriptions are a combination of data sourced directly from the manufacturers who made your product as well as content researched and curated by our content & customer service teams. This content is edited and reviewed internally before being made public to customers.
Our customer service team are at the ready daily to answer your part and product questions. We have a dedicated staff with decades of collective experience in helping customers just like you purchase parts to repair their products.
All our part reviews are solicited directly from other customers who have purchased this exact part. While we moderate these reviews for profanity, offensive language or personally identifiable information, these reviews are posted exactly as submitted and no alterations are made by our team.
All our customer repair instructions are solicited directly from other customers just like you who have purchased and replaced this exact part. While we moderate these reviews for profanity, offensive language or personally identifiable information, these reviews are posted exactly as submitted and no alterations are made by our team.
Based on data from past customer purchasing behaviors, these parts are most commonly purchased together along with the part you are viewing. These parts may be necessary or helpful to replace to complete your current repair.
All our installation videos are created and produced in collaboration with our in-house repair technician, Mark Sodja, who has helped millions of eReplacementParts customers over the last 13 years repair their products. Mark has years of experience in selling and repairing both commercial and residential products with a specialty in gas-powered equipment.
This data is collected from customers who submitted a repair instruction after replacing this exact part. Customers can rate how easy the repair was to complete and how long it took. We aggregate this data to provide a repair rating that allows customers to quickly determine the difficulty and time needed to perform their own repair.