eReplacementParts.com
877-346-4814
Black and Decker Parts

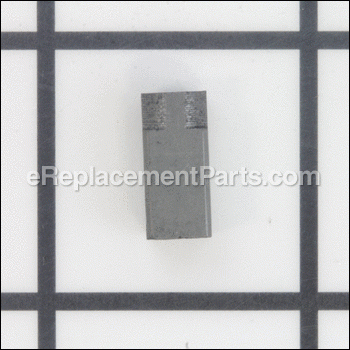
Brush 089754-01

OEM part for: Porter Cable, Black and Decker

Part Number: 089754-01


Install
Videos!
Brush - 089754-01:Porter Cable 360 View
Brush - 089754-01:Porter CableBrush - 089754-01:Porter CableBrush - 089754-01:Porter Cable 360 View
In Stock
Ships within 1 business day
Easy 15-30 minutes (11 rated repairs)?
OEM: Original Equipment Manufacturer ?
Porter CableBlack and Decker
Does this d-block d-md-none fit my product?

Product Description ?

Genuine Black and Decker replacement part
This brush is sold individually, 2 are needed for the tools shown below
It is always best to replace both brushes, even if only one is worn.

Worn brushes frequently are the cause behind a motor running poorly.
Replacing brushes can fix a motor that’s operating intermittently.
New brushes can restore a motor’s electric braking.

Carbon brushes are one of the most commonly replaced power tool parts. This is because carbon brushes are wear items, meaning that through friction and use they will gradually wear away until they need replacing. Worn brushes are a common causes of intermittent motor function, reduced electric braking and reduced motor power. A worn-out brush will often be worn down near to the wire lead and can be cracked, pitted, or burned. When replacing carbon brushes, be sure to inspect your armature for burns, cracks, or other damage which can indicate larger motor problem

  • Classification: Part
  • Weight: 0.01 lbs.
  • Shipping: Ships Worldwide

Frequently Purchased Together ?

Compatibility

This part will fit the following 138 machines

Black and Decker

JS200 Type 2 Jigsaw View Diagrams & Manuals
JS200 Type 3 Jigsaw View Diagrams & Manuals
JS300 Type 1 Jigsaw View Diagrams & Manuals
JS300 Type 2 Jigsaw View Diagrams & Manuals
JS300 Type 3 Jigsaw View Diagrams & Manuals
7552 Type 2 Jigsaw View Diagrams & Manuals
FS500 Type 1 Sander View Diagrams & Manuals
FS500 Type 2 Sander View Diagrams & Manuals
FS540 Type 1 Sander View Diagrams & Manuals
FS500-B Type 1 Sander View Diagrams & Manuals
FS520 Type 1 Sander View Diagrams & Manuals
FS550 Type 1 Sander View Diagrams & Manuals
FS1000 Type 1 Sander View Diagrams & Manuals
TV700 Type 2 Sander View Diagrams & Manuals
RO100 Type 1 Sander View Diagrams & Manuals
RO100 Type 2 Sander View Diagrams & Manuals
RO100B Type 4 Sander View Diagrams & Manuals
RO100 Type 4 Sander View Diagrams & Manuals
Q800 Type 1 Sander View Diagrams & Manuals
Q800 Type 2 Sander View Diagrams & Manuals
TS720 Type 1 Sander View Diagrams & Manuals
TV750 Type 1 Sander View Diagrams & Manuals
TV750 Type 2 Sander View Diagrams & Manuals
BT300 Type 2 Sander View Diagrams & Manuals
9411 Type 1 Band Saw View Diagrams & Manuals
9411 Type 2 Band Saw View Diagrams & Manuals
9411 Type 3 Band Saw View Diagrams & Manuals
7204 Type 1 1/2 In Drill View Diagrams & Manuals
7204 Type 2 1/2 In Drill View Diagrams & Manuals
ST100 Type 1 9 String Trimmer View Diagrams & Manuals
ST100 Type 2 9 String Trimmer View Diagrams & Manuals
TR250 Type 1 16 Hedge Trimmer View Diagrams & Manuals
TR250 Type 2 16 Hedge Trimmer View Diagrams & Manuals
TR130 Type 1 13 Hedge Trimmer View Diagrams & Manuals
TR130 Type 2 13 Hedge Trimmer View Diagrams & Manuals
TR160 Type 1 16 Hedge Trimmer View Diagrams & Manuals
TR160 Type 2 16 Hedge Trimmer View Diagrams & Manuals
8114 Type 1 Shrub and Hedge Trimmer View Diagrams & Manuals
8114 Type 11 Shrub and Hedge Trimmer View Diagrams & Manuals
8114 Type 2 Shrub and Hedge Trimmer View Diagrams & Manuals
8114 Type 21 Shrub and Hedge Trimmer View Diagrams & Manuals
8114 Type 3 Shrub and Hedge Trimmer View Diagrams & Manuals
8114 Type 31 Shrub and Hedge Trimmer View Diagrams & Manuals
8114 Type 4 Shrub and Hedge Trimmer View Diagrams & Manuals
8114 Type 41 Shrub and Hedge Trimmer View Diagrams & Manuals
8114 Type 5 Shrub and Hedge Trimmer View Diagrams & Manuals
8115-04 Type 2 Hedge Trimmer View Diagrams & Manuals
8115 Type 1 Utility Hedge Trimmer View Diagrams & Manuals
8115 Type 2 Utility Hedge Trimmer View Diagrams & Manuals
8115 Type 3 Utility Hedge Trimmer View Diagrams & Manuals
8115 Type 4 Utility Hedge Trimmer View Diagrams & Manuals
8118 Type 1 Deluxe Hedge Trimmer View Diagrams & Manuals
8118 Type 2 Deluxe Hedge Trimmer View Diagrams & Manuals
8124 Type 1 Deluxe Shrub and Hedge Trimmer View Diagrams & Manuals
8124 Type 11 Deluxe Shrub and Hedge Trimmer View Diagrams & Manuals
8124 Type 2 Deluxe Shrub and Hedge Trimmer View Diagrams & Manuals
8124 Type 22 Deluxe Shrub and Hedge Trimmer View Diagrams & Manuals
8124 Type 3 Deluxe Shrub and Hedge Trimmer View Diagrams & Manuals
8124 Type 31 Deluxe Shrub and Hedge Trimmer View Diagrams & Manuals
8124 Type 4 Deluxe Shrub and Hedge Trimmer View Diagrams & Manuals
8124 Type 41 Deluxe Shrub and Hedge Trimmer View Diagrams & Manuals
8124 Type 5 Deluxe Shrub and Hedge Trimmer View Diagrams & Manuals
8124 Type 51 Deluxe Shrub and Hedge Trimmer View Diagrams & Manuals
8124 Type 6 Deluxe Shrub and Hedge Trimmer View Diagrams & Manuals
8124 Type 7 Deluxe Shrub and Hedge Trimmer View Diagrams & Manuals
8124 Type 8 Deluxe Shrub and Hedge Trimmer View Diagrams & Manuals
8124 Type 9 Deluxe Shrub and Hedge Trimmer View Diagrams & Manuals
8124-04 Type 8 Hedge Trimmer View Diagrams & Manuals
8127-04 Type 1 16 Hedge Trimmer View Diagrams & Manuals
8127 Type 1 16 Utility Hedge Trimmer View Diagrams & Manuals
8127 Type 2 16 Utility Hedge Trimmer View Diagrams & Manuals
8127 Type 3 16 Utility Hedge Trimmer View Diagrams & Manuals
8127 Type 4 16 Utility Hedge Trimmer View Diagrams & Manuals
8134-04 Type 1 18 Hedge Trimmer View Diagrams & Manuals
8134-04 Type 2 18 Hedge Trimmer View Diagrams & Manuals
8134-04 Type 3 18 Hedge Trimmer View Diagrams & Manuals
8134 Type 1 Deluxe Hedge Trimmer View Diagrams & Manuals
8134 Type 2 Deluxe Hedge Trimmer View Diagrams & Manuals
8134 Type 3 Deluxe Hedge Trimmer View Diagrams & Manuals
8134 Type 4 Deluxe Hedge Trimmer View Diagrams & Manuals
8134 Type 5 Deluxe Hedge Trimmer View Diagrams & Manuals
8144 Type 1 Shrub and Hedge Trimmer View Diagrams & Manuals
8144 Type 11 Shrub and Hedge Trimmer View Diagrams & Manuals
8144 Type 2 Shrub and Hedge Trimmer View Diagrams & Manuals
8144 Type 21 Shrub and Hedge Trimmer View Diagrams & Manuals
8144 Type 3 Shrub and Hedge Trimmer View Diagrams & Manuals
8144 Type 4 Shrub and Hedge Trimmer View Diagrams & Manuals
8144 Type 5 Shrub and Hedge Trimmer View Diagrams & Manuals
8144 Type 6 Shrub and Hedge Trimmer View Diagrams & Manuals
8144 Type 7 Shrub and Hedge Trimmer View Diagrams & Manuals
8144 Type 8 Shrub and Hedge Trimmer View Diagrams & Manuals
JS100 Type 1 Single Speed Jig Saw View Diagrams & Manuals
JS200 Type 1 Variable Speed Jig Saw View Diagrams & Manuals
JS200U Type 2 Jig Saw View Diagrams & Manuals
JS300KV Type 1 Jig Saw View Diagrams & Manuals
TV400 Type 3 T.V. Variable Speed Jig Saw View Diagrams & Manuals
QS540B Type 1 1/4 Sheet Sander View Diagrams & Manuals
FS540K Type 1 1/4 Sheet Sander View Diagrams & Manuals
7530 Type 2 2-Speed Jig Saw View Diagrams & Manuals
7530 Type 3 2-Speed Jig Saw View Diagrams & Manuals
7530 Type 4 2-Speed Jig Saw View Diagrams & Manuals
318-06 (Type 1) 3/8 Drill View Diagrams & Manuals
TR250-BDK (Type 1) 16In. Hedge Trimmer View Diagrams & Manuals
TR250-BDK (Type 2) 16In. Hedge Trimmer View Diagrams & Manuals
JS200K (Type 2) Jig Saw View Diagrams & Manuals
JS200K (Type 3) Jig Saw View Diagrams & Manuals
JS300K (Type 1) 3.5a Vs Jig Saw Kit View Diagrams & Manuals
JS300K (Type 2) 3.5a Vs Jig Saw Kit View Diagrams & Manuals
JS300K (Type 3) 3.5a Vs Jig Saw Kit View Diagrams & Manuals
Q800K (Type 1) Quantum 5 R.O.S. View Diagrams & Manuals
Q800K (Type 2) Quantum 5 R.O.S. View Diagrams & Manuals
BDERO100 (Type 1) Epp Random Orbit San View Diagrams & Manuals
JS200B (Type 1) Vs Jigsaw W/Bonus Accys. View Diagrams & Manuals
RO100K (Type 4) 5 Palm Grip Ros View Diagrams & Manuals
B8144 (Type 1) 22in Cd Hedge Trim View Diagrams & Manuals
B8144 (Type 11) 22in Cd Hedge Trim View Diagrams & Manuals
B8144 (Type 2) 22in Cd Hedge Trim View Diagrams & Manuals
B8144 (Type 21) 22in Cd Hedge Trim View Diagrams & Manuals
B8144 (Type 3) 22in Cd Hedge Trim View Diagrams & Manuals
B8144 (Type 4) 22in Cd Hedge Trim View Diagrams & Manuals
B8144 (Type 5) 22in Cd Hedge Trim View Diagrams & Manuals
B8144 (Type 6) 22in Cd Hedge Trim View Diagrams & Manuals
B8144 (Type 7) 22in Cd Hedge Trim View Diagrams & Manuals
B8144 (Type 8) 22in Cd Hedge Trim View Diagrams & Manuals
B8134 (Type 1) 18in Dlx Hedge Trim View Diagrams & Manuals
B8134 (Type 2) 18in Dlx Hedge Trim View Diagrams & Manuals
B8134 (Type 3) 18in Dlx Hedge Trim View Diagrams & Manuals
B8134 (Type 4) 18in Dlx Hedge Trim View Diagrams & Manuals
B8134 (Type 5) 18in Dlx Hedge Trim View Diagrams & Manuals
JS200K A (Type 2) 3.5a Vs Jig Saw Kit View Diagrams & Manuals
7552 (Type 1) Jigsaw Power Tool View Diagrams & Manuals
BDERO100-B3 (Type 1) Orbital Sander Power Tool View Diagrams & Manuals
BDERO100-BR (Type 1) Orbital Sander Power Tool View Diagrams & Manuals
RO100 (Type 5) 5 Palm Grip Ro Sander Power Tool View Diagrams & Manuals
B8127 (Type 1) 16in Utility Hedge Trimmer Power Tool View Diagrams & Manuals
B8127 (Type 2) 16in Utility Hedge Trimmer Power Tool View Diagrams & Manuals
B8127 (Type 3) 16in Utility Hedge Trimmer Power Tool View Diagrams & Manuals
B8127 (Type 4) 16in Utility Hedge Trimmer Power Tool View Diagrams & Manuals
Show More Compatible Models
Don't see yours? Try searching our site for :

This item works with the following types of products:

  • Jig saw Parts
  • Saw Parts
  • Sander Parts
  • Band Saw Parts
  • Drill Parts
  • Trimmer Parts
  • Hedge Trimmer Parts

Customer Part Reviews ?

5
Average Rating (out of 5):
6 Reviews
Click to filter by ratings:
5 stars
6
4 stars
0
3 stars
0
2 stars
0
1 stars
0
  • Highest Rating
  • Most Recent
< PREV
  • 1
NEXT >
  • Just what I needed
    Turned out I only needed one brush. But I ordered two. So now I've got a backup in my jigsaw box. Thank you.
    Guest - July 24, 2023 Verified Purchase
    Easy repair with quality parts
    It took quite a while for the parts to arrive due to supply chain issues but they kept me informed. Parts arrived and I completed the repair of my saw with no issues. Saved myself from having to buy a new jig saw.
    Guest - July 5, 2023 Verified Purchase
    Just what I needed.
    The part fits perfectly and saved my tool from the trash heap!
    Guest - February 1, 2022 Verified Purchase
    Brushes fit perfect
    Repaired my jig-saw, runs like brand new, at a fraction of the price of a new one.
    david - November 23, 2021 Verified Purchase
    Hedge clipper repair
    The parts for my Black & Decker hedge clipper arrived in good shape and fit OK My hedge clipper is now working again . Thank you.
    Guest - June 6, 2020 Verified Purchase
    Perfect
    Received the brushes fast, installed in my hedge trimmer I've had for 12 years and it fired right up again. Thank you so much!!!!!
    Guest - September 16, 2019 Verified Purchase
    t
    t
    t - t days ago Verified Purchase
    eReplacementParts Team
    t

    Questions & Answers ?

    Our customer Service team is at the ready daily to answer your part and product questions.

    photo of team member
    Ask our Team

    We have a dedicated staff with decades of collective experience in helping customers just like you purchase parts to repair their products.

    Does this fit my product?

    Questions & Answers for Brush


    No questions have been asked yet

    Customer Repair Instructions ?

    All our customer repair instructions are solicited directly from other customers just like you who have purchased and replaced this exact part.

    Easy 15-30 minutes (11 rated repairs)?

    Brushes gone bad .

    barry - April 18, 2017
    👍 3 of 3 people found this instruction helpful
    Tool Type

    Jig saw

    Difficulty

    Medium

    Time

    15-30 minutes

    Tools Used

    Screwdriver, Pliers

    Remove the screws from the housing
    Carefully separate the housing halves
    Disconnect the brush lead
    Pull the brush holder out
    Remove the spring and old brush
    Insert the new brush in the holder
    Install the complete assembly in its place and connect the lead
    Screw the housings back together
    Did you find this story helpful?
    Thanks for voting and helping fellow customers!

    Motor Brush worn out

    Frederick - February 29, 2016
    👍 2 of 2 people found this instruction helpful
    Tool Type

    Jig saw

    Difficulty

    Medium

    Time

    30-60 minutes

    Tools Used

    Pliers, Torx Driver

    Remove the metal platen from the Jig Saw base
    Removed the Torx head screws and open the Jig saw molded body
    Attention: There is a square Nut for the Jig Saw Base that will become loosw when the body is opened!
    Gently remove the Brush Housing from its position against the motor commutator
    Remove the contact clip from the Brush housing that secures the brush and spring
    Remove the Brush and Spring from the H Brush Housing
    Remove the Spring from the worn Brush and assemble to the replacement Brush
    Insert the Brush and spring back into the Brush Housing
    Return the brush housing back into position in motor frame against the commutator
    Re-assemble the Jig saw Body and screws
    Re-assemble the Jig saw base
    Did you find this story helpful?
    Thanks for voting and helping fellow customers!

    Worn out motor brushes.

    Clyde - August 24, 2016
    👍 1 of 1 people found this instruction helpful
    Tool Type

    Saw

    Difficulty

    Easy

    Time

    15-30 minutes

    Tools Used

    Screwdriver, Socket set

    !. Removed the housing screws.
    2.Separated the housing.
    3. Removed the brush holders.
    4. Exchanged the old brushes with the new.
    5. Reinstalled the brush holders.
    6.Placed the housing parts together.
    7. Reinstalled the housing screws.
    Did you find this story helpful?
    Thanks for voting and helping fellow customers!

    Odd noises when using the sander, lots of sparks from brushes

    Paul - May 23, 2016
    👍 1 of 1 people found this instruction helpful
    Tool Type

    Sander

    Difficulty

    Easy

    Time

    15-30 minutes

    Tools Used

    Screwdriver

    Unscrew body halves, carefully remove the half that the screw heads came from making sure the parts stay in place, disconnect the wires from the connectors on the brush holders, replace the brushes, reconnect the wires, clean the dust from the inside of the sander, reassemble.


    Did you find this story helpful?
    Thanks for voting and helping fellow customers!

    Jig saw stopped working

    Michael - November 19, 2015
    👍 1 of 1 people found this instruction helpful
    Tool Type

    Jig saw

    Difficulty

    Medium

    Time

    Less than 15 minutes

    Tools Used

    Screwdriver

    Brushes have been worn out.
    Ordered brushes and changed them.
    The hardest part was to open jig saw, because heximal key was needed.
    Open the case, carefully pull out the brush holders and change brushes.
    Close the case.
    Did you find this story helpful?
    Thanks for voting and helping fellow customers!

    Don't start.

    Mihai - November 5, 2023
    Tool Type

    Jig saw

    Difficulty

    Easy

    Time

    Less than 15 minutes

    Tools Used

    Screwdriver, Pliers

    Removed old brush and replaced with the new one.
    Did you find this story helpful?
    Thanks for voting and helping fellow customers!

    Didn’t rotate

    Rick - May 11, 2023
    Tool Type

    Jig saw

    Difficulty

    Medium

    Time

    15-30 minutes

    Tools Used

    Screwdriver, None

    Separated case and took brushes out of holder and then installed new and reinstalled other half of case and tested
    Did you find this story helpful?
    Thanks for voting and helping fellow customers!

    Nothing

    Jamey - April 8, 2021
    Tool Type

    Sander

    Difficulty

    Easy

    Time

    15-30 minutes

    Tools Used

    Screwdriver, Torx Bits

    Removed old pad, replaced with new pad.
    Have not installed brushes yet. Still a few hours left in my old brushes.
    Did you find this story helpful?
    Thanks for voting and helping fellow customers!

    Runs out of brush

    Edgar - April 5, 2019
    Tool Type

    Jig saw

    Difficulty

    Easy

    Time

    15-30 minutes

    Tools Used

    Screwdriver

    Open up my jigsaw by using screwdriver tools and replaced/install the carbon brush to new one.
    Did you find this story helpful?
    Thanks for voting and helping fellow customers!

    Jig saw got hot and stopped running after heavy use.

    Sean - November 16, 2017
    Tool Type

    Jig saw

    Difficulty

    Easy

    Time

    Less than 15 minutes

    Tools Used

    Screwdriver, Pliers, Torx driver

    1. Remove the shoe from the bottom of the saw by removing the flat-head screw holding it in place.
    2. Lay saw on its side, with the Torx screws facing up.
    3. Remove all Torx screws.
    4. Separate the case halves, taking care not to lose the shoe nut, vacuum bag flapper door and trigger lock.
    5. Take note of the position of the brush holder and the routing of the white wire. Unplug the top-side white brush wire push-on connector from one side of the motor. Lift out the black plastic brush holder from its place against the motor.
    6. Using a small, flat-head screwdriver, carefully pry back the wire connector from the brush holder assembly, taking care not to lose the spring.
    7. Replace brush and re-install the spring, and then carefully push wire connector back into brush holder, taking care that the brush pokes through the end opening.
    8. Replace the brush holder and reconnect the white wire to the motor.
    9. Do the bottom-side brush assembly on other side of the motor the same way. Use a needle-nose pliers to reconnect the white wire to the motor before placing the brush holder.
    10. Carefully refit the case sides, making sure that the trigger, trigger lock, shoe nut and vacuum flapper door are all in place and can freely move. Do not force the sides together--they should easily fall into place. If they don't, stop and recheck that something hasn't come out of place.
    11. Replace the Torx screws.
    12. Replace the bottom shoe.
    13. Pat yourself on the back for a job well done!
    Did you find this story helpful?
    Thanks for voting and helping fellow customers!

    OEM stands for Original Equipment Manufacturer and means the part you’re buying is sourced directly from the manufacturer who made your product. At eReplacementParts, we sell only genuine OEM parts, guaranteeing the part you’re purchasing is of better design and of higher quality than aftermarket parts.

    Our product descriptions are a combination of data sourced directly from the manufacturers who made your product as well as content researched and curated by our content & customer service teams. This content is edited and reviewed internally before being made public to customers.

    Our customer service team are at the ready daily to answer your part and product questions. We have a dedicated staff with decades of collective experience in helping customers just like you purchase parts to repair their products.

    All our part reviews are solicited directly from other customers who have purchased this exact part. While we moderate these reviews for profanity, offensive language or personally identifiable information, these reviews are posted exactly as submitted and no alterations are made by our team.

    All our customer repair instructions are solicited directly from other customers just like you who have purchased and replaced this exact part. While we moderate these reviews for profanity, offensive language or personally identifiable information, these reviews are posted exactly as submitted and no alterations are made by our team.

    Based on data from past customer purchasing behaviors, these parts are most commonly purchased together along with the part you are viewing. These parts may be necessary or helpful to replace to complete your current repair.

    All our installation videos are created and produced in collaboration with our in-house repair technician, Mark Sodja, who has helped millions of eReplacementParts customers over the last 13 years repair their products. Mark has years of experience in selling and repairing both commercial and residential products with a specialty in gas-powered equipment.

    This data is collected from customers who submitted a repair instruction after replacing this exact part. Customers can rate how easy the repair was to complete and how long it took. We aggregate this data to provide a repair rating that allows customers to quickly determine the difficulty and time needed to perform their own repair.

    eReplacementParts.com
    7174 South 400 West
    Suite 5
    Midvale, UT 84047
    visa mastercard discover american express PayPal