
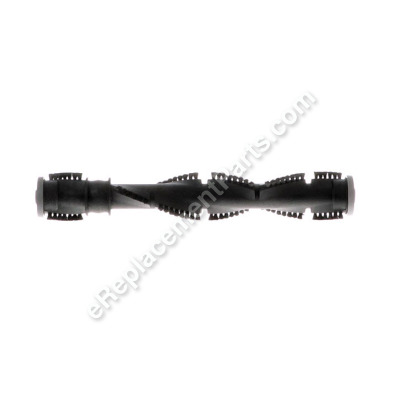


This is a genuine OEM approved replacement part designed for use with Bissell vacuum cleaners. It spins to pick up the dust and dirt from the carpet. This part is made out of plastic and it is sold individually.
When replacing this part you will need a screwdriver.
• Remove access plate and take off the belt
• Remove old brush roller and snap the new one into place
• Connect belt to the spindle
• Secure the access plate
15 Brush Assembly B-203-1283
OEM part for: Bissell
Part Number: B-203-1283
$36.23
In Stock
Product Description ?
- Classification: Part
- Weight: 0.77 lbs.
- Shipping: Ships Worldwide
Compatibility
This part will fit the following 6 machines
Bissell
6585 Powerforce Turbo Bagless Upright Vacuum View Diagrams & Manuals
4104 Powergroom Pet Upright Vacuum View Diagrams & Manuals
92L3P PowerClean Upright Carpet Cleaner View Diagrams & Manuals
98N4 Powergroom Helix Rewind View Diagrams & Manuals
92L3W Powerclean Bagless Upright Vacuum View Diagrams & Manuals
1044 Powerglide Pet View Diagrams & Manuals
Show More Compatible Models
This item works with the following types of products:
- Vacuum Parts
Customer Part Reviews ?
Average Rating (out of 5):
Click to filter by ratings:
5 stars
2
4 stars
0
3 stars
0
2 stars
0
1 stars
0
< PREV
- 1
Vacuum cleaner brush
Item arrived quickly and was as described.
Guest -
January 20, 2020
Verified Purchase
Saved us a new vacuum cleaner
The part was easy to install. My wife actually did the work and is thankful to have our vacuum cleaner working again. Took some time to get this "discontinued" part.
Guest -
July 4, 2019
Verified Purchase
t
t
t -
t days ago
Verified Purchase
eReplacementParts Team
t
Questions & Answers ?
Our customer Service team is at the ready daily to answer your part and product questions.

Ask our Team
We have a dedicated staff with decades of collective experience in helping customers just like you purchase parts to repair their products.
Does this fit my product?Questions & Answers for 15 Brush Assembly
No questions have been asked yet
Customer Repair Instructions ?
All our customer repair instructions are solicited directly from other customers just like you who have purchased and replaced this exact part.
Brush jammed then overheated and seized onto spindle ends, brush would not spin.
David - April 4, 2016
👍 2 of 2 people found this instruction helpful
Tool Type
Vacuum
Difficulty
Easy
Time
Less than 15 minutes
Tools Used
, No tools needed for this repair on this vacuum model
Parts Used
Belt and brush housing cover on this Bissell model 4104-C upright vacuum needs no tools to remove they use push tabs. Remove cover. Slide out old brush assembly, remove belt -mine was broken-, slide belt over belt groove roller end and then slide opposite end into brush slot, push belt onto motor spindle and pull the belt end of brush assembly to line up with 2nd slot and slide into place. Replace cover.
Did you find this story helpful?
Thanks for voting and helping fellow customers!
The bearings in the brush assembly (or beater bar) wore out.
Ted - February 10, 2018
👍 1 of 1 people found this instruction helpful
Tool Type
Vacuum
Difficulty
Easy
Time
Less than 15 minutes
Tools Used
Screwdriver
Parts Used
1. Used a screw driver to pry back the clips holding the brush assembly cover in place.
2. Removed the old brush assembly.
3. Installed the new brush assembly by inserting it into the two slots at the ends.
4. Replaced the brush assembly cover.
2. Removed the old brush assembly.
3. Installed the new brush assembly by inserting it into the two slots at the ends.
4. Replaced the brush assembly cover.
Did you find this story helpful?
Thanks for voting and helping fellow customers!
The belt broke and the roller was not turning easily.
Janis - December 5, 2017
👍 1 of 1 people found this instruction helpful
Tool Type
Vacuum
Difficulty
Easy
Time
Less than 15 minutes
Tools Used
1. Removed the under cover.
2. Installed the belt and the roller.
3. Replaced the cover and started vacuuming. Worked well.
2. Installed the belt and the roller.
3. Replaced the cover and started vacuuming. Worked well.
Did you find this story helpful?
Thanks for voting and helping fellow customers!
Brush ends caps seized up
brian - September 24, 2019
Tool Type
Vacuum
Difficulty
Easy
Time
Less than 15 minutes
Tools Used
Screwdriver
Parts Used
Did you find this story helpful?
Thanks for voting and helping fellow customers!
Roller bar wouldn't turn
Colleen - July 2, 2018
Tool Type
Vacuum
Difficulty
Easy
Time
Less than 15 minutes
Tools Used
Screwdriver
New roller and belt. Very easy to repair and the vacuum is working great now!
Did you find this story helpful?
Thanks for voting and helping fellow customers!
Brush assembly fell apart damaging case drum assembly
Michael - December 13, 2017
Tool Type
Vacuum
Difficulty
Easy
Time
15-30 minutes
Tools Used
Screwdriver
Ordered proper parts with model number and replaced parts damaged. Very easy to replace parts took only a few minutes. Much easier than replacing entire vaccuum. Thank you e-replacement parts for your prompt delivery of parts which only took a few days to get. Happy Holidays!!!!
Did you find this story helpful?
Thanks for voting and helping fellow customers!
Brush assembly froze up due to age.
Thomas - November 15, 2017
Tool Type
Vacuum
Difficulty
Easy
Time
Less than 15 minutes
Tools Used
Unsnapped the bottom plate, removed the roller, installed the new roller and the belt. No tools needed.
Did you find this story helpful?
Thanks for voting and helping fellow customers!
15" brush bearnings were bad
Herbert - September 10, 2017
Tool Type
Vacuum
Difficulty
Easy
Time
15-30 minutes
Tools Used
Screwdriver
Remove the access plate
Remove the old brush roll and the old belt
Install the new belt around the motor shaft
Install the belt around the brush roll
Insert the brush roll into the housing
Install the access plate
Remove the old brush roll and the old belt
Install the new belt around the motor shaft
Install the belt around the brush roll
Insert the brush roll into the housing
Install the access plate
Did you find this story helpful?
Thanks for voting and helping fellow customers!
Broken parts
Joe - February 9, 2016
Tool Type
Vacuum
Difficulty
Easy
Time
15-30 minutes
Tools Used
Screwdriver, none
When installing and removing case Drum Assembly leave the handle down
Did you find this story helpful?
Thanks for voting and helping fellow customers!
OEM stands for Original Equipment Manufacturer and means the part you’re buying is sourced directly from the manufacturer who made your product. At eReplacementParts, we sell only genuine OEM parts, guaranteeing the part you’re purchasing is of better design and of higher quality than aftermarket parts.
Our product descriptions are a combination of data sourced directly from the manufacturers who made your product as well as content researched and curated by our content & customer service teams. This content is edited and reviewed internally before being made public to customers.
Our customer service team are at the ready daily to answer your part and product questions. We have a dedicated staff with decades of collective experience in helping customers just like you purchase parts to repair their products.
All our part reviews are solicited directly from other customers who have purchased this exact part. While we moderate these reviews for profanity, offensive language or personally identifiable information, these reviews are posted exactly as submitted and no alterations are made by our team.
All our customer repair instructions are solicited directly from other customers just like you who have purchased and replaced this exact part. While we moderate these reviews for profanity, offensive language or personally identifiable information, these reviews are posted exactly as submitted and no alterations are made by our team.
Based on data from past customer purchasing behaviors, these parts are most commonly purchased together along with the part you are viewing. These parts may be necessary or helpful to replace to complete your current repair.
All our installation videos are created and produced in collaboration with our in-house repair technician, Mark Sodja, who has helped millions of eReplacementParts customers over the last 13 years repair their products. Mark has years of experience in selling and repairing both commercial and residential products with a specialty in gas-powered equipment.
This data is collected from customers who submitted a repair instruction after replacing this exact part. Customers can rate how easy the repair was to complete and how long it took. We aggregate this data to provide a repair rating that allows customers to quickly determine the difficulty and time needed to perform their own repair.