
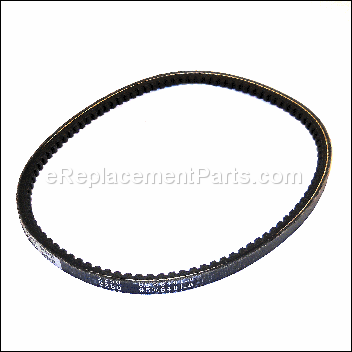
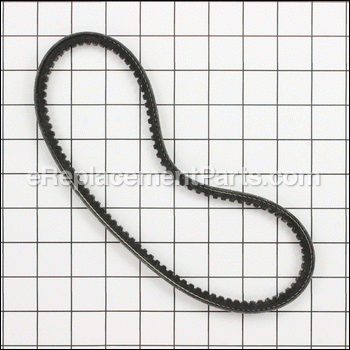

This is an authentic Jet replacement part manufactured for use with wood lathes. The special belt is cogged and used to link the motor pulley to the spindle pulley to drive the lathe. This belt is available as an individual replacement part, please see model diagram for associative parts.
Belt JWL1442-141
OEM part for: Jet
Part Number: JWL1442-141
$51.36
In Stock
Compatibility
This part will fit the following 2 machines
Jet
JWL-1442VS (2007) Wood Lathe View Diagrams & Manuals
JWL-1442VS (2010) Wood Lathe View Diagrams & Manuals
This item works with the following types of products:
- Lathe Parts
Customer Part Reviews ?
Average Rating (out of 5):
Click to filter by ratings:
5 stars
2
4 stars
0
3 stars
0
2 stars
0
1 stars
0
< PREV
- 1
belt for my jet lathe
Staff was easy to deal with-knew what they were doing!!! Very helpful!!!
Guest -
January 13, 2022
Verified Purchase
Part arrived quickly and works perfectly.
I ordered several parts for my Jet wood lathe. The belt was an after thought once I had it open to replace the bearings and pulley. The belt came in one day and I'm glad I did it. The lathe feels new again.
Guest -
January 14, 2020
Verified Purchase
t
t
t -
t days ago
Verified Purchase
eReplacementParts Team
t
Questions & Answers ?
Our customer Service team is at the ready daily to answer your part and product questions.

Ask our Team
We have a dedicated staff with decades of collective experience in helping customers just like you purchase parts to repair their products.
Does this fit my product?Questions & Answers for Belt
No questions have been asked yet
Customer Repair Instructions ?
All our customer repair instructions are solicited directly from other customers just like you who have purchased and replaced this exact part.
Jet model 1442 wood lathe belt was stretched to the point where it was slipping
Daniel - December 29, 2016
👍 1 of 1 people found this instruction helpful
Tool Type
Lathe
Difficulty
Medium
Time
1-2 hours
Tools Used
Screwdriver, Pliers, Wrench Set, Adjustable Wrench, Hex wrench set
Parts Used
1. Remove the motor housing cover and vacuum debris from inside drive area
2. Loosen the set screws on the hand wheel
3. Unscrew the hand wheel
4. Remove the socket head cap screws and unthread the clamping nut
5. Remove the e-ring from the drive shaft
6. Loosen the set screws on the right-hand pulley
7. Use the dowel and hammer to drive the spindle toward the headstock
8. Inspect reeves drive and clean pulleys and shafts
9. When the spindle clears the inside of the casting replace the belt
10. Reassemble in reverse order
11. Be sure the shaft key is placed in the keyway and the keyways are aligned
12. The new belt will likely not fit like the old one therefore the reeves drive may need to be adjusted
13. When reassembly is completed turn the lathe on and check operation
Did you find this story helpful?
Thanks for voting and helping fellow customers!
Motor pully wore out, broke belt
Thomas - March 27, 2018
Tool Type
Lathe
Difficulty
Medium
Time
30-60 minutes
Tools Used
Screwdriver, Pliers, Rubber hammer, snap ring pliers
Removed motor pulley from the motor. Removed headstock spindle from the headstock to replace belt. Clean motor shaft really well before mounting new pulley.
Did you find this story helpful?
Thanks for voting and helping fellow customers!
Belt stretched
Edward - August 31, 2016
Tool Type
Lathe
Difficulty
Medium
Time
15-30 minutes
Tools Used
Screwdriver, Hex wrench
Parts Used
Removed Motor housing cover
Removed Loosen 2 set screws on hand wheel and unthread wheel
Loosen socket head cap screw to unthread the clamping nut
Remove e wring from spindle
loosen 2 set screws in the right hand pulley
Use a wood dowel to knock spindle toward headstock
Replace belt and reassemble in reverse order
Removed Loosen 2 set screws on hand wheel and unthread wheel
Loosen socket head cap screw to unthread the clamping nut
Remove e wring from spindle
loosen 2 set screws in the right hand pulley
Use a wood dowel to knock spindle toward headstock
Replace belt and reassemble in reverse order
Did you find this story helpful?
Thanks for voting and helping fellow customers!
Belt broke
William - June 17, 2016
Tool Type
Lathe
Difficulty
Hard
Time
1-2 hours
Tools Used
Screwdriver, Pliers, Snap ring pliers, allen wrenches, bearing puller
Parts Used
Follow the instructions in the owners manual for replacing a belt i.e.
1. Place belt in its highest speed range.
2. Remove belt cover housing.
3. Loosen sets screws in the hand wheel and unthread hand wheel. ( Make sure there isn't a second set screw under the first - sometimes installed at the factory as a locking mechanism)
4.Loosen socket head cap screw and unthread clamping nut.
5. Remove e-ring from spindle (This requires the spindle to be knocked over a little with a wooden block in order to get at it).
6. Loosen set screws in top pulley. (check for second set of set screws).
7. Use dowel rod or wooden block to knock spindle towards tailstock.
8. Once the spindle clears the housing the belt can be replaced by placing it over bottom pulley and top pulley. (This process requires that the key way be lined up completely in the slot on the spindle and in both halves of the upper pulley while the set screw is tightened to hold the pulley in place. A second set of hands is almost essential to this process. Replacing the e-ring is a little more difficult than removing it and requires needle nose pliers and a screw driver.)
9. If the bottom pulley needs to be realigned, snap ring pliers can remove the snap ring on the end of the motor shaft so the spring can be removed and the pulley halves aligned on the key way the same as the upper pulley. In order to replace the spring, cut a u shaped hole in a small piece of 1/4 inch plywood ( about 4"by 2"). Using two quick release clamps on the back of the motor stretched to the piece of plywood on the motor shaft, clamp both at the same time to pull the spring closed and replace snap ring. Again two sets of hands are almost essential.
10. If the bottom pulley needs to be adjusted, a bearing puller can be used on the outer half of the pulley to compress the spring and make the necessary adjustment to the fixed half of the pulley.
11. When aligning the two halves of the pulleys, make sure the slots on the inner face of the pulleys are lined up perfectly so the pulleys can compress when the Reeves Drive is engaged.
Did you find this story helpful?
Thanks for voting and helping fellow customers!
OEM stands for Original Equipment Manufacturer and means the part you’re buying is sourced directly from the manufacturer who made your product. At eReplacementParts, we sell only genuine OEM parts, guaranteeing the part you’re purchasing is of better design and of higher quality than aftermarket parts.
Our product descriptions are a combination of data sourced directly from the manufacturers who made your product as well as content researched and curated by our content & customer service teams. This content is edited and reviewed internally before being made public to customers.
Our customer service team are at the ready daily to answer your part and product questions. We have a dedicated staff with decades of collective experience in helping customers just like you purchase parts to repair their products.
All our part reviews are solicited directly from other customers who have purchased this exact part. While we moderate these reviews for profanity, offensive language or personally identifiable information, these reviews are posted exactly as submitted and no alterations are made by our team.
All our customer repair instructions are solicited directly from other customers just like you who have purchased and replaced this exact part. While we moderate these reviews for profanity, offensive language or personally identifiable information, these reviews are posted exactly as submitted and no alterations are made by our team.
Based on data from past customer purchasing behaviors, these parts are most commonly purchased together along with the part you are viewing. These parts may be necessary or helpful to replace to complete your current repair.
All our installation videos are created and produced in collaboration with our in-house repair technician, Mark Sodja, who has helped millions of eReplacementParts customers over the last 13 years repair their products. Mark has years of experience in selling and repairing both commercial and residential products with a specialty in gas-powered equipment.
This data is collected from customers who submitted a repair instruction after replacing this exact part. Customers can rate how easy the repair was to complete and how long it took. We aggregate this data to provide a repair rating that allows customers to quickly determine the difficulty and time needed to perform their own repair.