

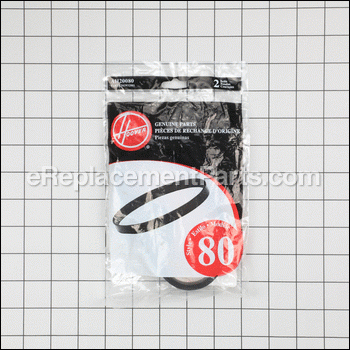

This genuine OEM supplied part is specially made for use with Hoover vacuums. The purpose of the belt is to drive the brush roller assembly. It is installed on the shaft of the motor and on the end of the brush roller. It provides an identical replacement for a missing or a faulty component that was installed on a new unit. Please make sure to check the owners manual and the appropriate diagrams of your model for the correct location and application of this part. Keep in mind this high-quality belt is made of durable rubber and is sold individually.
NOTE: We do have an article and a video on how to install this belt. Here is the link to it.
How to Replace a Vacuum Belt
Belt-stretch 2 Pack H-AH20080
OEM part for: Hoover
Part Number: H-AH20080
$4.99
In Stock
Jump To:
Product Description ?
- Classification: Part
- Weight: 0.01 lbs.
- Shipping: Ships Worldwide
Frequently Purchased Together ?


Compatibility
This part will fit the following 174 machines
Hoover
C1703-900 WindTunnel Professional View Diagrams & Manuals
C1705-900 WindTunnel Professional View Diagrams & Manuals
C1712 WindTunnel Professional View Diagrams & Manuals
CH50010 Professional Series View Diagrams & Manuals
C1701 WindTunnel View Diagrams & Manuals
UH70115 WindTunnel Series View Diagrams & Manuals
UH70116 WindTunnel Series View Diagrams & Manuals
UH70110 WindTunnel Series Rewind View Diagrams & Manuals
UH70120 WindTunnel Series Rewind View Diagrams & Manuals
UH70100 WindTunnel Purely Pet View Diagrams & Manuals
UH70105 WindTunnel Purely Pet View Diagrams & Manuals
UH70106 WindTunnel Purely Pet View Diagrams & Manuals
UH70107 WindTunnel Purely Pet View Diagrams & Manuals
U5140-900 Widepath Tempo Alllergen Filtration View Diagrams & Manuals
UH30015 Widepath Tempo Alllergen Filtration View Diagrams & Manuals
UH30030HD Widepath Tempo Alllergen Filtration View Diagrams & Manuals
U5458-900 WindTunnel Supreme View Diagrams & Manuals
U5458-910 WindTunnel Supreme View Diagrams & Manuals
U5460-900 WindTunnel Supreme View Diagrams & Manuals
U5462-900 WindTunnel Supreme View Diagrams & Manuals
U5467-900 WindTunnel Supreme View Diagrams & Manuals
U5468-900 WindTunnel Supreme View Diagrams & Manuals
U5470-900 WindTunnel Supreme View Diagrams & Manuals
U5471-900 WindTunnel Supreme View Diagrams & Manuals
U5472-900 WindTunnel Supreme View Diagrams & Manuals
U5473-900 WindTunnel Supreme View Diagrams & Manuals
U5481-900 WindTunnel Supreme View Diagrams & Manuals
U5491-900 WindTunnel Supreme View Diagrams & Manuals
U5491-950 WindTunnel Supreme View Diagrams & Manuals
UH30070 WindTunnel Supreme View Diagrams & Manuals
UH30085 WindTunnel Lite Bagged Upright Vacuum View Diagrams & Manuals
U5753-900 WindTunnel Bagless View Diagrams & Manuals
U5760-900 WindTunnel Bagless View Diagrams & Manuals
U5786-900 WindTunnel Bagless View Diagrams & Manuals
UH40115 WindTunnel Bagless View Diagrams & Manuals
UH40125 WindTunnel Bagless View Diagrams & Manuals
U5762-900 WindTunnel Bagless View Diagrams & Manuals
UH40020 WindTunnel Bagless View Diagrams & Manuals
UH40065 WindTunnel Bagless View Diagrams & Manuals
UH40145B WindTunnel Bagless View Diagrams & Manuals
UH40265 WindTunnel Bagless View Diagrams & Manuals
U5396900 WindTunnel View Diagrams & Manuals
EH51000 Wind Tunnel Bagged Upright Vacuum View Diagrams & Manuals
UH70035B WindTunnel Cyclonic Upright Vacuum View Diagrams & Manuals
UH70831 WindTunnel 2 Rewind Pet Bagless Upright View Diagrams & Manuals
UH70820 WindTunnel 2 Rewind Bagless Upright View Diagrams & Manuals
UH70816 WindTunnel High Capacity Pet Bagless Upright View Diagrams & Manuals
UH70809 WindTunnel 2 High Capacity View Diagrams & Manuals
UH70800 WindTunnel 2 High Capacity Bagless Upright View Diagrams & Manuals
Uh70830 Windtunnel2 Rewind Pet View Diagrams & Manuals
Uh70825 Windtunnel 2 Rewind Bagless View Diagrams & Manuals
Uh70831Pc Windtunnel 2 Rewind Pet Bagless View Diagrams & Manuals
CH53005 Task Vac Hard Bag Lightweight View Diagrams & Manuals
CH53010 Task Vac Bagless View Diagrams & Manuals
UH70801 WindTunnel 2 - High Capacity View Diagrams & Manuals
UH70805 WindTunnel 2 - High Capacity View Diagrams & Manuals
UH70810 WindTunnel 2 - High Capacity Pet View Diagrams & Manuals
UH70811 WindTunnel 2 - High Capacity Pet View Diagrams & Manuals
UH70815 WindTunnel 2 - High Capacity Pet View Diagrams & Manuals
UH70819 WindTunnel 2 - High Capacity Pet View Diagrams & Manuals
UH70821 WindTunnel 2 Rewind View Diagrams & Manuals
UH70829 WindTunnel 2 Rewind View Diagrams & Manuals
UH70832 WindTunnel 2 Rewind View Diagrams & Manuals
UH70839 WindTunnel 2 Rewind View Diagrams & Manuals
UH71003 Elite Rewind View Diagrams & Manuals
UH71009 Elite Rewind View Diagrams & Manuals
UH71011 Elite Rewind View Diagrams & Manuals
UH72003 Elite Max Capacity View Diagrams & Manuals
UH72011 Elite Max Capacity View Diagrams & Manuals
U5140 Upright Vacuum View Diagrams & Manuals
U5142 Upright Vacuum View Diagrams & Manuals
U5144 Upright Vacuum View Diagrams & Manuals
U5145 Upright Vacuum View Diagrams & Manuals
U5146 Upright Vacuum View Diagrams & Manuals
U5147 Upright Vacuum View Diagrams & Manuals
U5148 Upright Vacuum View Diagrams & Manuals
U5150 Upright Vacuum View Diagrams & Manuals
U5154 Upright Vacuum View Diagrams & Manuals
U5155 Upright Vacuum View Diagrams & Manuals
U5156 Upright Vacuum View Diagrams & Manuals
U5295 Upright Vacuum View Diagrams & Manuals
U5301 Upright Vacuum View Diagrams & Manuals
U5302 Upright Vacuum View Diagrams & Manuals
U5330 Upright Vacuum View Diagrams & Manuals
U5344 Upright Vacuum View Diagrams & Manuals
U5347 Upright Vacuum View Diagrams & Manuals
U5348 Upright Vacuum View Diagrams & Manuals
U5351 Upright Vacuum View Diagrams & Manuals
U5361 Upright Vacuum View Diagrams & Manuals
U5363 Upright Vacuum View Diagrams & Manuals
U5365 Upright Vacuum View Diagrams & Manuals
U5393 Upright Vacuum View Diagrams & Manuals
U5394 Upright Vacuum View Diagrams & Manuals
U5395 Upright Vacuum View Diagrams & Manuals
U5396 Upright Vacuum View Diagrams & Manuals
U5397 Upright Vacuum View Diagrams & Manuals
U5398 Upright Vacuum View Diagrams & Manuals
U5399 Upright Vacuum View Diagrams & Manuals
U5402 Upright Vacuum View Diagrams & Manuals
U5403 Upright Vacuum View Diagrams & Manuals
U5409 Upright Vacuum View Diagrams & Manuals
U5415 Upright Vacuum View Diagrams & Manuals
U5416 Windtunnel Upright Vacuum View Diagrams & Manuals
U5420 Bagged Widepath Upright Vacuum View Diagrams & Manuals
U5421 Upright Vacuum View Diagrams & Manuals
U5423 Upright Vacuum View Diagrams & Manuals
U5432 Upright Vacuum View Diagrams & Manuals
U5433 Upright Vacuum View Diagrams & Manuals
U5434 Upright Vacuum View Diagrams & Manuals
U5435 Upright Vacuum View Diagrams & Manuals
U5436 Upright Vacuum View Diagrams & Manuals
U5437 Upright Vacuum View Diagrams & Manuals
U5438 Windtunnel Upright Vacuum View Diagrams & Manuals
U5439 Upright Vacuum View Diagrams & Manuals
U5443 Upright Vacuum View Diagrams & Manuals
U5444 Upright Vacuum View Diagrams & Manuals
U5445 Upright Vacuum View Diagrams & Manuals
U5446 Upright Vacuum View Diagrams & Manuals
U5447 Windtunnel Upright Vacuum View Diagrams & Manuals
U5449 Upright Vacuum View Diagrams & Manuals
U5450 Upright Vacuum View Diagrams & Manuals
U5451 Upright Vacuum View Diagrams & Manuals
U5452 Upright Vacuum View Diagrams & Manuals
U5453 Windtunnel Supreme Bagged Upright View Diagrams & Manuals
U5454 Upright Vacuum View Diagrams & Manuals
U5456 Upright Vacuum View Diagrams & Manuals
U5457 Upright Vacuum View Diagrams & Manuals
U5458 Windtunnel Supreme View Diagrams & Manuals
U5459 Windtunnel Upright Vacuum View Diagrams & Manuals
U5460 Upright Vacuum View Diagrams & Manuals
U5461 Upright Vacuum View Diagrams & Manuals
U5462 Windtunnel Supreme View Diagrams & Manuals
U5463 Upright Vacuum View Diagrams & Manuals
U5464 Upright Vacuum View Diagrams & Manuals
U5465 Upright Vacuum View Diagrams & Manuals
U5467 Windtunnel Supreme View Diagrams & Manuals
U5468 Windtunnel Supreme View Diagrams & Manuals
U5469 Upright Vacuum View Diagrams & Manuals
U5470 Windtunnel Supreme View Diagrams & Manuals
U5471 Windtunnel Supreme View Diagrams & Manuals
U5472 Upright Vacuum View Diagrams & Manuals
U5473 Windtunnel Supreme View Diagrams & Manuals
U5475 Upright Vacuum View Diagrams & Manuals
U5477 Windtunnel Upright Vacuum View Diagrams & Manuals
U5481 Windtunnel Supreme View Diagrams & Manuals
U5491 Windtunnel Supreme View Diagrams & Manuals
U5700 Windtunnel Bagless Upright View Diagrams & Manuals
U5720 Windtunnel Bagless Upright View Diagrams & Manuals
U5721 Windtunnel Bagless Upright View Diagrams & Manuals
U5722 Windtunnel Upright Vacuum View Diagrams & Manuals
U5723 Upright Vacuum View Diagrams & Manuals
U5725 Upright Vacuum View Diagrams & Manuals
U5750 Windtunnel Bagless Upright View Diagrams & Manuals
U5751 Upright Vacuum View Diagrams & Manuals
U5752 Upright Vacuum View Diagrams & Manuals
U5753 Upright Vacuum View Diagrams & Manuals
U5755 Windtunnel Bagless Upright View Diagrams & Manuals
U5756 Upright Vacuum View Diagrams & Manuals
U5757 Windtunnel Bagless Upright View Diagrams & Manuals
U5758 Upright Vacuum View Diagrams & Manuals
U5759 Upright Vacuum View Diagrams & Manuals
U5760 Windtunnel Bagless View Diagrams & Manuals
U5761 Windtunnel Bagless Upright View Diagrams & Manuals
U5762 Upright Vacuum View Diagrams & Manuals
U5763 Upright Vacuum View Diagrams & Manuals
U5765 Upright Vacuum View Diagrams & Manuals
U5767 Upright Vacuum View Diagrams & Manuals
U5768 Upright Vacuum View Diagrams & Manuals
U5769 Upright Vacuum View Diagrams & Manuals
U5786 Windtunnel Bagless Upright View Diagrams & Manuals
C1703 Commercial Bagged Upright View Diagrams & Manuals
C1705 Commercial Bagged Upright View Diagrams & Manuals
CH54013 Commercial Vacuum Hushtone View Diagrams & Manuals
CH54015 Commercial Vacuum Hushtone View Diagrams & Manuals
Show More Compatible Models
This item works with the following types of products:
- Vacuum Parts
This part replaces obsolete part #: AH20080, H-562932001, H-38528058, 562932001, 38528058, 38528033
Customer Part Reviews ?
Average Rating (out of 5):
Click to filter by ratings:
5 stars
12
4 stars
2
3 stars
0
2 stars
0
1 stars
0
< PREV
- 1
- 2
Perfect fit
I always have a good experience with e-replacement parts.
Guest -
March 14, 2024
Verified Purchase
Excellent service
Was able to find and order the part I needed easily, received it in a few days, very happy with purchase. Would recommend their service to anyone.
Guest -
September 25, 2023
Verified Purchase
Great service fast shipping
Belt was as described fast shipping
Guest -
July 14, 2023
Verified Purchase
Excellent! WOrked like a Charm.... A+
It worked perfectly.....The vaccum worked like new..... Keep up the good work!! Thanks
iGlobal -
July 10, 2023
Verified Purchase
QuicknEasy
Finding the right part on their website took less than a minute; ordering and receiving confirmation and final delivery was done in a snap. I’m very pleased with the overall shopping experience!
iGlobal -
May 19, 2023
Verified Purchase
Exactly what I needed
Part was perfect, arrived timely and fit perfectly
Guest -
January 18, 2023
Verified Purchase
Great part
The belt worked fine had to run all over to different hardware stores to find right beltsize but glad I linked on your web site and ordered correct the correct size and I'm grateful to linked on to this web site thanks again..
Anonymous -
October 10, 2022
Verified Purchase
new belts
Got the right ones in a short time. I even put it on myself and works great !
Guest -
July 21, 2022
Verified Purchase
Correct
The parts I ordered were correct one and shipped fast
Guest -
June 5, 2021
Verified Purchase
The right part
Easy to order and received the correct part quickly
Guest -
March 30, 2021
Verified Purchase
t
t
t -
t days ago
Verified Purchase
eReplacementParts Team
t
Questions & Answers ?
Our customer Service team is at the ready daily to answer your part and product questions.

Ask our Team
We have a dedicated staff with decades of collective experience in helping customers just like you purchase parts to repair their products.
Does this fit my product?Questions & Answers for Belt-stretch 2 Pack
Will this belt fit? What are the belt dimensions?
Rick
for model number uh71011
asked on 2022-04-14
Hello Rick, Thank you for contacting us. We have researched the model you have provided and have found the part you are looking for is Part Number: H-AH20080. The length of belt should be approximately 14 inches. If you need help placing an order, customer service is open 7 days a week. Please feel free to give us a call. We look forward to hearing from you!
eReplacementParts Team April 14, 2022
Customer Repair Instructions ?
All our customer repair instructions are solicited directly from other customers just like you who have purchased and replaced this exact part.
Vacuum belt to rotating roller brush
Ralph - August 18, 2016
👍 8 of 8 people found this instruction helpful
Tool Type
Vacuum
Difficulty
Medium
Time
15-30 minutes
Tools Used
Screwdriver
Parts Used
Remove cover
Clean dust that built up
Place belt on spindle
Place belt on roller brush
Stretch belt enough to place roller back in position
Reattach cover
Clean dust that built up
Place belt on spindle
Place belt on roller brush
Stretch belt enough to place roller back in position
Reattach cover
Did you find this story helpful?
Thanks for voting and helping fellow customers!
Brush roll clogged with hair and wouldn't spin causing motor shaft to burn belt.
Jesse - May 31, 2017
👍 2 of 2 people found this instruction helpful
Tool Type
Vacuum
Difficulty
Easy
Time
Less than 15 minutes
Tools Used
Power Drill
1. Removed suction hose mounting bracket. Two screws, located where the bottom of the hose connects.
2. Removed top cover. Four screws located on the top of plastic body where logo and height adjustment knobs are, respectively.
3. Removed top cover. Apply gentle rocking pressure to remove cover from rubber gasket. (Looks like a bumper.)
4. With cover off, brush roll and belt are exposed. Remove belt from motor shaft and brush roll from end brackets.
5. Slide new belt onto new brush roll. The correct side has about 1.5 inches of bare plastic with no bristles.
6. With belt on brush roll, hook belt onto motor shaft.
7. Pull brush roll forward and lock into end brackets.
Note: there should be tension on the belt and you should feel a good bit of resistance when pulling forward. The end brackets are built into the body of machine and are hexagonal. Rotate brush roll until it literally snaps into place.
8. Turn on vacuum briefly to verify brush roll spins and belt doesn't bind up.
9. Reinstall top cover.
10. Reinstall hose bracket.
Did you find this story helpful?
Thanks for voting and helping fellow customers!
Vacuum belt broke
Tawana - June 7, 2018
👍 1 of 1 people found this instruction helpful
Tool Type
Vacuum
Difficulty
Easy
Time
Less than 15 minutes
Tools Used
Screwdriver
Parts Used
1. Remove bottom plate of vacuum.
2. Removed old broken belt.
3. Installed new belt over the motor shaft and brush-roller.
4. Replace bottom plate of vacuum.
2. Removed old broken belt.
3. Installed new belt over the motor shaft and brush-roller.
4. Replace bottom plate of vacuum.
Did you find this story helpful?
Thanks for voting and helping fellow customers!
Original belt and spool were worn and slipping
Norman - August 30, 2023
Tool Type
Vacuum
Difficulty
Easy
Time
15-30 minutes
Tools Used
Screwdriver
Laid vacuum on back side.
Turned and slid 2 retainer clips and removed a few of the phillips screws to gain access to belt and spool ends.
I pushed belt off shaft, lifted out spool assembly.
Placed new belt on spool, engaged belt on motor shaft, then forced the two square ends of spool into their slots.
Replaced screws, slid and turned two retainer clips to lock assembly in.
Done.
Did you find this story helpful?
Thanks for voting and helping fellow customers!
Let it get hot and it broke
William - December 6, 2022
Tool Type
Vacuum
Difficulty
Easy
Time
Less than 15 minutes
Tools Used
Screwdriver
Parts Used
Have to pinch it to get it on the post or turn it sidewise, otherwise simple.
Did you find this story helpful?
Thanks for voting and helping fellow customers!
Broken vacuum belt
Mohammad - April 14, 2022
Tool Type
Vacuum
Difficulty
Easy
Time
Less than 15 minutes
Tools Used
Screwdriver, None
Parts Used
Replaced the broken belt
Did you find this story helpful?
Thanks for voting and helping fellow customers!
belt broke
larry - September 16, 2021
Tool Type
Vacuum
Difficulty
Easy
Time
Less than 15 minutes
Tools Used
Screwdriver, Nutdriver
Parts Used
removed screws and replaced belt
Did you find this story helpful?
Thanks for voting and helping fellow customers!
The belt on the vacuum broke
Phyllis - August 11, 2021
Tool Type
Vacuum
Difficulty
Medium
Time
15-30 minutes
Tools Used
Screwdriver
Parts Used
Removed the outer cover and all inside parts at the bottom of the vacuum.
Followed written directions that came with new belts.
Replaced belt without too much trouble.
Closed up the bottom but then realized I had left out the piece below the roller and had to remove the bottom, loft out the roller with attached new belt.
Put the piece that belonged below the roller in place.
Replaced the roller and new belt and closed up again. It would help to have diagrams of the parts along with the explanation of how to repair.
Good belt with enough give to make it attach relatively easily. Very pleased that vacuum now works well again.
Did you find this story helpful?
Thanks for voting and helping fellow customers!
Worn out belt and very dirty filter.
TERRY - January 20, 2021
Tool Type
Vacuum
Difficulty
Easy
Time
Less than 15 minutes
Tools Used
Screwdriver
1. Removed screws holding cover plate over drive belt.
2. Lifted up roller and removed belt.
3. Reinstalled new belt over drive motor spindle and roller brush.
4. Stretched belt and placed roller back in guides.
5. Reinstalled roller cover and inserted and tightened screws.
1. Opened filter door removed and replaced filter snd closed access door.
2. Lifted up roller and removed belt.
3. Reinstalled new belt over drive motor spindle and roller brush.
4. Stretched belt and placed roller back in guides.
5. Reinstalled roller cover and inserted and tightened screws.
1. Opened filter door removed and replaced filter snd closed access door.
Did you find this story helpful?
Thanks for voting and helping fellow customers!
The plastic component that held the roller brush in place broke and caused the roller to be misaligned and grind away other parts of the plastic base.
Samuel - June 8, 2018
Tool Type
Vacuum
Difficulty
Easy
Time
Less than 15 minutes
Tools Used
Screwdriver
Did you find this story helpful?
Thanks for voting and helping fellow customers!
Load More Install Stories
OEM stands for Original Equipment Manufacturer and means the part you’re buying is sourced directly from the manufacturer who made your product. At eReplacementParts, we sell only genuine OEM parts, guaranteeing the part you’re purchasing is of better design and of higher quality than aftermarket parts.
Our product descriptions are a combination of data sourced directly from the manufacturers who made your product as well as content researched and curated by our content & customer service teams. This content is edited and reviewed internally before being made public to customers.
Our customer service team are at the ready daily to answer your part and product questions. We have a dedicated staff with decades of collective experience in helping customers just like you purchase parts to repair their products.
All our part reviews are solicited directly from other customers who have purchased this exact part. While we moderate these reviews for profanity, offensive language or personally identifiable information, these reviews are posted exactly as submitted and no alterations are made by our team.
All our customer repair instructions are solicited directly from other customers just like you who have purchased and replaced this exact part. While we moderate these reviews for profanity, offensive language or personally identifiable information, these reviews are posted exactly as submitted and no alterations are made by our team.
Based on data from past customer purchasing behaviors, these parts are most commonly purchased together along with the part you are viewing. These parts may be necessary or helpful to replace to complete your current repair.
All our installation videos are created and produced in collaboration with our in-house repair technician, Mark Sodja, who has helped millions of eReplacementParts customers over the last 13 years repair their products. Mark has years of experience in selling and repairing both commercial and residential products with a specialty in gas-powered equipment.
This data is collected from customers who submitted a repair instruction after replacing this exact part. Customers can rate how easy the repair was to complete and how long it took. We aggregate this data to provide a repair rating that allows customers to quickly determine the difficulty and time needed to perform their own repair.