


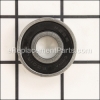
It is a genuine OEM sourced item that is designed for use with Milwaukee power tools. This special bearing allows spindle shaft to rotate freely with minimal friction, over time the rollers of the bearing may begin to wear out and fail eventually requiring replacement. It is a high-quality component which is made of durable steel and it is sold individually.
Bearing 02-04-1745
OEM part for: Milwaukee
Part Number: 02-04-1745
$8.25
In Stock
Jump To:
Frequently Purchased Together ?


Compatibility
This part will fit the following 244 machines
Milwaukee
4991-2 (SER W-4-91) Grinder View Diagrams & Manuals
4991 (SER W10-86) Grinder View Diagrams & Manuals
4995 (SER W10-86) Grinder View Diagrams & Manuals
5196-50 (SER 960A) Grinder View Diagrams & Manuals
5196-55 (SER A40A) Grinder View Diagrams & Manuals
5223 (SER 584C) Grinder View Diagrams & Manuals
5223 (SER 584D) Grinder View Diagrams & Manuals
5223 (SER 584-2000) Grinder View Diagrams & Manuals
5223-50 (SER 584A) Grinder View Diagrams & Manuals
5223-55 (SER A41A) Grinder View Diagrams & Manuals
5243-2 (SER 663-6600) Grinder View Diagrams & Manuals
5243-2 (SER 663B) Grinder View Diagrams & Manuals
5243 (SER 663-1001) Grinder View Diagrams & Manuals
5243 (SER 663-7651) Grinder View Diagrams & Manuals
5243 (SER 663B) Grinder View Diagrams & Manuals
6140 (SER 762-1001) Grinder View Diagrams & Manuals
6140 (SER 762-116163) Grinder View Diagrams & Manuals
6140 (SER 762-197163) Grinder View Diagrams & Manuals
6140 (SER 762-225408) Grinder View Diagrams & Manuals
6140 (SER 762D) 4-1/2 Inch Sander-Grinder View Diagrams & Manuals
6140 (SER 762E) 4-1/2 Inch Sander-Grinder View Diagrams & Manuals
6140 (SER 762F) 4-1/2 Inch Sander-Grinder View Diagrams & Manuals
6141 (SER 763C) 5 Inch DI Sander-Grinder View Diagrams & Manuals
6141 (SER 763D) 5 Inch DI Sander-Grinder View Diagrams & Manuals
6141 (SER 763E) 5 Inch DI Sander-Grinder View Diagrams & Manuals
6141 (SER 763F) 5 Inch DI Sander-Grinder View Diagrams & Manuals
9570 (SER 486) Electric Chain Hoist View Diagrams & Manuals
6088-20 (SER 994D) Sander/Grinder View Diagrams & Manuals
6098-2 (SER 721A) Sander/Grinder View Diagrams & Manuals
6146 (SER 684-13000) Sander/Grinder View Diagrams & Manuals
6066 (SER 753A) Sander View Diagrams & Manuals
6170 (SER 594-1001) Chop Saw View Diagrams & Manuals
6170 (SER 594-22000) Saw View Diagrams & Manuals
6156-20 (SER 950C) Grinder View Diagrams & Manuals
9567 (SER 486) Electric Chain Hoist View Diagrams & Manuals
6125 (SER 787E) Random Orbit Sander View Diagrams & Manuals
6156-20 (SER 950B) Grinder View Diagrams & Manuals
4931 (SER W10-86) Grinder View Diagrams & Manuals
4935 (SER W10-86) Grinder View Diagrams & Manuals
0234-1 (SER 532-1001) Electric Drill / Driver View Diagrams & Manuals
6141 (SER 763-1001) Sander View Diagrams & Manuals
6141 (SER 763-22912) Grinder View Diagrams & Manuals
2870-1 Electric Drill / Driver View Diagrams & Manuals
6149-02 (SER 919A) 5" Angle Grinder View Diagrams & Manuals
6140-2 (SER 762G) Sander/Grinder View Diagrams & Manuals
6140-2 (SER 762A) Sander/Grinder View Diagrams & Manuals
6373 (SER 626-12931) Worm Drive Circular Saw View Diagrams & Manuals
6154-50 (SER 907B) Grinder View Diagrams & Manuals
6148 (SER 856E) Angle Grinder View Diagrams & Manuals
6148 (SER 856H) Grinder View Diagrams & Manuals
6145 (SER 627B) Sander/Grinder View Diagrams & Manuals
6126 (SER 788-1001) Sander View Diagrams & Manuals
6080-20 (SER 988A) Sander View Diagrams & Manuals
6105 (SER 879A) Band File View Diagrams & Manuals
6065 (SER 752-44801) Sander View Diagrams & Manuals
6098 (SER 721-10401) Grinder View Diagrams & Manuals
6148 (SER 856F) Grinder View Diagrams & Manuals
6068 (SER 817B) Grinder View Diagrams & Manuals
6086-20 (SER 991B) Grinder View Diagrams & Manuals
6155-20 (SER 949B) Grinder View Diagrams & Manuals
6405 (SER 552-7500) Circular Saw View Diagrams & Manuals
6126 (SER 788A) Sander View Diagrams & Manuals
6140-2 (SER 762B) Sander/Grinder View Diagrams & Manuals
6151 (SER 868E) Grinder View Diagrams & Manuals
6080-20 (SER 988B) Sander View Diagrams & Manuals
6096 (SER 717-44001) Sander View Diagrams & Manuals
6106 (SER 654-5001) Sander/Grinder View Diagrams & Manuals
6066-2 (SER 753-1001) Sander View Diagrams & Manuals
6407 (SER 633-3101) Circular Saw View Diagrams & Manuals
9568 (SER 486) Electric Chain Hoist View Diagrams & Manuals
6125 (SER 787-8310) Sander View Diagrams & Manuals
6367 (SER 632-7193) Circular Saw View Diagrams & Manuals
6148-50 (SER 870C) Grinder View Diagrams & Manuals
6148 (SER 856D) Grinder View Diagrams & Manuals
6089-20 (SER 992A) Grinder View Diagrams & Manuals
6068 (SER 817A) Grinder View Diagrams & Manuals
6096 (SER 717A) Sander View Diagrams & Manuals
6098-2 (SER 721-1162) Grinder View Diagrams & Manuals
6145 (SER 627C) Sander/Grinder View Diagrams & Manuals
6140-2 (SER 762-1001) Sander/Grinder View Diagrams & Manuals
6126 (SER 788-3274) Sander View Diagrams & Manuals
6115 (SER 671-1001) Sander/Grinder View Diagrams & Manuals
6460 (SER 607-1001) 10-1/4" Circular Saw View Diagrams & Manuals
6460 (SER 607-3000) 10-1/4" Circular Saw View Diagrams & Manuals
6078 (SER 834B) DI 6000 RPM Dial Speed Sander View Diagrams & Manuals
6072 (SER 703-1001) 2.25 max HP, 7 in./9 in. Sander, 5000 RPM View Diagrams & Manuals
6072 (SER 703-23000) 2.25 max HP, 7 in./9 in. Sander, 5000 RPM View Diagrams & Manuals
6072 (SER 703-47001) 2.25 max HP, 7 in./9 in. Sander, 5000 RPM View Diagrams & Manuals
6072 (SER 703-49351) 2.25 max HP, 7 in./9 in. Sander, 5000 RPM View Diagrams & Manuals
6072 (SER 703A) 2.25 max HP, 7 in./9 in. Sander, 5000 RPM View Diagrams & Manuals
6072 (SER 703B) 2.25 max HP, 7 in./9 in. Sander, 5000 RPM View Diagrams & Manuals
6072 (SER 703C) 2.25 max HP, 7 in./9 in. Sander, 5000 RPM View Diagrams & Manuals
6072 (SER 703D) 2.25 max HP, 7 in./9 in. Sander, 5000 RPM View Diagrams & Manuals
6078 (SER 834A) 2.25HP 0-6000 RPM 7"/9" Sander View Diagrams & Manuals
6080-20 (SEC 988C) 7"/9" Sander View Diagrams & Manuals
6081-20 (SER 989A) 7"/9" Sander View Diagrams & Manuals
6081-20 (SER 989B) 7"/9" Sander View Diagrams & Manuals
6081-20 (SER 989C) 7"/9" Sander View Diagrams & Manuals
6082-20 (SER 990A) 7"/9" Sander View Diagrams & Manuals
6082-20 (SER 990B) 7"/9" Sander View Diagrams & Manuals
6101 (SER 878A) 5.5 Amp Bandfile View Diagrams & Manuals
6101 (SER 878B) 5.5 Amp Bandfile View Diagrams & Manuals
6101 (SER 878C) 5.5 Amp Bandfile View Diagrams & Manuals
6101 (SER 878D) 5.5 Amp Bandfile View Diagrams & Manuals
6101-6 (SER 878E) 5.5 Amp Bandfile View Diagrams & Manuals
6125 (SER 787-1001) 5 in. Random Orbit Sander, 5.5 Amp, 10,000 OPM View Diagrams & Manuals
6125 (SER 787A) 5 in. Random Orbit Sander, 5.5 Amp, 10,000 OPM View Diagrams & Manuals
6125 (SER 787B) 5 in. Random Orbit Sander, 5.5 Amp, 10,000 OPM View Diagrams & Manuals
6125 (SER 787C) 5 in. Random Orbit Sander, 5.5 Amp, 10,000 OPM View Diagrams & Manuals
6125 (SER 787D) 5 in. Random Orbit Sander, 5.5 Amp, 10,000 OPM View Diagrams & Manuals
6125 (SER 787F) 5 in. Random Orbit Sander, 5.5 Amp, 10,000 OPM View Diagrams & Manuals
6145 (SER 627-1001) 4-1/2 in. Sander/Grinder View Diagrams & Manuals
6145 (SER 627-86000) 4-1/2 in. Sander/Grinder View Diagrams & Manuals
6145 (SER 627-133000) 4-1/2 in. Sander/Grinder View Diagrams & Manuals
6145 (SER 627-254500) 4-1/2 in. Sander/Grinder View Diagrams & Manuals
6145 (SER 627-385789) 4-1/2 in. Sander/Grinder View Diagrams & Manuals
6145 (SER 627-411585) 4-1/2 in. Sander/Grinder View Diagrams & Manuals
6145 (SER 627-418057) 4-1/2 in. Sander/Grinder View Diagrams & Manuals
6145 (SER 627D) 4-1/2 in. Sander/Grinder View Diagrams & Manuals
6145 (SER 627E) 4-1/2 in. Sander/Grinder View Diagrams & Manuals
6145 (SER 627F) 4-1/2 in. Sander/Grinder View Diagrams & Manuals
6151 (SER 868A) 4-1/2 in. Magnum Sander/Grinder View Diagrams & Manuals
6151 (SER 868C) 4-1/2 in. Magnum Sander/Grinder View Diagrams & Manuals
6151 (SER 868D) 4-1/2 in. Magnum Sander/Grinder View Diagrams & Manuals
6151 (SER 868F) 4-1/2 in. Magnum Sander/Grinder View Diagrams & Manuals
6151 (SER 868G) 4-1/2 in. Magnum Sander/Grinder View Diagrams & Manuals
6151 (SER 868H) 4-1/2 in. Magnum Sander/Grinder View Diagrams & Manuals
6153-20 (SER 906A) 4-1/2 in. Super Magnum Sander/Grinder View Diagrams & Manuals
6153-20 (SER 906B) 4-1/2 in. Super Magnum Sander/Grinder View Diagrams & Manuals
6153-20 (SER 906C) 4-1/2 in. Super Magnum Sander/Grinder View Diagrams & Manuals
6153-20 (SER 906D) 4-1/2 in. Super Magnum Sander/Grinder View Diagrams & Manuals
6154-20 (SER 907A) 4-1/2 in. Super Magnum Sander/Grinder View Diagrams & Manuals
6154-20 (SER 907B) 4-1/2 in. Super Magnum Sander/Grinder View Diagrams & Manuals
6154-20 (SER 907C) 4-1/2 in. Super Magnum Sander/Grinder View Diagrams & Manuals
6154-20 (SER 907D) 4-1/2 in. Super Magnum Sander/Grinder View Diagrams & Manuals
6155-20 (SER 949A) 5 in. Magnum Sander/Grinder View Diagrams & Manuals
6155-20 (SER 949C) 5 in. Magnum Sander/Grinder View Diagrams & Manuals
6155-20 (SER 949D) 5 in. Magnum Sander/Grinder View Diagrams & Manuals
6156-20 (SER 950A) 5 in. Magnum Sander/Grinder View Diagrams & Manuals
6156-20 (SER 950D) 5 in. Magnum Sander/Grinder View Diagrams & Manuals
6160-20 (SER A16A) 6 in. Right Angle Grinder View Diagrams & Manuals
6185-20 (SER A20A) 14 in. Handheld Cut-Off Machine View Diagrams & Manuals
6185-20 (SER A20C) 14 in. Handheld Cut-Off Machine View Diagrams & Manuals
9560 (SER 486) 1/2 Ton Electric Chain Hoist View Diagrams & Manuals
9561 (SER 486) 1/2 Ton Electric Chain Hoist View Diagrams & Manuals
9562 (SER 486) 1/2 Ton Electric Chain Hoist View Diagrams & Manuals
9565 (SER 486) 1 Ton Electric Chain Hoist View Diagrams & Manuals
9566 (SER 486) 1 Ton Electric Chain Hoist View Diagrams & Manuals
9571 (SER 486) 2 Ton Electric Chain Hoist View Diagrams & Manuals
9572 (SER 486) 2 Ton Electric Chain Hoist View Diagrams & Manuals
9573 (SER 486) 2 Ton Electric Chain Hoist View Diagrams & Manuals
6095 (699-1001) 9" 5,000 RPM Sander View Diagrams & Manuals
6095 (699-39451) 9" 5,000 RPM Sander View Diagrams & Manuals
6095 (699-49501) 9" 5,000 RPM Sander View Diagrams & Manuals
6095 (699A) 9" 5,000 RPM Sander View Diagrams & Manuals
6086-20 (SER 991A) 9" Grinder View Diagrams & Manuals
6086-20 (SER 911C) 9" Grinder View Diagrams & Manuals
6086-20 (SER 991D) 9" Grinder View Diagrams & Manuals
6088-20 (SER 994A) 7" Grinder View Diagrams & Manuals
6088-20 (SER 994B) 7" Grinder View Diagrams & Manuals
6088-20 (SER 994C) 7" Grinder View Diagrams & Manuals
6089-20 (SER 992B) 9" Grinder View Diagrams & Manuals
6089-20 (SER 992C) 9" Grinder View Diagrams & Manuals
6148 (SER 856A) 4-1/2" Angle Grinder View Diagrams & Manuals
6148 (SER 856B) 4-1/2" Angle Grinder View Diagrams & Manuals
6148 (SER 856C) 4-1/2" Angle Grinder View Diagrams & Manuals
6148 (SER 856G) 4-1/2" Angle Grinder View Diagrams & Manuals
48-06-2871 Right Angle Drive Unit View Diagrams & Manuals
2870 Right Angle Drive View Diagrams & Manuals
6070 (SER 818-1001) 7" 8000 RPM Grinder View Diagrams & Manuals
6056 (SER 651-6401) 9" Sander/Grinder View Diagrams & Manuals
6058 (SER 610-1001) 7" Sander/Grinder View Diagrams & Manuals
6058 (SER 610-19001) 7" Sander/Grinder View Diagrams & Manuals
6064 (SER 653-1001) 9" Sander/Grinder View Diagrams & Manuals
6064 (SER 653-4001) 9" Sander/Grinder View Diagrams & Manuals
6065 (SER 653-4001) 9" 5000 R.P.M. Sander View Diagrams & Manuals
6065 (SER 752-1001) 9" 5000 R.P.M. Sander View Diagrams & Manuals
6065 (SER 752-17751) 9" 5000 R.P.M. Sander View Diagrams & Manuals
6065 (SER 752A) 7"/9" 5000 R.P.M. Sander View Diagrams & Manuals
6066 (SER 752B) 9" 6000 R.P.M. Sander View Diagrams & Manuals
6066 (SER 753-20101) 9" 6000 R.P.M. Sander View Diagrams & Manuals
6066 (SER 753-47501) 9" 6000 R.P.M. Sander View Diagrams & Manuals
6067 (SER 753B) 9" 5000 R.P.M. Grinder View Diagrams & Manuals
6067 (SER 816-1001) 9" 5000 R.P.M. Grinder View Diagrams & Manuals
6067 (SER 816A) 9" 5000 R.P.M. Grinder View Diagrams & Manuals
6377 (SER 620-1001) 7-1/4" Worm Drive Circular Saw View Diagrams & Manuals
6377 (SER 620-16000) 7-1/4" Worm Drive Circular Saw View Diagrams & Manuals
6378 (SER 621-1001) 8-1/4" Worm Drive Circular Saw View Diagrams & Manuals
6387 (SER 679-1001) 7-1/4" Worm Drive Circular Saw View Diagrams & Manuals
6405 (SER 552-1001) 8-1/4" Circular Saw View Diagrams & Manuals
6405 (SER 552-31000) 8-1/4" Circular Saw View Diagrams & Manuals
6405 (SER 552-42201) 8-1/4" Circular Saw View Diagrams & Manuals
6405 (SER 552-55000) 8-1/4" Circular Saw View Diagrams & Manuals
6407 (SER 633-1300) 8-1/4" D.I. Circular Saw View Diagrams & Manuals
6407 (SER 633-4200) 8-1/4" D.I. Circular Saw View Diagrams & Manuals
6070 (SER 818A) 7" Grinder View Diagrams & Manuals
6075 (SER 733-1001) Lightweight Sander View Diagrams & Manuals
6075 (SER 733-8751) Lightweight Sander View Diagrams & Manuals
6075 (SER 733A) Lightweight Sander View Diagrams & Manuals
6075 (SER 733B) Lightweight Sander View Diagrams & Manuals
6076 (SER 861A) Grinder View Diagrams & Manuals
6076 (SER 861B) Grinder View Diagrams & Manuals
6086-20 (SER 991C) 9" Grinder View Diagrams & Manuals
6090 (SER 668-1001) 7" Sander / Grinder View Diagrams & Manuals
6090 (SER 668-5001) 7" Sander / Grinder View Diagrams & Manuals
6096 (SER 717-1001) 9" Sander View Diagrams & Manuals
6096 (SER 717-33701) 9" Sander View Diagrams & Manuals
6096 (SER 717B) 7" / 9" Sander View Diagrams & Manuals
6098 (SER 721-1001) 7" Grinder View Diagrams & Manuals
6098 (SER 721-17001) 7" Grinder View Diagrams & Manuals
6098 (SER 721A) 7" Grinder View Diagrams & Manuals
6098 (SER 721B) 7" Grinder View Diagrams & Manuals
6105 (SER 879C) Band File View Diagrams & Manuals
6106 (SER 654-1001) 9" Sander / Grinder View Diagrams & Manuals
6108 (SER 655-1001) 9" Sander / Grinder View Diagrams & Manuals
6108 (SER 655-4001) 9" Sander / Grinder View Diagrams & Manuals
6126 (SER 788B) Random Orbit Sander View Diagrams & Manuals
6126 (SER 788C) Random Orbit Sander View Diagrams & Manuals
6126 (SER 788D) Random Orbit Sander View Diagrams & Manuals
6126 (SER 788E) Orbit Sander View Diagrams & Manuals
6146 (SER 684-1001) 5" Sander View Diagrams & Manuals
6146 (SER 684-5889) 5" Sander View Diagrams & Manuals
6149-02 (SER 919B) 5" Grinder View Diagrams & Manuals
6149-02 (SER 919C) 5" Grinder View Diagrams & Manuals
6149-02 (SER 919D) 5" Grinder View Diagrams & Manuals
6149-02 (SER 919E) 5" Grinder View Diagrams & Manuals
6152-02 (SER 920A) 5" Grinder View Diagrams & Manuals
6152-02 (SER 920B) 5" Grinder View Diagrams & Manuals
6165 (SER 582-1001) 12" Chop Saw View Diagrams & Manuals
6373 (SER 626-1001) 7-1/4" Worm Drive Circular Saw View Diagrams & Manuals
6370 (SER 368-1001) Worm Drive Circular Saw View Diagrams & Manuals
6370 (SER 368-3701) Worm Drive Circular Saw View Diagrams & Manuals
6370 (SER 368-6101) Worm Drive Circular Saw View Diagrams & Manuals
6370 (SER 368-27500) Worm Drive Circular Saw View Diagrams & Manuals
6367 (SER 632-1001) 7-1/4" Circular Saw View Diagrams & Manuals
6365 (SER 546-1001) 7-1/4" Circular Saw View Diagrams & Manuals
6365 (SER 546-31000) 7-1/4" Circular Saw View Diagrams & Manuals
6365 (SER 546-154000) 7-1/4" Circular Saw View Diagrams & Manuals
6365 (SER 546-191000) 7-1/4" Circular Saw View Diagrams & Manuals
6088-30 (SER B43A) 7"/9" Grinder With Lock-On View Diagrams & Manuals
6088-31 (SER B44A) 7"/9" Grinder View Diagrams & Manuals
6089-30 (SER B45A) 7"/9" Grinder With Lock-On View Diagrams & Manuals
6089-31 (SER B46A) 7"/9" Grinder View Diagrams & Manuals
6101-6 (878F) Band File View Diagrams & Manuals
Show More Compatible Models
This item works with the following types of products:
- Grinder Parts
- Sander Parts
- Chop Saw Parts
- Saw Parts
- Drill Parts
- Electric Drill Parts
- Circular Saw Parts
- Screwdriver Parts
This part replaces obsolete part #: 02-04-1746
Customer Part Reviews ?
Average Rating (out of 5):
Click to filter by ratings:
5 stars
1
4 stars
0
3 stars
0
2 stars
0
1 stars
0
< PREV
- 1
Milwaukee 9 inch grinder bearing replacement...
Bearing fit perfectly. Company was easy to deal on with.
Guest -
March 29, 2022
Verified Purchase
t
t
t -
t days ago
Verified Purchase
eReplacementParts Team
t
Questions & Answers ?
Our customer Service team is at the ready daily to answer your part and product questions.

Ask our Team
We have a dedicated staff with decades of collective experience in helping customers just like you purchase parts to repair their products.
Does this fit my product?Questions & Answers for Bearing
No questions have been asked yet
Customer Repair Instructions ?
All our customer repair instructions are solicited directly from other customers just like you who have purchased and replaced this exact part.
Broken reversing spindle
gary - June 1, 2017
👍 1 of 1 people found this instruction helpful
Tool Type
Drill
Difficulty
Medium
Time
15-30 minutes
Tools Used
Pliers, Socket set, hammer
Took overlapping snap ring out took vise grips locked on broken spindle shaft hit vise grips with hammer and spindle bearing and gear came out ,then put spindle in vice loose just to support bearing and drove spindle out of bearing and gear saved wood ruff key and used a deep socket to drive gear on without hitting teeth and washer with key back on spindle used spindle to tap bearing on first and reinstalled back in housing reinstall snap ring 20 min
Did you find this story helpful?
Thanks for voting and helping fellow customers!
Reversing shaft sheared off between bearing and chuck
Larry - August 24, 2016
👍 1 of 1 people found this instruction helpful
Tool Type
Electric Drill
Difficulty
Medium
Time
30-60 minutes
Tools Used
Wrench Set, Hammer, bench vise, short piece of 1\\\\
1. Remove angle drive housing from drill, (1/2" 90 degree drill)
2. Remove old shaft assembly remnants from housing, destroy old bearing while removing
3. Assemble new shaft, washer and (press on) new bearing using pipe and vise
5. Grease gears and install assembly in angle drive housing
6. Attach angle drive housing to drill
7. Attach chuck
8. Make holes in stuff
Did you find this story helpful?
Thanks for voting and helping fellow customers!
bearings bad and needed replacement
Tom - July 1, 2020
Tool Type
Circular Saw
Difficulty
Hard
Time
More than 2 hours
Tools Used
Screwdriver, bearing puller, snap ring pliers, wooden dowel, hammer
1. used snap ring pliers to remove external snap ring holding blade guard.
2. removed 4 phillips screws holding gearbox lid.
3. tapped out sealed bearing in gearbox lid using wooden dowel and hammer.
4. removed 4 long phillips screws holding gearbox body.
5. removed needle bearing from gearbox using greasy rag trick. (google it. easier if you
watch. ( it works! i used strips of blue shop paper towel...) removed inner snap ring and
bearing.
6. removed brush covers and brushes. moved gearbox aside and removed commutator
and cardboard insulator.
7. used 3 armed bearing puller to remove bearings from both ends.
8. with commutator out, removed grounding wire screw from gearbox.
9. cleaned all parts in mineral spirits. cleaned contacts on commutator with 1200 grit
emery cloth
10. replaced bearings on commutator; tapped small bearing on with wooden dowel and
hammer. tapped large bearing with 3/4" pipe and hammer, touching only inner bearing
race.
11. replaced brush covers and brushes. replaced commutator and cardboard insulator
12. reattached ground wire to gearbox. reattached gearbox.
13. tapped needle bearing in socket with wooden dowel.
14. filled gearbox with grease.
15. pressed bearing into gearbox lid with fingers! replaced inner snap ring. added more
grease on lid.
16. replaced gearbox lid and screws.
17. replaced blade guard and outer snap ring. replaced blade.
this is how i remember it. your mileage may vary...
Did you find this story helpful?
Thanks for voting and helping fellow customers!
OEM stands for Original Equipment Manufacturer and means the part you’re buying is sourced directly from the manufacturer who made your product. At eReplacementParts, we sell only genuine OEM parts, guaranteeing the part you’re purchasing is of better design and of higher quality than aftermarket parts.
Our product descriptions are a combination of data sourced directly from the manufacturers who made your product as well as content researched and curated by our content & customer service teams. This content is edited and reviewed internally before being made public to customers.
Our customer service team are at the ready daily to answer your part and product questions. We have a dedicated staff with decades of collective experience in helping customers just like you purchase parts to repair their products.
All our part reviews are solicited directly from other customers who have purchased this exact part. While we moderate these reviews for profanity, offensive language or personally identifiable information, these reviews are posted exactly as submitted and no alterations are made by our team.
All our customer repair instructions are solicited directly from other customers just like you who have purchased and replaced this exact part. While we moderate these reviews for profanity, offensive language or personally identifiable information, these reviews are posted exactly as submitted and no alterations are made by our team.
Based on data from past customer purchasing behaviors, these parts are most commonly purchased together along with the part you are viewing. These parts may be necessary or helpful to replace to complete your current repair.
All our installation videos are created and produced in collaboration with our in-house repair technician, Mark Sodja, who has helped millions of eReplacementParts customers over the last 13 years repair their products. Mark has years of experience in selling and repairing both commercial and residential products with a specialty in gas-powered equipment.
This data is collected from customers who submitted a repair instruction after replacing this exact part. Customers can rate how easy the repair was to complete and how long it took. We aggregate this data to provide a repair rating that allows customers to quickly determine the difficulty and time needed to perform their own repair.