


This is a genuine part from the original manufacturer. It fits various models of Bear Cat chippers and shredders.
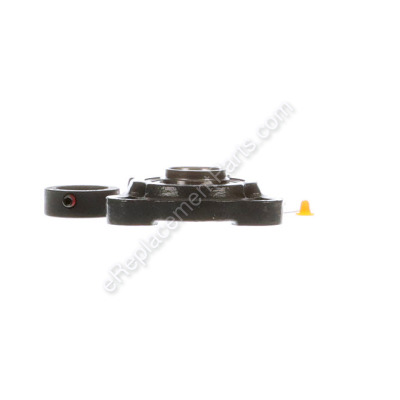
Bearing, 1 In. Flushmount 16234B
OEM part for: Crary Bear Cat
Part Number: 16234B
$54.79
Usually ships in 7 - 12 business days
7 - 12 business days
Jump To:
Frequently Purchased Together ?

Compatibility
This part will fit the following 9 machines
Crary Bear Cat
SC3206 (70050) Chipper/Shredder View Diagrams & Manuals
SC3240 (70380) Chipper/Shredder View Diagrams & Manuals
SC3240T (70580) Chipper/Shredder View Diagrams & Manuals
SC3270 Chipper/Shredder View Diagrams & Manuals
SC3270T Chipper/Shredder View Diagrams & Manuals
SC3305 (70080) Chipper/Shredder View Diagrams & Manuals
SC3305E (70085) Chipper/Shredder View Diagrams & Manuals
SC3342 (75311) Chipper / Shredder View Diagrams & Manuals
SC3265 (A08787) 3 Inch Chipper/Shredder View Diagrams & Manuals
Show More Compatible Models
This item works with the following types of products:
- Chipper / Shredder Parts
This part replaces obsolete part #: 16234
Customer Part Reviews ?
Average Rating (out of 5):
Click to filter by ratings:
5 stars
6
4 stars
0
3 stars
0
2 stars
0
1 stars
0
< PREV
- 1
Bearing
Quite a bit of work involved in replacing these. Parts were reasonably priced.
William -
June 21, 2023
Verified Purchase
Whew!
Super nervous about replacing both bearings on my chipper but it went better than planned.
The unit itself was slightly damaged when the bearing went out. Pounded things straight, and used washers to beef up where the bolts go through the unit housing.
But the bearings were the easy part. A bit of effort to remove, but went on clean and easy.
Cleaned and maintained the engine before remounting...Lined up the belt, and started chipping.
Cheers!
Gerald -
December 8, 2021
Verified Purchase
Great Service & Fast Shipping
The part was exactly the correct replacement part and worked perfectly.
Mitch
Guest -
February 12, 2021
Verified Purchase
Great service
Part was exact OEM replacement for my chipper. Ordered Thursday morning; was in my PO box early Saturday morning.
Guest -
July 24, 2020
Verified Purchase
Fast delivery and quality as promised
Belt and bearings were super quality
Guest -
July 6, 2019
Verified Purchase
Superior to Original
This was a replacement bearing for a 25 year old Bearcat Chipper. The chipper should have been built with this bearing. It is superior in every way. The addition of a greasing point would have most likely saved the old bearing. Replacement took 20 minutes.
Guest -
June 22, 2019
Verified Purchase
t
t
t -
t days ago
Verified Purchase
eReplacementParts Team
t
Questions & Answers ?
Our customer Service team is at the ready daily to answer your part and product questions.

Ask our Team
We have a dedicated staff with decades of collective experience in helping customers just like you purchase parts to repair their products.
Does this fit my product?Questions & Answers for Bearing, 1 In. Flushmount
Does this replace bearing 17831 in the manual parts list?
Tom
for model number 70180
asked on 2022-02-24
Hi Tom,
Thank you for your question. Part number 17831 has not been replaced with another part number. If you would like to place an order for part number 17831, customer service is open 7 days a week and anyone will be happy to assist you. Please feel free to give us a call. We look forward to hearing from you!
eReplacementParts Team February 24, 2022
Customer Repair Instructions ?
All our customer repair instructions are solicited directly from other customers just like you who have purchased and replaced this exact part.
Two rotor flat mount bearings
Norman - June 17, 2016
👍 1 of 1 people found this instruction helpful
Tool Type
Chipper Shredder
Difficulty
Hard
Time
More than 2 hours
Tools Used
Screwdriver, Pliers, Wrench Set, Allen wrenches, wheel puller, hand grinder
Parts Used
1. Pulled engine and limb chute
2. Removed Allen bolts from bearings and pulleys
3. Removed belt
4. Unbolted old bearings from frame
5. Remove rotor if free from bearings. If not use wheel or bearing puller to remove. A good time to resharpen blades and repair rotor if needed.
6. Refit new bearings and reassemble.
Good luck it's not easy but doable with the proper tools
Caution: Make sure the clearance between rotor knives and limb chute are close as possible, very hard to see or measure, adjust before setting and tightening allen bolts.
Did you find this story helpful?
Thanks for voting and helping fellow customers!
Replaced worn bearings
CJ - April 15, 2023
Tool Type
Chipper Shredder
Difficulty
Medium
Time
More than 2 hours
Tools Used
, Puller
Parts Used
1984 WW Gardner Superhawk,
Used puller and torch heat to remove original 1 inch shaft bearings and upgraded to newer style off Bear Cat, chipper model # 70080 greasable 1 inch flush mount bearings
(Manufacturer: Crary Bear Cat
Product Number: 16234B). Works great!.
Used puller and torch heat to remove original 1 inch shaft bearings and upgraded to newer style off Bear Cat, chipper model # 70080 greasable 1 inch flush mount bearings
(Manufacturer: Crary Bear Cat
Product Number: 16234B). Works great!.
Did you find this story helpful?
Thanks for voting and helping fellow customers!
Bearing wore out
Timothy - November 1, 2018
Tool Type
Chipper Shredder
Difficulty
Hard
Time
1-2 hours
Tools Used
Screwdriver, Socket set, Adjustable Wrench, Pipe wrench and pipe cheater bar
The locking collar, the rotor pulley and the bearing itself did not come off easily. The locking collar was the toughest to remove. I tried everything suggested from YouTube videos without success including WD40, Acetic acid to dissolve the "rust bond" between collar and shaft, two types of torches to heat and lost of banging. What does work is using a pipe wrench on the collar in both directions while simultaneously prying up the bearing from behind with a pry bar. It took me three days of failed YouTube attempts and one night of remembering I had pipe wrenches stored somewhere. The 2 foot long cheater bar was important also to give effortless torque. Because this was the bearing next to the motor, the whole job took about 2 hours excluding all the wasted time and effort from other "expert" advice.
Did you find this story helpful?
Thanks for voting and helping fellow customers!
Locked up bearing
Mark - August 1, 2018
Tool Type
Chipper Shredder
Difficulty
Easy
Time
15-30 minutes
Tools Used
Socket set, None
Parts Used
Removed dust cover loosened set screw from concentric removed concentric loosened three bolts from bearing housing slid bearing off shaft. Installed new bearing reassembled unit. Started unit and tested. Unit worked perfectly
Did you find this story helpful?
Thanks for voting and helping fellow customers!
Replaced worn out original bearing on shredder with new bearing assembly after ~17 yrs service
Christopher - June 6, 2016
👍 0 of 1 people found this instruction helpful
Tool Type
Chipper Shredder
Difficulty
Medium
Time
15-30 minutes
Tools Used
Socket set, Wrench Set, bearing puller, rubber mallet & Emory cloth sandpaper
Parts Used
1- Using a puller, removed the existing bearing, apply WD-40 or penetrating oil to facilitate removal. 2- Once bearing is off the shaft, clean shaft with light Emory cloth then apply a light coating of oil of grease to shaft. 3- Install new bearing and apply grease to bearing assembly. Re-attach shaft guard and presto, job completed and ready for use.
Did you find this story helpful?
Thanks for voting and helping fellow customers!
OEM stands for Original Equipment Manufacturer and means the part you’re buying is sourced directly from the manufacturer who made your product. At eReplacementParts, we sell only genuine OEM parts, guaranteeing the part you’re purchasing is of better design and of higher quality than aftermarket parts.
Our product descriptions are a combination of data sourced directly from the manufacturers who made your product as well as content researched and curated by our content & customer service teams. This content is edited and reviewed internally before being made public to customers.
Our customer service team are at the ready daily to answer your part and product questions. We have a dedicated staff with decades of collective experience in helping customers just like you purchase parts to repair their products.
All our part reviews are solicited directly from other customers who have purchased this exact part. While we moderate these reviews for profanity, offensive language or personally identifiable information, these reviews are posted exactly as submitted and no alterations are made by our team.
All our customer repair instructions are solicited directly from other customers just like you who have purchased and replaced this exact part. While we moderate these reviews for profanity, offensive language or personally identifiable information, these reviews are posted exactly as submitted and no alterations are made by our team.
Based on data from past customer purchasing behaviors, these parts are most commonly purchased together along with the part you are viewing. These parts may be necessary or helpful to replace to complete your current repair.
All our installation videos are created and produced in collaboration with our in-house repair technician, Mark Sodja, who has helped millions of eReplacementParts customers over the last 13 years repair their products. Mark has years of experience in selling and repairing both commercial and residential products with a specialty in gas-powered equipment.
This data is collected from customers who submitted a repair instruction after replacing this exact part. Customers can rate how easy the repair was to complete and how long it took. We aggregate this data to provide a repair rating that allows customers to quickly determine the difficulty and time needed to perform their own repair.