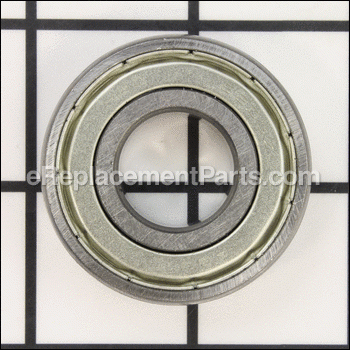
Genuine Manufacturer Sourced replacement part used on a variety of Power Tools. This part is made out of Metal and it is sold individually. Ball bearings are used to reduce friction between rotating parts. The balls or rollers take the load and spin, distributing the weight evenly while the minimal contact area of the ball reduces friction. This reduces wear on the tool and allows it to run smoothly. Bearings experience constant wear when the tool is in operation from pressure, heat, vibration and friction. Because of this, many Bearings need periodic maintenance or replacement.
Ball Bearing BB-6203ZZ
OEM part for: Powermatic, Jet
Part Number: BB-6203ZZ
Jump To:
Frequently Purchased Together ?
Compatibility
This part will fit the following 49 machines
Powermatic
Jet
This item works with the following types of products:
- Jointer Parts
- Planer Parts
- Drill Parts
- Drill Press Parts
- Saw Parts
- Table Saw Parts
- Jig saw Parts
- Band Saw Parts
- Sander Parts
This part replaces obsolete part #: 5300531
Customer Part Reviews ?
- 1
Questions & Answers ?
Our customer Service team is at the ready daily to answer your part and product questions.

Ask our Team
We have a dedicated staff with decades of collective experience in helping customers just like you purchase parts to repair their products.
Does this fit my product?Questions & Answers for Ball Bearing
Customer Repair Instructions ?
All our customer repair instructions are solicited directly from other customers just like you who have purchased and replaced this exact part.
Bearings were worn out and noisy
Tool Type
Table Saw
Difficulty
Medium
Time
More than 2 hours
Tools Used
Wrench Set, Nutdriver, Rubber mallet, scrap wood, arbor press, freezer
Parts Used
1. Unplugged the tool!
2. Removed the blade
3. Loosened the belt tension. Loosened two bolts that secured motor on pivot and lifted up. Removed belts one at a time (there are 3)
4. Removed spanner nut and arbor nut on the back of the shaft. When doing the arbor nut you need a wrench for the blade-side and a socket for the other side. Remember, the nut is reverse-threaded! Righty-loosey, lefty-tighty in this case.
5. After those are loose, tapped the non-blade side of the shaft with a rubber mallet to extract it.
6. There was one bearing still on the shaft, and one bearing in the assembly. The one of the shaft had to be removed with an arbor press and creativity (it is difficult to get up under the flange, need to use a wrench or couple pieces of steel and bang on those). The bearing that was still in the assembly just comes out, but you may need to tap it from the other side if it's stuck.
7. Once bearings are removed (which is the longest part of the process), put the new one on the shaft. When installing the new ones, make sure to only put force against the outer ring/race of the bearing where it is strongest. If you hit the cage/shield, you will mess up the bearings as it is soft metal there. Just be patient and clever.
8. Now the tricky part, reassembling the shaft assembly. Look at the diagram for which parts to put on first.
9. Once all the shaft parts are in place, tighten down the spanner nut to lock the loose bearing in place.
10. CRITICAL: Put arbor nut on, but DO NOT wrench down on it. Just get it to meet up with the end of the thread. Putting any amount of torque on it after it has met a surface will compress the bearings in a direction they are not meant to handle force, shortening the lifespan of the bearings. This is the second time I've reinstalled the bearings in 6 months and talking to an expert convinced me that is the issue we've been having.
The bearings that are installed now are already sounding gritty again, whereas when they were freshly installed they were quiet as a mouse. Take care in reinstalling because it will determine how long your bearings last.
Saw made squealing sound, vibration, and slight wobble in blade initially.
Tool Type
Table Saw
Difficulty
Medium
Time
More than 2 hours
Tools Used
Screwdriver, Socket set, Wrench Set, Hex Head Wrenches
2. Removed saw table top (as 1 piece). Make note of any shims under the table top when lifting it off.
3. Removed belts by loosening saw motor.
4. Removed arbor assembly as a unit.
5. Replaced both bearings, spacers, and load spring. The arbor shaft has a left hand threaded nut on the end that required cutting off as it was so tight. I would recommend ordering a new nut.
6. Reinstalled arbor assembly. (Turn tilt adjustment wheel to aid in getting assemble aligned properly. Lubricate all parts to ease installation and don't try to force any of the mating parts.
7. Reinstall all other parts in reverse order (3-1)
Bearing went bad
Tool Type
Table Saw
Difficulty
Medium
Time
1-2 hours
Tools Used
Screwdriver, Socket set, Wrench Set
Parts Used
Bearing collapsed.
Tool Type
Band Saw
Difficulty
Easy
Time
Less than 15 minutes
Tools Used
Socket set, Hammer
Parts Used
Ball bearing was wore out within a year
Tool Type
Table Saw
Difficulty
Easy
Time
1-2 hours
Tools Used
Screwdriver, Socket set, Wrench Set, Adjustable Wrench
Parts Used
table-saw arbor ball bearing
Tool Type
Table Saw
Difficulty
Hard
Time
1-2 hours
Tools Used
Socket set, Wrench Set
Parts Used
2. unscrew the left loosening nut
3. push the shaft out
4. take the ball bearing out with bearing puller
5. mount the new bearing on
6. add the new side bearing on too
7. screw the nut on tighten by counterclockwise tightening.
Wasted one hour trying to take the ball bearing out by simply using two metal plates and a piece of wood an hammering it. Borrowed my brother's ball bearing puller and took only 25 minutes to assemble after that.
Jointer bearing failure
Tool Type
Jointer
Difficulty
Easy
Time
30-60 minutes
Tools Used
Socket set, Wrench Set
Pressed old bearings from assembly carefully marking right and left bearing mounts before removal.
Pressed new bearings into assembly.
Mounted assembly back into jointer base.
Checked alinement and bold torques.
Made final jointer table alinement adjustments and started jointer.
Ball bearing on arbor shaft of my Jet table saw went bad
Tool Type
Table Saw
Difficulty
Medium
Time
More than 2 hours
Tools Used
Screwdriver, Pliers, Socket set, Wrench Set, Adjustable Wrench, Arbor press
Parts Used
Worn bearings on upper wheel, caused blade to wobble front to back. Vibration
Tool Type
Band Saw
Difficulty
Easy
Time
15-30 minutes
Tools Used
, Mallet, wood rod to knock out bearings
Parts Used
2. Remove wheel
3. Lay on a bench with the open area under center area
4. Using wooden rod, place rod through center of bearing to reach bearing on other side.
5. Tap bearing out evenly around all sides. Use a little harder tap to get started.
6. Flip over wheel and repeat for other bearing. Easy once first bearing is out of way.
7. Clean inside surface of wheel prior to inserting new bearings
8. Find small flat piece of wood, 2x4 0r 1x4 then place new bearing over hole. Place wood on top of bearing then tap evenly to get started. Get eye level with wheel and slowly tap in place.
9. Install wheel
10. Install blade
11. Done!!
Excessive noise
Tool Type
Jointer
Difficulty
Easy
Time
1-2 hours
Tools Used
Screwdriver, Socket set, Wrench Set, Hammer, bearing puller
Parts Used
OEM stands for Original Equipment Manufacturer and means the part you’re buying is sourced directly from the manufacturer who made your product. At eReplacementParts, we sell only genuine OEM parts, guaranteeing the part you’re purchasing is of better design and of higher quality than aftermarket parts.
Our product descriptions are a combination of data sourced directly from the manufacturers who made your product as well as content researched and curated by our content & customer service teams. This content is edited and reviewed internally before being made public to customers.
Our customer service team are at the ready daily to answer your part and product questions. We have a dedicated staff with decades of collective experience in helping customers just like you purchase parts to repair their products.
All our part reviews are solicited directly from other customers who have purchased this exact part. While we moderate these reviews for profanity, offensive language or personally identifiable information, these reviews are posted exactly as submitted and no alterations are made by our team.
All our customer repair instructions are solicited directly from other customers just like you who have purchased and replaced this exact part. While we moderate these reviews for profanity, offensive language or personally identifiable information, these reviews are posted exactly as submitted and no alterations are made by our team.
Based on data from past customer purchasing behaviors, these parts are most commonly purchased together along with the part you are viewing. These parts may be necessary or helpful to replace to complete your current repair.
All our installation videos are created and produced in collaboration with our in-house repair technician, Mark Sodja, who has helped millions of eReplacementParts customers over the last 13 years repair their products. Mark has years of experience in selling and repairing both commercial and residential products with a specialty in gas-powered equipment.
This data is collected from customers who submitted a repair instruction after replacing this exact part. Customers can rate how easy the repair was to complete and how long it took. We aggregate this data to provide a repair rating that allows customers to quickly determine the difficulty and time needed to perform their own repair.


