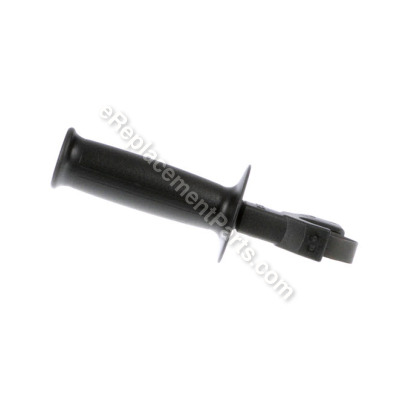
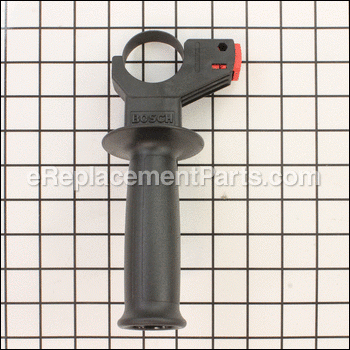


This high quality OEM replacement part is specially designed for Bosch hammer drills. It is the side handle that provides user with a comfortable grip for operating the tool. This part is made from durable plastic and it is sold individually. Attaching this handle is very easy with the built in mechanism, no tools required.
Auxiliary Handle 2602025118
OEM part for: Bosch
Part Number: 2602025118
$18.16
In Stock
Jump To:
Frequently Purchased Together ?

Compatibility
This part will fit the following 19 machines
Bosch
11224VSR (0611224739) Hammer Drill View Diagrams & Manuals
GBH2SE (0611226639) Hammer Drill View Diagrams & Manuals
GBH2SR (0611226739) Hammer Drill View Diagrams & Manuals
GBH2SR (0611226839) Hammer Drill View Diagrams & Manuals
11228VS (0611228639) Hammer Drill View Diagrams & Manuals
11228VSR (0611228739) Hammer Drill View Diagrams & Manuals
11234S (0611234039) Rotary Hammer View Diagrams & Manuals
11234SE (0611234639) Rotary Hammer View Diagrams & Manuals
11234VSR (0611234739) Rotary Hammer View Diagrams & Manuals
11250VSR (0611250739) Rotary Hammer View Diagrams & Manuals
11225VSRH (0611260539) Cordless Rotary Hammer View Diagrams & Manuals
11234VSR (0611234769) Rotary Hammer View Diagrams & Manuals
11226 (0611226039) Rotary Hammer View Diagrams & Manuals
GBH2-24DS (0611228039) Rotary Hammer View Diagrams & Manuals
GBH 223 E (3611B508K0) Rotary Hammer View Diagrams & Manuals
GSB 16 RE (0601148634) Percussion Drill View Diagrams & Manuals
GBH 222 RE (061125079A) Rotary Hammer View Diagrams & Manuals
11224VSR (3611B247A0) Corded Rotary Hammer Drill View Diagrams & Manuals
11224VSR (3611B24739) 11224 Bare Tool 120v Sds Rot.Hammer Us View Diagrams & Manuals
Show More Compatible Models
This item works with the following types of products:
- Drill Parts
- Hammer Drill Parts
- Rotary Hammer Parts
Customer Part Reviews ?
Average Rating (out of 5):
Click to filter by ratings:
5 stars
3
4 stars
1
3 stars
0
2 stars
1
1 stars
0
< PREV
- 1
Great quality part!
This handle fits perfectly on my bosch drill. I'm pleased with the quality.
Guest -
March 3, 2021
Verified Purchase
Exactly what I was looking for. The right part the first time.
Was what I needed, and it was here quick. No generic either, the real mcCoy. Thanks!
Guest -
June 16, 2020
Verified Purchase
Good replacement part and great service.
Once every ten years I loan out a tool. This time it was a Bosch hammer drill and it came back missing the depth gauge fastener. This new one arrived quickly and in a factory sealed bag. I will use eReplacement again. And maybe someday I'll learn.
Guest -
November 11, 2019
Verified Purchase
Part fit my drill perfect,back at work
The handle fit arrived it great condition,and quickly
Guest -
June 22, 2022
Verified Purchase
Wrong Part
Wrong Part
Guest -
August 21, 2019
Verified Purchase
t
t
t -
t days ago
Verified Purchase
eReplacementParts Team
t
Questions & Answers ?
Our customer Service team is at the ready daily to answer your part and product questions.

Ask our Team
We have a dedicated staff with decades of collective experience in helping customers just like you purchase parts to repair their products.
Does this fit my product?Questions & Answers for Auxiliary Handle
No questions have been asked yet
Customer Repair Instructions ?
All our customer repair instructions are solicited directly from other customers just like you who have purchased and replaced this exact part.
Bad o-ring, old
David - February 26, 2022
Tool Type
Rotary Hammer
Difficulty
Medium
Time
15-30 minutes
Tools Used
Screwdriver, Pliers, Socket set, Pick, torx screwdriver, hammer, paper towels, grease, spark
Parts Used
1. Pry off the rubber end with a flathead screwdriver.
2.remove the retaining ring. You can do it with some finesse and screwdrivers. Then remove the bit holder assembly. (Spring, ball, washer, etc )
3. Remove the selector switch. Do this by pushing in the red button and turning it beyond the hammer position, then pull out with pliers.
4. Use torx head screwdriver (t-20?)to remove the front housing bolts, then remove housing .
5. Now you'll see the piston/cylinder assembly. Grab the tip of the piston with needle nose pliers and pull it straight up and out of the cylinder.
6.use a pick tool and remove the old o-ring.
7. Grease up the inside of the cylinder and the piston and install the new o-ring onto the piston. Insert the piston into the cylinder.
8. Now is a good time to clean and regrease everything.
9.put the front housing back on and tighten the bolts.
10. Put the bit holder assy back together.
11.put retaining ring back on. A spark plug socket will help, then two screwdrivers. Put rubber top back on.
12. Put selector switch on.
I think that's all that there was to it. If I forgot a step or two, you'll figure it out. Good luck.
Did you find this story helpful?
Thanks for voting and helping fellow customers!
OEM stands for Original Equipment Manufacturer and means the part you’re buying is sourced directly from the manufacturer who made your product. At eReplacementParts, we sell only genuine OEM parts, guaranteeing the part you’re purchasing is of better design and of higher quality than aftermarket parts.
Our product descriptions are a combination of data sourced directly from the manufacturers who made your product as well as content researched and curated by our content & customer service teams. This content is edited and reviewed internally before being made public to customers.
Our customer service team are at the ready daily to answer your part and product questions. We have a dedicated staff with decades of collective experience in helping customers just like you purchase parts to repair their products.
All our part reviews are solicited directly from other customers who have purchased this exact part. While we moderate these reviews for profanity, offensive language or personally identifiable information, these reviews are posted exactly as submitted and no alterations are made by our team.
All our customer repair instructions are solicited directly from other customers just like you who have purchased and replaced this exact part. While we moderate these reviews for profanity, offensive language or personally identifiable information, these reviews are posted exactly as submitted and no alterations are made by our team.
Based on data from past customer purchasing behaviors, these parts are most commonly purchased together along with the part you are viewing. These parts may be necessary or helpful to replace to complete your current repair.
All our installation videos are created and produced in collaboration with our in-house repair technician, Mark Sodja, who has helped millions of eReplacementParts customers over the last 13 years repair their products. Mark has years of experience in selling and repairing both commercial and residential products with a specialty in gas-powered equipment.
This data is collected from customers who submitted a repair instruction after replacing this exact part. Customers can rate how easy the repair was to complete and how long it took. We aggregate this data to provide a repair rating that allows customers to quickly determine the difficulty and time needed to perform their own repair.