


Why Read This Article?
Finish Nailer Repair - Replacing the Driver Guide (Ridgid Part # 79004001022)
Article Breakdown
Finish Nailer Repair - Replacing the Driver Guide (Ridgid Part # 79004001022)
Video
Tools & Materials
- Phillip's-head screwdriver
- Pick
- Needle-nose pliers
- Small Allen wrenches

Remember to use our Milwaukee parts finder to find the right switch for your Milwaukee drill.
Replacing the Switch:
1. Remove the back cover
Remove the three screws that secure the back cover and set it aside. This will give you access to the switch.
2. Draw a diagram of the wires
Before you remove the switch, you will want to note where all the wires connect to it. You can draw a diagram or use a digital camera or phone to note the wire positions.
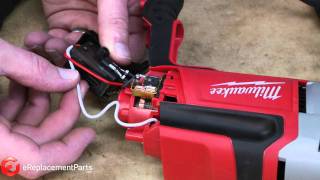
3. Begin removing the wires
Now you can begin removing the wires. On the Milwaukee 0240-20 drill, the wires connect to the switch three different ways:
Allen-wrench screws: Two of the wires are secured by small Allen-wrench screws. Loosen these screws to remove the wires.
Trap doors: Two of the wires are secured with trap doors. Use a pick to trigger the release and then pull the wires free from the switch.
Tabs: The other four wires simply slide into place with tabs. You can use pliers to pull them off their tabs to finish freeing up the switch.

4. Install the new switch
Now use your diagram to install the new switch. Slide the Allen-wrench wires into place then tighten the screws. The trap door wires will click into their slots, and you can slide tab wires into place with your pliers.
Once you have all the wires connected, set the switch into place then route the wires so they won't get pinched when you re-install the back cover.
5. Re-install the back cover
Now set the back cover into place and tighten the screws to finalize the repair.
[Back to Top]
Conclusion:
And that's how you replace the switch on your Milwaukee 0240-20 corded drill. This repair should only take about 15 minutes, especially if you take the time to draw a diagram or take a quick digital photo of your switch's wiring.
Use our power tool parts finder to find parts such as switches for all your Milwaukee and other power tools.
[Back to Top]
What We're About
