


Why Read This Article?
Finish Nailer Repair - Replacing the Driver Guide (Ridgid Part # 79004001022)
Article Breakdown
Finish Nailer Repair - Replacing the Driver Guide (Ridgid Part # 79004001022)
Video
Tools & Materials
- Chainsaw tool
- Flat-head screwdriver
- Hammer
 For this repair we used two Husqvarna chainsaws, but the steps to replace spur and rim sprockets will be the same on most models of saws. You can use eReplacementParts.com's handy parts search feature to find the Husqvarna sprocket that will work with your saw.
Disassembling the Chainsaw
1. Remove the chain brake, bar, and chain
Remove the two nuts that secure the chain brake.
Unlock the brake by shifting the saw lever back, then remove the chain brake.
Now you can slide the bar and chain away from the saw.
2. Remove the cover and spark plug
Remove the chainsaw cover (it may fasten with screws or clips).
Remove the spark plug.
3. Bind the piston
Now you need to bind the piston. If you skip this step, the clutch will spin freely and you won't be able to remove it.
If you have a piston stopper, just thread it into the spark plug hole.
If you don't have a piston stopper, you can use a piece of shoestring dropped into the spark plug hole. Just be sure to leave enough tail on the string that you can remove it later.
With your string or stopper in place, gently pull the starter cord to freeze the piston at top-dead center.
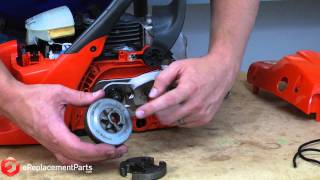
4. Remove the clutch
If you have a clutch removal tool, you can use it to remove the clutch. Otherwise, you can strike a screwdriver with a hammer to loosen it. Remember that the clutch threads onto the saw using a reverse thread.

1. Replacing a spur/star sprocket
Spur sprockets--also referred to as star sprockets--combine the sprocket with the clutch drum. To replace a spur sprocket, just replace the entire clutch drum.
2. Replacing a rim sprocket
A rim sprocket is a separate piece from the clutch drum. In most cases you will only need to replace the sprocket, unless the drum is especially worn.
Just slide the rim sprocket onto the drum's splines to mate the two pieces.
1. Replace the sprocket and clutch drum
Slide the sprocket and drum back onto the saw.
2. Seat the clutch
Now you can seat the clutch using the method you used to remove it. One or two good hits with the hammer should seat it into place and it will tighten as you use the saw.
3. Unbind the piston
Now you can remove your piece of string or piston stopper. Replace the spark plug and connect it to the boot, then replace the cover.
4. Replace the bar, chain, and chain brake
Set the bar and chain back in place on the saw. Replace the chain brake cover and loosely tighten the nuts.
5. Tension the chain
Tension the chain to finalize the repair. Check out our article on tensioning a chainsaw chain for more information on how to get the proper tension.
[Back to Top]
Conclusion
Replacing the sprocket and clutch is an easy repair that you can complete in about 30 minutes. This repair will troubleshoot most of your chain-not-moving problems, and as long as you get the right sprocket for your saw, the repair should be a breeze.
Remember to get the right parts for your repair needs by using our simple lawn equipment parts finder.
[Back to Top]
What We're About
