


Why Read This Article?
Finish Nailer Repair - Replacing the Driver Guide (Ridgid Part # 79004001022)
Article Breakdown
Finish Nailer Repair - Replacing the Driver Guide (Ridgid Part # 79004001022)
Video
Tools & Materials
- Socket wrench
- Pliers
- Container for fuel
- Shop rag
- Carburetor cleaner
- Small piece of fishing line (optional)
Safety Guidelines
This article will teach you two ways to clean your carburetor:
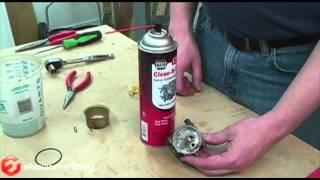
- With carburetor cleaning spray
- With an ultra sonic cleaner
If your carburetor has worn o-rings and gaskets, you will want to use a carburetor repair kit in addition to the cleaning. Check ou eReplacementParts.com's Walbro repair parts page to get the parts you need to get your carburetor running like new again. [Back to top]
Disassembling the Carburetor
1. Remove the carburetor bowl.
You should disassemble the carburetor over a container because fuel collects in the carburetor bowl and will leak out during the disassembly. Remove the nut beneath the bowl, then remove the bowl and drain any remaining fuel.
2. Inspect gaskets and o-rings.
If the o-rings and gaskets on your carburetor are worn or cracked, you will want to install a repair kit. Otherwise, just set them aside until it's time to reassemble the carburetor.
3. Remove the float.
Use pliers to remove the pin holding the float to the carburetor.
Remove the float from the carburetor, taking special care to catch the needle nestled into the float. Set the float and needle aside.
 [Back to top]
Cleaning the Carburetor
You can use a spray carburetor cleaner or a sonic cleaner to perform this repair. If you do a lot of repair work, look into purchasing a sonic cleaner as it cleans products very well, shaking dirt from even the smallest passages. You can find a sonic cleaner like the one used in this article for less than $100.
Using spray carburetor cleaner is a quick way to maintain your carburetor. While it won't knock out dirt like a sonic cleaner, spray cleaner will help return your carburetor to good working condition.
1. Spray down the carburetor.
Spray down the exterior of the carburetor and the bowl.
2. Clean small passages.
Spray cleaner into the carburetor's small passages.
You can use a piece of fishing line to break dirt loose in all the small passages. Never use a metal object to clean any of the openings on your carburetor as this will damage the unit.
3. Clean the needle.
Spray some carburetor cleaner on a shop rag and use it to clean the tip of the float needle.
Now you're ready to reassemble your carburetor. [Back to top]
A sonic cleaner will penetrate deep into the small passages of the carburetor, loosening dirt you normally cannot reach. They are easy to use and can restore even the dirtiest parts to like-new condition.
1. Preheat the water.
If your sonic cleaner has a heating function, you will want to preheat the water for 30 minutes before you begin the repair.
2. Submerge the carburetor and bowl.
Once your water is warm--or if your cleaner doesn't have a heating function--simply submerge the carburetor and bowl in the water.
3. Start the cleaner.
Set the timer on your cleaner to six minutes and turn it on.
Wait six minutes.
4. Remove the parts and dry them off.
Use compressed air to blow any residual water out of the carburetor. Use a shop rag to wipe the carburetor and bowl clean.
5. Clean the float needle.
This is also a good time to clean the float needle. Spray some carburetor cleaner on a rag and clean off the tip of the float needle.
6. Reassemble and reinstall the carburetor.
The sonic cleaner will remove most of the dirt from your carburetor, but it also leaves some water in the passages. Reassemble your carburetor and reinstall it on the engine as quickly as possible. Run your machine for a few minutes to push fuel through the carburetor, cleaning out all the water in the process. [Back to top] Reassembling the Carburetor
1. Reinstall the float.
Install the float needle into its holder on the float.
Align the float with the holes on the carburetor and reinstall the pin that attaches the float to the carburetor.
2. Reinstall the bowl o-ring.
Replace the rubber o-ring that seals the bowl to the carburetor body.
3. Install the bowl.
Align the bowl with the carburetor body and tighten the nut.
 [Back to top]
Conclusion
Cleaning your carburetor will help improve engine performance and increase the life of the tools you count on. If you regularly maintain tools, investing in a sonic cleaner can really pay off since the sonic action helps loosen dirt in hard-to-reach places.
[Back to top]
Conclusion
Cleaning your carburetor will help improve engine performance and increase the life of the tools you count on. If you regularly maintain tools, investing in a sonic cleaner can really pay off since the sonic action helps loosen dirt in hard-to-reach places.
To help you see the kind of difference a sonic cleaner can make, take a look at the what the carburetor looked like before:
 After six minutes in the sonic cleaner, the carburetor shines like new:
 In addition to the professional maintenance information that we provide, eReplacementParts.com also offers a full inventory of carburetor parts and repair kits for when your carburetor needs more than a quick cleaning.
Use our easy search features to find the right parts for your four-cycle engine and to find other replacement parts available at our warehouse.
[Back to top]
What we're about
In addition to the professional maintenance information that we provide, eReplacementParts.com also offers a full inventory of carburetor parts and repair kits for when your carburetor needs more than a quick cleaning.
Use our easy search features to find the right parts for your four-cycle engine and to find other replacement parts available at our warehouse.
[Back to top]
What we're about
