


Why Read This Article?
Finish Nailer Repair - Replacing the Driver Guide (Ridgid Part # 79004001022)
Article Breakdown
Finish Nailer Repair - Replacing the Driver Guide (Ridgid Part # 79004001022)
Video

Tools & Materials
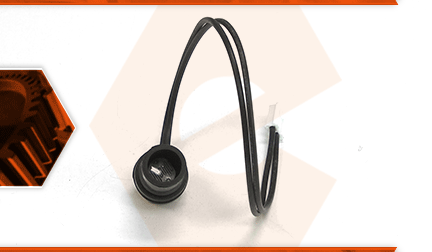
The photocell assembly is a sensor that verifies ignition has occurred and that combustion is taking place. It senses the light (from flame) in the combustion chamber and sends this data to the circuit board. If ignition doesn't take place, or combustion stops during operation, the photocell will signal the circuit board, which signals another circuit to shut down the heater. The photocell can become dirty, or fail over time.
Let's get started.
REMOVING THE PHOTOCELL 1. Safety first.
a. Disconnect the heater from its source of electricity.
b. Drain any excess fuel from the heater.
2. Remove the top cover.
a. Remove the screws securing the top cover to the lower housing.
b. Lift the top cover away from the unit.
3. Remove the fan guard.
a. Lift the fan guard away from the lower housing.
4. Remove the side cover. There are covers on both sides of the heater. The following steps refer to the side cover containing the ON/OFF switch:
a. Remove the (4) screws securing the side cover to the lower housing.
b. Remove the side cover from the circuit board. (The cover is tethered to the circuit board by the switch wires, so be careful not to pull the side cover too far in any direction).
5. Disconnect the photocell from the circuit board.
a. Use wire cutters to cut the cable tie securing the wire bundle to the circuit board.
b. Trace the wires from the photocell to the circuit board (to identify the point-of-attachment).
c. Disconnect the photocell (wiring) connector from the circuit board.
6. Reposition the fuel line. The wires for the photocell pass through the same opening (in the housing) as one of the fuel lines. This fuel line must be temporarily repositioned for the photocell wiring harness to fit through the opening.
a. Identify the fuel line that passes through the same opening in the housing as the photocell wires.
b. Follow the fuel line to its point-of-attachment on the heater.
c. Use long-nosed pliers to release the clamp securing the fuel line to the inlet/outlet port.
d. Disconnect the fuel line from the inlet/outlet port.
e. Remove the clamp from the fuel line.
f. Push the fuel line through the opening in the lower housing (from the inside).
7. Remove the photocell.
a. Pull the photocell wiring harness through the opening in the lower housing.
b. The photocell is coupled to the mounting bracket with an O-ring. To remove the photocell, pull it gradually away from the bracket until the O-ring releases.
INSTALLING THE NEW PHOTOCELL
8. Install the photocell.
a. Install the new photocell onto the mounting bracket.
b. Press the photocell firmly into the bracket to ensure that the O-ring seats (and secures the assembly).
c. Route the photocell wiring harness beneath the (connected) fuel line and through the opening on the lower housing.
REASSEMBLING THE UNIT 9. Reinstall the fuel line.
a. Route the fuel line back through the shared opening on the lower housing (toward the inside of the heater).
b. Install the fuel line clamp onto the fuel line.
c. Connect the fuel line to the inlet/outlet port.
d. Secure the fuel line with the clamp.
10. Connect the photocell to the circuit board.
a. Connect the new photocell wiring harness to open slot on the circuit board.
11. Re-bundle the wires.
a. Gather all of the loose wires (surrounding the circuit board) into a bundle.
b. Secure the wire bundle with a new cable tie.
12. Reinstall the side cover.
a. Install the side cover over the circuit board.
b. Secure the side cover with the (4) screws.
13. Reinstall the fan guard.
a. Align the fan guard with the slots on the lower housing.
b. Press down firmly on the fan guard to seat it in the lower housing.
14. Reinstall the top cover.
a. Install the top cover onto the lower housing.
b. Secure the top cover with the screws.
