


Why Read This Article?
Finish Nailer Repair - Replacing the Driver Guide (Ridgid Part # 79004001022)
Article Breakdown
Finish Nailer Repair - Replacing the Driver Guide (Ridgid Part # 79004001022)
Video

Tools & Materials
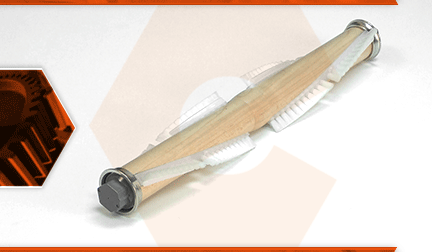
The brush roll assembly consists of the wooden roller (with the brushes attached) and the end-bearings. After years of use, the brushes on the roller can wear out. The bearings can also wear out and fail.
Let's get started.
REMOVING THE BRUSH ROLL 1. Remove the nozzle guard.
a. Pull the metal tab (on the bottom of the nozzle guard) away from the brush roll assembly to disengage the locking tabs.
b. Remove the nozzle guard from the vacuum.
2. Remove the adjustment dial.
a. Use a screwdriver to carefully pry the adjustment dial away from the nozzle.
3. Remove the brush roll.
a. Rotate the brush roll clockwise (backwards) until the drive belt disengages the drive shaft.
b. Remove the brush roll assembly (and the belt) from the nozzle.
c. Remove the drive belt from the brush roll.
INSTTALLING THE NEW BRUSH ROLL
4. Install the brush roll.
a. Loop the belt around the new brush roll assembly.
b. Locate the arrow (stamped into the wood) on the new brush roll assembly.
c. Orient the brush roll so that the arrow points to the right-hand side of the vacuum.
d. Align the brush roll bearings with the holders on the nozzle.
e. Install the brush roll assembly (and the new belt) into the nozzle.
REASSEMBLING THE UNIT
5. Reconnect the belt.
a. Align the belt with the opening on the inside of the nozzle.
b. The belt must be partially twisted prior to engaging the drive shaft. (The adjustment dial contains a diagram for proper belt alignment).
c. Insert a screwdriver through the opening on the front of the nozzle and pass the screwdriver through the drive belt.
d. Use the screwdriver to carefully twist the belt into alignment with the drive shaft (toward the LEFT-HAND side of the vacuum; per the diagram on the adjustment dial). If the belt is installed (twisted) incorrectly, it will slip off the drive shaft when the vacuum is powered on.
e. Rotate the brush roll counter-clockwise (forward) to seat the belt onto the drive shaft.
6. Reinstall the adjustment dial.
a. Align the adjustment dial with the opening on the nozzle.
b. Press the adjustment dial into position (it should snap into place). 7. Reinstall the nozzle guard.
a. Install the nozzle guard onto the nozzle.
b. Tap the nozzle guard lightly to snap it into place against the nozzle assembly.
