
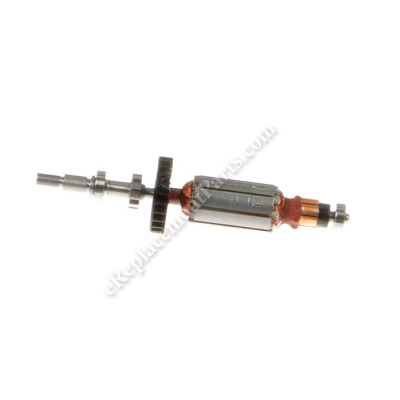


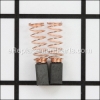
It is a genuine OEM sourced replacement part that is designed for use with Dremel rotary tools. This item includes an armature, fan, armature bearing and commutator end bearing. You'll need to replace the armature if you notice smoke or sparks coming from the vents on the back of your tool. If this happens, you've probably overloaded your armature and some point, which caused the insulation to break down. It is highly recommended to replace both carbon brushes when replacing an armature.
Armature 2610004634
OEM part for: Dremel, Bosch
Part Number: 2610004634
$38.91
Usually ships in 7 - 12 business days
7 - 12 business days
Jump To:
Frequently Purchased Together ?
Compatibility
This part will fit the following 2 machines
Dremel
4000 Variable-Speeds Rotary Tool View Diagrams & Manuals
4000 (F013400001) Bare Tool 120v Usa 4000 View Diagrams & Manuals
This item works with the following types of products:
- Multi-Tool Parts
Customer Part Reviews ?
Average Rating (out of 5):
Click to filter by ratings:
5 stars
3
4 stars
0
3 stars
0
2 stars
0
1 stars
0
< PREV
- 1
The right part, the right price, delivered promptly.
The armature fit perfectly and once installed, the Dremel was back in service.
Guest -
March 14, 2022
Verified Purchase
Easy repair part fit perfectly.
I am always leery of purchases online. You don’t get the face to face communication and reassurance that the part your ordering is the correct one. The description of the part was very easy to understand and seems pretty cut and dry. The part arrived when they said it would. I installed it that night and it now works perfectly. One word of advice, try to keep the small parts from rolling off the coffee table onto the carpet. I was on my hands and knees for half an hour looking for a spring!
Guest -
August 12, 2020
Verified Purchase
Perfect Replacement for the Original
Brand new part, fit right where the old one did. Replaced the original due to a failed bearing, but now it runs smooth at all speeds.
Guest -
February 8, 2020
Verified Purchase
t
t
t -
t days ago
Verified Purchase
eReplacementParts Team
t
Questions & Answers ?
Our customer Service team is at the ready daily to answer your part and product questions.

Ask our Team
We have a dedicated staff with decades of collective experience in helping customers just like you purchase parts to repair their products.
Does this fit my product?Questions & Answers for Armature
just asking i took the armature out their big gouge marks on the armature is that the way they supposed to look 3 on one side and 2 on the other side note baring moving free
Keith
for model number 4000
asked on 2022-11-27
Hello Keith, thank you for your questions. No, there should not be big gouge marks on the armature. We look forward to hearing from you.
eReplacementParts Team November 27, 2022
Customer Repair Instructions ?
All our customer repair instructions are solicited directly from other customers just like you who have purchased and replaced this exact part.
Smoking motor, RPM struggling
NATHANIEL - September 30, 2016
👍 3 of 4 people found this instruction helpful
Tool Type
MultiTool
Difficulty
Easy
Time
Less than 15 minutes
Tools Used
Screwdriver
Parts Used
Unscrewed the housing
Fished the motor out of the central casing
Replaced the old motor with the new one
Re-closed the housing, carefully making sure wires and adjustable mechanics fit correctly in place.
Fished the motor out of the central casing
Replaced the old motor with the new one
Re-closed the housing, carefully making sure wires and adjustable mechanics fit correctly in place.
Did you find this story helpful?
Thanks for voting and helping fellow customers!
Excessive sparking and running at very slow speed
Herby - May 11, 2017
👍 1 of 1 people found this instruction helpful
Tool Type
MultiTool
Difficulty
Easy
Time
Less than 15 minutes
Tools Used
Screwdriver, Allen wrench
Parts Used
1. Removed cover and brushes
2. Removed old armature
3. Replaced with new armature
4. Replaced cover and added new brushes
2. Removed old armature
3. Replaced with new armature
4. Replaced cover and added new brushes
Did you find this story helpful?
Thanks for voting and helping fellow customers!
Bent armature, tool fell from the bench.
Dale - February 24, 2022
Tool Type
MultiTool
Difficulty
Easy
Time
Less than 15 minutes
Tools Used
Screwdriver
Parts Used
Unplug tool.
2-remove five torx screws, nose piece and collet.
3- remove brushes.
4-Pry case apart with Bench made pocket knife.
5-Pull the stator and old armature out of the case.
6-Clean off the dirt and gook in the groove and inside of case.
7-Put new armature in the bearing retainer and then re-assemble in reverse order.
Did you find this story helpful?
Thanks for voting and helping fellow customers!
One of the brushes broke into pieces catching one of the brass plates ripping it from the armature while I was sharpening a lawnmower blade.
David - October 17, 2019
Tool Type
MultiTool
Difficulty
Medium
Time
Less than 15 minutes
Tools Used
Screwdriver, Pliers
Parts Used
1. Remove hanger bracket by spreading and pulling from tool. 2. Remove screws using a driver with a star bit. 3. Remove the brushes on both sides of the tool by unscrewing the brush caps. 4. Gently and carefully pry apart the two halves with a blade screw driver. 5.Carefully lift slightly and pull the armature through the housing enough to allow room to remove the rubber coverage of the rear bearings. 6.Continue to slowly remove the armature successfully clearing the housing. 7. Reverse steps to install the new armature and reassemble tool.
Did you find this story helpful?
Thanks for voting and helping fellow customers!
Armature worn out
Kerrry - June 23, 2019
Tool Type
MultiTool
Difficulty
Easy
Time
15-30 minutes
Tools Used
Power Drill, Deemed 4000
Parts Used
Opened caseing removed armature and replaced with new one
Did you find this story helpful?
Thanks for voting and helping fellow customers!
Armature needed replacement after it was damaged (bent) after falling off workbench
Tim - May 16, 2019
Tool Type
MultiTool
Difficulty
Easy
Time
Less than 15 minutes
Tools Used
Parts Used
Removed commutator brushes, removed torx screws and then removed damaged armature. Installed new armature and reassembled. Was ready to go in about 15 minutes.
Did you find this story helpful?
Thanks for voting and helping fellow customers!
My father crushed the copper end of the armature, breaking off a piece, and which caused the brush and springs to wear out
Karen - December 28, 2017
Tool Type
MultiTool
Difficulty
Easy
Time
Less than 15 minutes
Tools Used
Screwdriver
Parts Used
A simple repair. I opened the Dremel multi tool up to see what was causing the problem. The detailed pictures and parts list made ordering the correct parts easy. I was just planning to purchase the armature but after reading a few comments, I realized I would also need the brush and springs. After receiving the parts, I removed 5 screws, pulled out the old armature and slid the new one in. Reassembled the tool and slid the brush and springs in on either side. Done and fully functional!
Did you find this story helpful?
Thanks for voting and helping fellow customers!
Would not run other than a sporadic burst of rotation occasionally.
Aaron - February 19, 2017
Tool Type
MultiTool
Difficulty
Easy
Time
15-30 minutes
Tools Used
, Torx head screwdriver
Parts Used
1. Remove brushes.
2. Remove screws carefully separate tool housing.
3. Remove and replace armature don't forget to reinstall original rubber bushing on rear bearing of new armature bearing.
4. Reassemble housing and install brushes.
2. Remove screws carefully separate tool housing.
3. Remove and replace armature don't forget to reinstall original rubber bushing on rear bearing of new armature bearing.
4. Reassemble housing and install brushes.
Did you find this story helpful?
Thanks for voting and helping fellow customers!
The threads on the shaft were cross threaded
George - December 21, 2016
Tool Type
MultiTool
Difficulty
Easy
Time
Less than 15 minutes
Tools Used
, Torx bit
Parts Used
I opened and separated the two half's and gently lifted the rear bearing along with the rubber ring holding the bearing, then I removed the rubber ring off the bearing and slide the armature straight out from the housing.
Then I reversed the process.
Closed it up checked it out and it worked just fine. Repairs where complete.
Then I reversed the process.
Closed it up checked it out and it worked just fine. Repairs where complete.
Did you find this story helpful?
Thanks for voting and helping fellow customers!
OEM stands for Original Equipment Manufacturer and means the part you’re buying is sourced directly from the manufacturer who made your product. At eReplacementParts, we sell only genuine OEM parts, guaranteeing the part you’re purchasing is of better design and of higher quality than aftermarket parts.
Our product descriptions are a combination of data sourced directly from the manufacturers who made your product as well as content researched and curated by our content & customer service teams. This content is edited and reviewed internally before being made public to customers.
Our customer service team are at the ready daily to answer your part and product questions. We have a dedicated staff with decades of collective experience in helping customers just like you purchase parts to repair their products.
All our part reviews are solicited directly from other customers who have purchased this exact part. While we moderate these reviews for profanity, offensive language or personally identifiable information, these reviews are posted exactly as submitted and no alterations are made by our team.
All our customer repair instructions are solicited directly from other customers just like you who have purchased and replaced this exact part. While we moderate these reviews for profanity, offensive language or personally identifiable information, these reviews are posted exactly as submitted and no alterations are made by our team.
Based on data from past customer purchasing behaviors, these parts are most commonly purchased together along with the part you are viewing. These parts may be necessary or helpful to replace to complete your current repair.
All our installation videos are created and produced in collaboration with our in-house repair technician, Mark Sodja, who has helped millions of eReplacementParts customers over the last 13 years repair their products. Mark has years of experience in selling and repairing both commercial and residential products with a specialty in gas-powered equipment.
This data is collected from customers who submitted a repair instruction after replacing this exact part. Customers can rate how easy the repair was to complete and how long it took. We aggregate this data to provide a repair rating that allows customers to quickly determine the difficulty and time needed to perform their own repair.