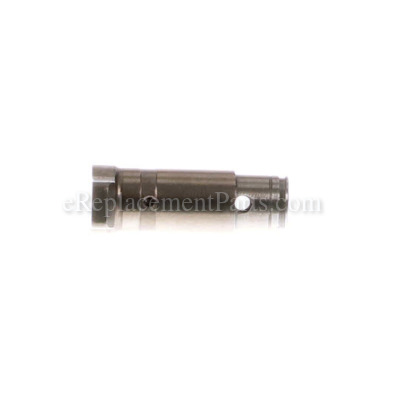
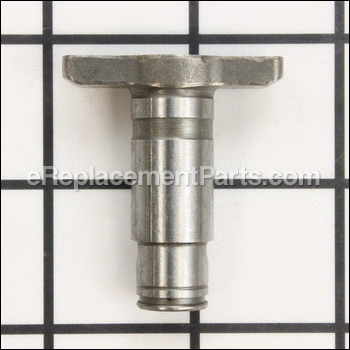
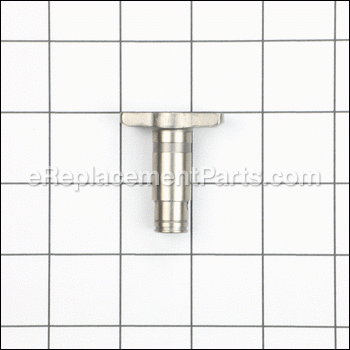


The anvil fits between the nylon washer and the hammer. This item is available individually and is made out of metal. This is an original Makita part for use in impact drivers. It might require a screwdriver and an adjustable wrench to replace this part. It will require replacing if it becomes broken.
Anvil M 324432-0
OEM part for: Makita
Part Number: 324432-0
$32.01
In Stock
Compatibility
This part will fit the following 29 machines
Makita
6935FDWDE 14.4V Cordless Impact Driver View Diagrams & Manuals
6980FDWDE Cordless Impact Driver View Diagrams & Manuals
BTD130FW Impact Driver View Diagrams & Manuals
BTD140 Impact Driver View Diagrams & Manuals
6936FD Cordless Impact Driver View Diagrams & Manuals
BTD142 18V Compact Lithium-Ion Cordless Impact Driver View Diagrams & Manuals
6935FD Drill / Driver View Diagrams & Manuals
6936FDWDE Drill / Driver View Diagrams & Manuals
6980FD Drill / Driver View Diagrams & Manuals
6980FDWAE Drill / Driver View Diagrams & Manuals
BTD130FSFEW (Type 1) Drill / Driver View Diagrams & Manuals
BTD130FSFEW (Type 2) Drill / Driver View Diagrams & Manuals
BTD130FSFEW (Type 3) Drill / Driver View Diagrams & Manuals
BTD130F (Type 1) Drill / Driver View Diagrams & Manuals
BTD130F (Type 2) Drill / Driver View Diagrams & Manuals
BTD130F (Type 3) Drill / Driver View Diagrams & Manuals
BTD130FZ (Type 1) Drill / Driver View Diagrams & Manuals
BTD130FZ (Type 2) Drill / Driver View Diagrams & Manuals
BTD130FZ (Type 3) Drill / Driver View Diagrams & Manuals
BTD140 (Type 1) Drill / Driver View Diagrams & Manuals
BTD140 (Type 2) Drill / Driver View Diagrams & Manuals
BTD140 (Type 3) Drill / Driver View Diagrams & Manuals
BTD140Z (Type 1) Drill / Driver View Diagrams & Manuals
BTD140Z (Type 2) Drill / Driver View Diagrams & Manuals
BTD140Z (Type 3) Drill / Driver View Diagrams & Manuals
BTD142H (Type 1) Drill / Driver View Diagrams & Manuals
BTD142H (Type 2) Drill / Driver View Diagrams & Manuals
BTD142HW (Type 1) Drill / Driver View Diagrams & Manuals
BTD142HW (Type 2) Drill / Driver View Diagrams & Manuals
Show More Compatible Models
This item works with the following types of products:
- Impact Driver Parts
Customer Part Reviews ?
Average Rating (out of 5):
Click to filter by ratings:
5 stars
1
4 stars
0
3 stars
0
2 stars
0
1 stars
0
< PREV
- 1
Excellent how-to videos; right part
First, thank you for the videos showing how to remove the chuck, and then dissect the Makita driver down to the anvil (which I’d globbed up with a wrong bit) AND then put it back together working properly! You had the right part which was delivered quickly. The right part plus confidence from your videos quickly had my driver back to work. Thank you!!!
Guest -
March 20, 2020
Verified Purchase
t
t
t -
t days ago
Verified Purchase
eReplacementParts Team
t
Questions & Answers ?
Our customer Service team is at the ready daily to answer your part and product questions.

Ask our Team
We have a dedicated staff with decades of collective experience in helping customers just like you purchase parts to repair their products.
Does this fit my product?Questions & Answers for Anvil M
No questions have been asked yet
Customer Repair Instructions ?
All our customer repair instructions are solicited directly from other customers just like you who have purchased and replaced this exact part.
I had a bit completely jammed in the anvil
Greg - January 24, 2017
👍 1 of 1 people found this instruction helpful
Tool Type
Impact Driver
Difficulty
Medium
Time
1-2 hours
Tools Used
Screwdriver, Adjustable Wrench, Bench vise
Parts Used
Watched a youtube video on the Replacement Parts channel- and followed the instructions. It was perfect. I also cleaned the inside of my impact driver while it was open. The most difficulty I had was removing the jump loop and spring because a bit was jammed in the anvil. This must have taken an hour or more alone. Also in reassembling the rear round casing- I found if I tightened the screws down all the way- it impeded the performance of the brushes. I made a rubber gasket out of a rubber band and it provided enough of a spacer for the tool to work at full speed/ performance.
Did you find this story helpful?
Thanks for voting and helping fellow customers!
Anvil apparently worn out. The bit was stuck in the anvil and while I tried multiple times could not remove the bit
Michael - October 1, 2020
Tool Type
Impact Driver
Difficulty
Medium
Time
30-60 minutes
Tools Used
Screwdriver, Adjustable Wrench
Parts Used
I followed the repair video by ereplacements.com to disassemble and reassemble the drill. I did have two difficulties: When removing the spring washer it shot out quickly and I never was able to find it so I had to purchase one of those also. Also my transmission was difficult to open but I eventually succeeded. The video was extremely helpful and I recommend it
Did you find this story helpful?
Thanks for voting and helping fellow customers!
Old socket extension stuck in impact driver..
maurice - February 12, 2016
Tool Type
Impact Driver
Difficulty
Easy
Time
30-60 minutes
Tools Used
Screwdriver, hacksaw
I used replacement parts on you tube to see how it was done to basically change out the anvil.
I then went to e-replacement parts.com to find the parts I would need.
Parts came in a good timely manner.. I hack sawed the socket off, unscrewed the impact driver casings, replaced parts, and put it back together. I did use the e-replacement diagrams while doing this ,just to make sure I had it right..
I would use and recommend e-replacement parts to everyone in a heart beat, after all replacing something is much cheaper than buying a new one..
Thank you...
Did you find this story helpful?
Thanks for voting and helping fellow customers!
Bit broke in socket (Anvil)
Jeff - July 20, 2016
👍 0 of 1 people found this instruction helpful
Tool Type
Impact Driver
Difficulty
Medium
Time
15-30 minutes
Tools Used
Screwdriver
1. Removed Chuck
2. Opened impact driver case
3. Disassembled transmission
4. Removed and replaced Anvil
5. Reassembled impact driver
2. Opened impact driver case
3. Disassembled transmission
4. Removed and replaced Anvil
5. Reassembled impact driver
Did you find this story helpful?
Thanks for voting and helping fellow customers!
OEM stands for Original Equipment Manufacturer and means the part you’re buying is sourced directly from the manufacturer who made your product. At eReplacementParts, we sell only genuine OEM parts, guaranteeing the part you’re purchasing is of better design and of higher quality than aftermarket parts.
Our product descriptions are a combination of data sourced directly from the manufacturers who made your product as well as content researched and curated by our content & customer service teams. This content is edited and reviewed internally before being made public to customers.
Our customer service team are at the ready daily to answer your part and product questions. We have a dedicated staff with decades of collective experience in helping customers just like you purchase parts to repair their products.
All our part reviews are solicited directly from other customers who have purchased this exact part. While we moderate these reviews for profanity, offensive language or personally identifiable information, these reviews are posted exactly as submitted and no alterations are made by our team.
All our customer repair instructions are solicited directly from other customers just like you who have purchased and replaced this exact part. While we moderate these reviews for profanity, offensive language or personally identifiable information, these reviews are posted exactly as submitted and no alterations are made by our team.
Based on data from past customer purchasing behaviors, these parts are most commonly purchased together along with the part you are viewing. These parts may be necessary or helpful to replace to complete your current repair.
All our installation videos are created and produced in collaboration with our in-house repair technician, Mark Sodja, who has helped millions of eReplacementParts customers over the last 13 years repair their products. Mark has years of experience in selling and repairing both commercial and residential products with a specialty in gas-powered equipment.
This data is collected from customers who submitted a repair instruction after replacing this exact part. Customers can rate how easy the repair was to complete and how long it took. We aggregate this data to provide a repair rating that allows customers to quickly determine the difficulty and time needed to perform their own repair.