


Genuine Husqvarna replacement part, this part is sold individually.
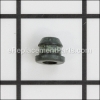
The 503939601 Air Purge does just what the part name says.
It purges the air out of the carburetor.
Then it forces fuel from the fuel tank and fuel line in to the carburetor.
Air Purge 503936601
OEM part for: Husqvarna, Jonsered
Part Number: 503936601
$13.69
In Stock
Jump To:
Product Description ?
- Classification: Part
- Weight: 0.01 lbs.
- Also Known As: Purge Bulb, Plunger, Purge Bubble, Purger Bulb, Primer Bulb
- Shipping: Ships Worldwide
Frequently Purchased Together ?


Compatibility
This part will fit the following 645 machines
Husqvarna
435 (2008-05) Chainsaw View Diagrams & Manuals
435 E (2008-05) Chainsaw View Diagrams & Manuals
440 E (2008-05) Chainsaw View Diagrams & Manuals
445 (2007-03) Chainsaw View Diagrams & Manuals
445 (2007-09) Chainsaw View Diagrams & Manuals
445 E (2007-03) Chainsaw View Diagrams & Manuals
445 E (2007-09) Chainsaw View Diagrams & Manuals
450 E (2007-03) Chainsaw View Diagrams & Manuals
450 E (2007-09) Chainsaw View Diagrams & Manuals
455 E (2007-01) Chainsaw View Diagrams & Manuals
455 E (2006-06) Chainsaw View Diagrams & Manuals
455 (2004-10) Chainsaw View Diagrams & Manuals
455 (2005-01) Chainsaw View Diagrams & Manuals
455 (2005-03) Chainsaw View Diagrams & Manuals
455 Rancher (2006-02) Chainsaw View Diagrams & Manuals
455 (2006-06) Chainsaw View Diagrams & Manuals
455 (2007-01) Chainsaw View Diagrams & Manuals
460 (2005-03) Chainsaw View Diagrams & Manuals
460 (2006-02) Chainsaw View Diagrams & Manuals
460 (2006-06) Chainsaw View Diagrams & Manuals
460 (2007-01) Chainsaw View Diagrams & Manuals
334 T (2003-05) Chainsaw View Diagrams & Manuals
334 T (2003-11) Chainsaw View Diagrams & Manuals
334 T (2004-01) Chainsaw View Diagrams & Manuals
334 T (2005-03) Chainsaw View Diagrams & Manuals
334 T (2006-01) Chainsaw View Diagrams & Manuals
334 T (2006-09) Chainsaw View Diagrams & Manuals
338 XPT (2003-05) Chainsaw View Diagrams & Manuals
338 XPT (2003-11) Chainsaw View Diagrams & Manuals
338 XPT (2004-01) Chainsaw View Diagrams & Manuals
338 XPT (2005-03) Chainsaw View Diagrams & Manuals
338 XPT (2006-01) Chainsaw View Diagrams & Manuals
338 XPT (2006-09) Chainsaw View Diagrams & Manuals
340 (2005-05) Chainsaw View Diagrams & Manuals
340 (2006-06) Chainsaw View Diagrams & Manuals
340 (2007-01) Chainsaw View Diagrams & Manuals
340 E (2005-05) Chainsaw View Diagrams & Manuals
340 E (2006-06) Chainsaw View Diagrams & Manuals
345 (2007-01) Chainsaw View Diagrams & Manuals
345 E (2005-05) Chainsaw View Diagrams & Manuals
345 E (2006-06) Chainsaw View Diagrams & Manuals
346 XP (2007-08) Chainsaw View Diagrams & Manuals
350 (2005-05) Chainsaw View Diagrams & Manuals
350 (2006-06) Chainsaw View Diagrams & Manuals
350 (2007-01) Chainsaw View Diagrams & Manuals
350 EPA (2006-06) Chainsaw View Diagrams & Manuals
353 (2007-08) Chainsaw View Diagrams & Manuals
225 BX (2001-06) Blower View Diagrams & Manuals
225 BX (2006-09) Blower View Diagrams & Manuals
225 HBV (2000-01) Blower View Diagrams & Manuals
356 BF (2004-10) Blower View Diagrams & Manuals
356 BT (2004-10) Blower View Diagrams & Manuals
325 LX (2000-10) Trimmer View Diagrams & Manuals
325 LX (2001-01) Trimmer View Diagrams & Manuals
325 LXT (2000-01) Trimmer View Diagrams & Manuals
325 RX (2002-01) Trimmer View Diagrams & Manuals
326 C (2001-03) Trimmer View Diagrams & Manuals
326 L (2001-03) Trimmer View Diagrams & Manuals
326 LX (2001-03) Trimmer View Diagrams & Manuals
325 RXT (2002-01) Trimmer View Diagrams & Manuals
325 RDX (2002-01) Trimmer View Diagrams & Manuals
325 RJX (2002-01) Trimmer View Diagrams & Manuals
326 SX (2002-10) Sweeper View Diagrams & Manuals
323 P4 (2002-05) Pole Saw View Diagrams & Manuals
325 P4 X-Series (2001-02) Pole Saw View Diagrams & Manuals
325 P4 X-Series (2002-05) Pole Saw View Diagrams & Manuals
325 P5 X-Series (2002-05) Pole Saw View Diagrams & Manuals
326 P4 (2002-05) Pole Saw View Diagrams & Manuals
326 P4 (2004-06) Pole Saw View Diagrams & Manuals
326 P4 (2006-07) Pole Saw View Diagrams & Manuals
326 P4 X-Series (2001-09) Pole Saw View Diagrams & Manuals
326 P4 X-Series (2002-05) Pole Saw View Diagrams & Manuals
326 P5 X-Series (2002-05) Pole Saw View Diagrams & Manuals
326 P5 X-Series (2006-07) Pole Saw View Diagrams & Manuals
326 P5X (2004-06) Pole Saw View Diagrams & Manuals
227 L (1999-09) Line Trimmer View Diagrams & Manuals
227 LD (1999-09) Line Trimmer View Diagrams & Manuals
227 R (1999-09) Line Trimmer View Diagrams & Manuals
227 RD (1999-09) Line Trimmer View Diagrams & Manuals
232 L (2000-04) Line Trimmer View Diagrams & Manuals
240 L (2000-04) Line Trimmer View Diagrams & Manuals
322 C (1999-03) Line Trimmer View Diagrams & Manuals
322 C (2000-04) Line Trimmer View Diagrams & Manuals
322 L (2000-01) Line Trimmer View Diagrams & Manuals
322 L (2000-04) Line Trimmer View Diagrams & Manuals
322 R (106 25 68-62) (1999-03) Line Trimmer View Diagrams & Manuals
325 CX (2000-04) Line Trimmer View Diagrams & Manuals
325 LX (106 25 68-62) (1999-03) Line Trimmer View Diagrams & Manuals
325 LX (2000-01) Line Trimmer View Diagrams & Manuals
325 LX (2000-04) Line Trimmer View Diagrams & Manuals
325 LXT (2000-04) Line Trimmer View Diagrams & Manuals
325 RJX (2000-01) Line Trimmer View Diagrams & Manuals
325 RX (106 25 68-62) (1999-03) Line Trimmer View Diagrams & Manuals
225 AI 15 (1998-09) Ice Auger View Diagrams & Manuals
225 AI 25 (1998-09) Ice Auger View Diagrams & Manuals
325 E X-Series (2001-01) Edger View Diagrams & Manuals
325 E X-Series (2006-04) Edger View Diagrams & Manuals
325 E X-Series (E-Tech 2) (2001-01) Edger View Diagrams & Manuals
326 E X-Series (E-Tech 2) (2001-03) Edger View Diagrams & Manuals
326 E X-Series (E-Tech 2) (2002-02) Edger View Diagrams & Manuals
326 ES (2008-04) Edger View Diagrams & Manuals
225 H60 (1998-01) Hedge Trimmer View Diagrams & Manuals
225 H60 (2002-06) Hedge Trimmer View Diagrams & Manuals
225 H75 (1998-01) Hedge Trimmer View Diagrams & Manuals
225 H75 (2002-06) Hedge Trimmer View Diagrams & Manuals
323 HD60 (2002-06) Hedge Trimmer View Diagrams & Manuals
323 HE 3 (2005-02) Hedge Trimmer View Diagrams & Manuals
323 HE 3 (2005-09) Hedge Trimmer View Diagrams & Manuals
323 HE 3 (2005-10) Hedge Trimmer View Diagrams & Manuals
323 HE 3 (2007-01) Hedge Trimmer View Diagrams & Manuals
325 HDA 55 X-Series (2003-01) Hedge Trimmer View Diagrams & Manuals
325 HDA 55x (2005-02) Hedge Trimmer View Diagrams & Manuals
325 HDA 55x (2005-09) Hedge Trimmer View Diagrams & Manuals
325 HDA 55x (2005-10) Hedge Trimmer View Diagrams & Manuals
325 HDA 65X (2007-01) Hedge Trimmer View Diagrams & Manuals
325 HE 3 (2001-01) Hedge Trimmer View Diagrams & Manuals
325 HE 3 (2001-05) Hedge Trimmer View Diagrams & Manuals
325 HE 3 X-Series (2003-01) Hedge Trimmer View Diagrams & Manuals
325 HE 3x (2005-02) Hedge Trimmer View Diagrams & Manuals
325 HE 3x (2005-10) Hedge Trimmer View Diagrams & Manuals
325 HE 3X (2007-01) Hedge Trimmer View Diagrams & Manuals
325 HE 4 (2001-01) Hedge Trimmer View Diagrams & Manuals
325 HE 4 (2001-05) Hedge Trimmer View Diagrams & Manuals
325 HE 4 X-Series (2003-01) Hedge Trimmer View Diagrams & Manuals
325 HE 4x (2005-02) Hedge Trimmer View Diagrams & Manuals
325 HE 4x (2005-09) Hedge Trimmer View Diagrams & Manuals
325 HE 4x (2005-10) Hedge Trimmer View Diagrams & Manuals
325 HE 4X (2007-01) Hedge Trimmer View Diagrams & Manuals
325 HS 75 (2000-10) Hedge Trimmer View Diagrams & Manuals
325 HS 75 X (2000-10) Hedge Trimmer View Diagrams & Manuals
325 HS 75 X-Series (2003-01) Hedge Trimmer View Diagrams & Manuals
325 HS 99 (2000-10) Hedge Trimmer View Diagrams & Manuals
325 HS 99 X (2000-10) Hedge Trimmer View Diagrams & Manuals
325 HS 99 X-Series (2003-01) Hedge Trimmer View Diagrams & Manuals
326 HD 60 X-Series (2002-02) Hedge Trimmer View Diagrams & Manuals
326 HD 60 X-Series (2003-01) Hedge Trimmer View Diagrams & Manuals
326 HD 60x (2006-07) Hedge Trimmer View Diagrams & Manuals
326 HD 75 X-Series (2002-02) Hedge Trimmer View Diagrams & Manuals
326 HD 75 X-Series (2003-01) Hedge Trimmer View Diagrams & Manuals
326 HD 75x (2006-07) Hedge Trimmer View Diagrams & Manuals
326 HDA (E-tech 2) (2001-09) Hedge Trimmer View Diagrams & Manuals
326 HDA 55 X-Series (2003-01) Hedge Trimmer View Diagrams & Manuals
326 HDA 55 X-Series (2004-01) Hedge Trimmer View Diagrams & Manuals
326 HDA 55x (2005-10) Hedge Trimmer View Diagrams & Manuals
326 HE 3 (E-tech 2) (2001-09) Hedge Trimmer View Diagrams & Manuals
326 HE 3 X-Series (2003-01) Hedge Trimmer View Diagrams & Manuals
326 HE 3 X-Series (2004-01) Hedge Trimmer View Diagrams & Manuals
326 HE 3x (2005-10) Hedge Trimmer View Diagrams & Manuals
326 HE 4 (E-tech 2) (2001-09) Hedge Trimmer View Diagrams & Manuals
326 HE 4 X-Series (2003-01) Hedge Trimmer View Diagrams & Manuals
326 HE 4 X-Series (2004-01) Hedge Trimmer View Diagrams & Manuals
326 HE 4x (2005-10) Hedge Trimmer View Diagrams & Manuals
326 HS 75 X-Series (2002-01) Hedge Trimmer View Diagrams & Manuals
326 HS 75 X-Series (2003-01) Hedge Trimmer View Diagrams & Manuals
326 HS 99 X-Series (2002-01) Hedge Trimmer View Diagrams & Manuals
326 HS 99 X-Series (2003-01) Hedge Trimmer View Diagrams & Manuals
HA 850 (2005-10) Hedge Trimmer View Diagrams & Manuals
HA 850 Attachment (2005-09) Hedge Trimmer View Diagrams & Manuals
HA 850 Attachment (2005-10) Hedge Trimmer View Diagrams & Manuals
HA 850 Attachment (2007-01) Hedge Trimmer View Diagrams & Manuals
HA 850 Attachment (2004-01) Hedge Trimmer View Diagrams & Manuals
K760 Power Cutter View Diagrams & Manuals
225B (2001-06) Handheld Leaf Blower View Diagrams & Manuals
350BF (X-Series)(2004-10) Backpack Blower View Diagrams & Manuals
356BT (X-Series)(2004-10) Backpack Blower View Diagrams & Manuals
356BF (X-Series)(2009-07) Backpack Blower View Diagrams & Manuals
356BT (X-Series)(2009-07) Backpack Blower View Diagrams & Manuals
327P4 (2012-10) Polesaw View Diagrams & Manuals
327P5X (2012-10) Polesaw View Diagrams & Manuals
135R (2011-02) Brushcutter View Diagrams & Manuals
223L (2006-01) Brushcutter View Diagrams & Manuals
223R (2006-01) Brushcutter View Diagrams & Manuals
225R (2000-10) Brushcutter View Diagrams & Manuals
225RD (2000-10) Brushcutter View Diagrams & Manuals
225RJ (2000-10) Brushcutter View Diagrams & Manuals
227R (2000-10) Brushcutter View Diagrams & Manuals
227R (2002-09) Brushcutter View Diagrams & Manuals
227RD (2000-10) Brushcutter View Diagrams & Manuals
227RJ (2000-10) Brushcutter View Diagrams & Manuals
232R (2000-04) Brushcutter View Diagrams & Manuals
232R (2002-09) Brushcutter View Diagrams & Manuals
232R (2006-01) Brushcutter View Diagrams & Manuals
232R (2006-04) Brushcutter View Diagrams & Manuals
232R (2007-01) Brushcutter View Diagrams & Manuals
232RD (2000-04) Brushcutter View Diagrams & Manuals
235FR (2007-01) Brushcutter View Diagrams & Manuals
235FR (2009-05) Brushcutter View Diagrams & Manuals
235R (2000-04) Brushcutter View Diagrams & Manuals
235R (2002-09) Brushcutter View Diagrams & Manuals
235R (2006-01) Brushcutter View Diagrams & Manuals
235R (2006-04) Brushcutter View Diagrams & Manuals
235R (2007-01) Brushcutter View Diagrams & Manuals
235R (2009-05) Brushcutter View Diagrams & Manuals
235RII (2002-09) Brushcutter View Diagrams & Manuals
235RII (2006-01) Brushcutter View Diagrams & Manuals
235RII (2006-04) Brushcutter View Diagrams & Manuals
235RII (2007-01) Brushcutter View Diagrams & Manuals
240RJ (2000-04) Brushcutter View Diagrams & Manuals
240RJ (2002-09) Brushcutter View Diagrams & Manuals
241R (2007-11) Brushcutter View Diagrams & Manuals
241R (2009-09) Brushcutter View Diagrams & Manuals
241R (2010-11) Brushcutter View Diagrams & Manuals
241RJ (2007-11) Brushcutter View Diagrams & Manuals
322R (1999-03) Brushcutter View Diagrams & Manuals
322R (2000-05) Brushcutter View Diagrams & Manuals
322R (2001-02) Brushcutter View Diagrams & Manuals
323R (2002-01) Brushcutter View Diagrams & Manuals
323R (2004-03) Brushcutter View Diagrams & Manuals
323R (2005-05) Brushcutter View Diagrams & Manuals
323R (2006-04) Brushcutter View Diagrams & Manuals
323R (2007-01) Brushcutter View Diagrams & Manuals
323R (2008-03) Brushcutter View Diagrams & Manuals
323RII (2008-03) Brushcutter View Diagrams & Manuals
323RII (2012-01) Brushcutter View Diagrams & Manuals
323RII (2009-10) Brushcutter View Diagrams & Manuals
323RJ (2002-01) Brushcutter View Diagrams & Manuals
323RJ (2005-05) Brushcutter View Diagrams & Manuals
323RJ (2008-03) Brushcutter View Diagrams & Manuals
325RJX (2005-05) Brushcutter View Diagrams & Manuals
325RJX (2002-01) Brushcutter View Diagrams & Manuals
325RJX (2008-03) Brushcutter View Diagrams & Manuals
325RJX (2000-01) Brushcutter View Diagrams & Manuals
325RX (1999-03) Brushcutter View Diagrams & Manuals
325RX (2000-05) Brushcutter View Diagrams & Manuals
325RX (2008-03) Brushcutter View Diagrams & Manuals
326RJX (2004-03) Brushcutter View Diagrams & Manuals
326RJX (2006-04) Brushcutter View Diagrams & Manuals
326RJX (2007-01) Brushcutter View Diagrams & Manuals
326RJX (2009-05) Brushcutter View Diagrams & Manuals
326RX (2002-08) Brushcutter View Diagrams & Manuals
326RX (2004-03) Brushcutter View Diagrams & Manuals
326RX (2006-04) Brushcutter View Diagrams & Manuals
326RX (2007-01) Brushcutter View Diagrams & Manuals
326RX (2009-05) Brushcutter View Diagrams & Manuals
326RX (2002-02) Brushcutter View Diagrams & Manuals
326RX (2001-03) Brushcutter View Diagrams & Manuals
327RDX (2008-03) Brushcutter View Diagrams & Manuals
327RDX (2010-09) Brushcutter View Diagrams & Manuals
327RDX (2012-01) Brushcutter View Diagrams & Manuals
327RJX (2008-03) Brushcutter View Diagrams & Manuals
327RJX (2009-10) Brushcutter View Diagrams & Manuals
327RJX (2012-01) Brushcutter View Diagrams & Manuals
327RX (2008-03) Brushcutter View Diagrams & Manuals
327RX (2009-10) Brushcutter View Diagrams & Manuals
327RX (2012-01) Brushcutter View Diagrams & Manuals
333R (2006-10) Brushcutter View Diagrams & Manuals
333R (2007-01) Brushcutter View Diagrams & Manuals
333R (2008-10) Brushcutter View Diagrams & Manuals
333R (2005-06) Brushcutter View Diagrams & Manuals
335FR (2008-10) Brushcutter View Diagrams & Manuals
335RX (2005-06) Brushcutter View Diagrams & Manuals
335RJX (2006-10) Brushcutter View Diagrams & Manuals
335RJX (2007-01) Brushcutter View Diagrams & Manuals
335RJX (2008-10) Brushcutter View Diagrams & Manuals
335RX (2006-10) Brushcutter View Diagrams & Manuals
335RX (2007-01) Brushcutter View Diagrams & Manuals
335RX (2008-10) Brushcutter View Diagrams & Manuals
336FR (2011-02) Brushcutter View Diagrams & Manuals
336FRD (2011-02) Brushcutter View Diagrams & Manuals
343F (2003-05) Brushcutter View Diagrams & Manuals
343F (2004-08) Brushcutter View Diagrams & Manuals
343 Brushcutter View Diagrams & Manuals
343F (2006-10) Brushcutter View Diagrams & Manuals
343F (2008-05) Brushcutter View Diagrams & Manuals
343F (2010-09) Brushcutter View Diagrams & Manuals
343F (2011-02) Brushcutter View Diagrams & Manuals
343FR (2006-10) Brushcutter View Diagrams & Manuals
343FR (2008-05) Brushcutter View Diagrams & Manuals
343FR (2010-09) Brushcutter View Diagrams & Manuals
343FR (2011-02) Brushcutter View Diagrams & Manuals
343FRM (2008-05) Brushcutter View Diagrams & Manuals
343R (2003-05) Brushcutter View Diagrams & Manuals
343R (2004-08) Brushcutter View Diagrams & Manuals
343R (2006-10) Brushcutter View Diagrams & Manuals
343R (2010-09) Brushcutter View Diagrams & Manuals
343R (2011-02) Brushcutter View Diagrams & Manuals
345FR (2011-03) Brushcutter View Diagrams & Manuals
345FR (2012-12) Brushcutter View Diagrams & Manuals
345FX (2003-05) Brushcutter View Diagrams & Manuals
345FX (2004-08) Brushcutter View Diagrams & Manuals
345FX (2006-10) Brushcutter View Diagrams & Manuals
345FX (2008-05) Brushcutter View Diagrams & Manuals
345FX (2010-09) Brushcutter View Diagrams & Manuals
345FX (2011-02) Brushcutter View Diagrams & Manuals
345FXT (2003-05) Brushcutter View Diagrams & Manuals
345FXT (2004-08) Brushcutter View Diagrams & Manuals
345FXT (2010-09) Brushcutter View Diagrams & Manuals
345FXT (2011-02) Brushcutter View Diagrams & Manuals
345FXT (2006-10) Brushcutter View Diagrams & Manuals
345FXT (2008-05) Brushcutter View Diagrams & Manuals
345R (2003-05) Brushcutter View Diagrams & Manuals
345R (2008-05) Brushcutter View Diagrams & Manuals
345RX (2004-08) Brushcutter View Diagrams & Manuals
345RX (2006-10) Brushcutter View Diagrams & Manuals
345RX (2008-05) Brushcutter View Diagrams & Manuals
345RX (2010-09) Brushcutter View Diagrams & Manuals
345RX (2011-02) Brushcutter View Diagrams & Manuals
355FRM (2008-07) Brushcutter View Diagrams & Manuals
355FRM (2011-01) Brushcutter View Diagrams & Manuals
355FX (2007-08) Brushcutter View Diagrams & Manuals
355FXT (2007-08) Brushcutter View Diagrams & Manuals
355FXT (2011-01) Brushcutter View Diagrams & Manuals
355RX (2007-08) Brushcutter View Diagrams & Manuals
355RX (2011-01) Brushcutter View Diagrams & Manuals
535FBX (2010-03) Brushcutter View Diagrams & Manuals
535LS (2011-02) Brushcutter View Diagrams & Manuals
535RJ (2011-02) Brushcutter View Diagrams & Manuals
535RX (2011-02) Brushcutter View Diagrams & Manuals
535RXT (2011-02) Brushcutter View Diagrams & Manuals
322L (1999-03) Line Trimmer View Diagrams & Manuals
327PT5S (2011-06) Pruner View Diagrams & Manuals
327PT5S (2012-01) Pruner View Diagrams & Manuals
450 (2011-07) Chainsaw View Diagrams & Manuals
450 (2010-09) Chainsaw View Diagrams & Manuals
460 (2011-01) Rancher Chainsaw View Diagrams & Manuals
123L (2004-03) String Trimmer View Diagrams & Manuals
323L (2008-03) Light Weight Trimmer View Diagrams & Manuals
323L (2005-05) Trimmer View Diagrams & Manuals
562XP Chainsaw View Diagrams & Manuals
K760 (2013-02) Power Cutter View Diagrams & Manuals
225 AI (1998-09) Ice Auger View Diagrams & Manuals
325 P5 (2002-05) X-Series Saw Attachment View Diagrams & Manuals
326 P5 (2006-07) X-Series Saw Attachment View Diagrams & Manuals
326 P5 (2002-05) X-Series Saw Attachment View Diagrams & Manuals
326 P5 (2004-06) Saw Attachment View Diagrams & Manuals
323 LD (2005-05) Trimmer View Diagrams & Manuals
525 BX (967284201, 967284202, 967284203) (2017-02) Blower View Diagrams & Manuals
525 L Brushcutter View Diagrams & Manuals
525 LK Brushcutter View Diagrams & Manuals
525 LS Brushcutter View Diagrams & Manuals
525 LST Brushcutter View Diagrams & Manuals
525 RJD Brushcutter View Diagrams & Manuals
525 RJX Brushcutter View Diagrams & Manuals
525 RK Brushcutter View Diagrams & Manuals
525 RS (967622801) (2015-09) For China View Diagrams & Manuals
525 RS Brushcutter View Diagrams & Manuals
525 RX Brushcutter View Diagrams & Manuals
525 RXT Brushcutter View Diagrams & Manuals
325 RJ X-SERIES (2000-01) Brushcutter View Diagrams & Manuals
326 R X-SERIES (2002-02) Brushcutter View Diagrams & Manuals
326 R X-SERIES (2001-03) Brushcutter View Diagrams & Manuals
543 RBS (967348401) (2015-11) For China View Diagrams & Manuals
543 RBX (2015-11) For China View Diagrams & Manuals
543 RS (967348201) (2015-11) For China View Diagrams & Manuals
545 FR Brushcutter View Diagrams & Manuals
333 RJ (2014-12) From Brushcutter View Diagrams & Manuals
333 RJ (2008, 2009, 2010) 2008, 2009, 2010 Brushcutter View Diagrams & Manuals
333 RJ (2007-01) Brushcutter View Diagrams & Manuals
333 RJ (2006-10) Brushcutter View Diagrams & Manuals
545 FX Brushcutter View Diagrams & Manuals
545FX (2017-12) At Brushcutter View Diagrams & Manuals
335 R (2005-06) X-Series View Diagrams & Manuals
545 FXT Brushcutter View Diagrams & Manuals
545 FXT AT (2017-12) Brushcutter View Diagrams & Manuals
232 RJ (2000-04) Brushcutter View Diagrams & Manuals
545 RX Brushcutter View Diagrams & Manuals
545 RXT Brushcutter View Diagrams & Manuals
336 FRD/336 RK Brushcutter View Diagrams & Manuals
545 RXT AT (2017-12) Brushcutter View Diagrams & Manuals
235 Rll (2014-12) From Brushcutter View Diagrams & Manuals
555 FRM Brushcutter View Diagrams & Manuals
555 FX Brushcutter View Diagrams & Manuals
555 FXT Brushcutter View Diagrams & Manuals
555 RXT Brushcutter View Diagrams & Manuals
445 E II Chain Saw View Diagrams & Manuals
445 II Chain Saw View Diagrams & Manuals
135 (2011-08) From Chain Saw View Diagrams & Manuals
135 E (2011-08) From Chain Saw View Diagrams & Manuals
450 E II Chain Saw View Diagrams & Manuals
455 E RANCHER II Chain Saw View Diagrams & Manuals
455 RANCHER II Chain Saw View Diagrams & Manuals
140 (2012-01) From Chain Saw View Diagrams & Manuals
140 E (2012-01) From Chain Saw View Diagrams & Manuals
461 Chain Saw View Diagrams & Manuals
465 RANCHER II Chain Saw View Diagrams & Manuals
545 Chain Saw View Diagrams & Manuals
550 XP/XPG Chain Saw View Diagrams & Manuals
555 Chain Saw View Diagrams & Manuals
556 Chain Saw View Diagrams & Manuals
560 XP/XPG Chain Saw View Diagrams & Manuals
562 XP/XPG Chain Saw View Diagrams & Manuals
565 Chain Saw View Diagrams & Manuals
572 XP/XPG Chain Saw View Diagrams & Manuals
435 E II Chain Saw View Diagrams & Manuals
435 II Chain Saw View Diagrams & Manuals
440 E II Chain Saw View Diagrams & Manuals
T540XP Chain Saw View Diagrams & Manuals
440 II Chain Saw View Diagrams & Manuals
T540 XP II Chain Saw View Diagrams & Manuals
327 HDA65 X-SERIES (2015-02) From Hedge Trimmer View Diagrams & Manuals
327 HDA65 X-SERIES (2009-04) Hedge Trimmer View Diagrams & Manuals
327 HE3 X-SERIES (2015-02) From Hedge Trimmer View Diagrams & Manuals
327 HE3 X-SERIES (2009-04) Hedge Trimmer View Diagrams & Manuals
325 HD75 X-SERIES (2008-04) Hedge Trimmer View Diagrams & Manuals
325 HD75 X-SERIES (2002-06) Hedge Trimmer View Diagrams & Manuals
327 HE4 X-SERIES (2015-01) From Hedge Trimmer View Diagrams & Manuals
327 HE4 X-SERIES (2009-04) Hedge Trimmer View Diagrams & Manuals
325 HDA65 X-SERIES (2009-03) Hedge Trimmer View Diagrams & Manuals
325 HDA65 X-SERIES (2007-01) Hedge Trimmer View Diagrams & Manuals
525 HF3S Hedge Trimmer View Diagrams & Manuals
225 AI (1998-09) Ice Auger View Diagrams & Manuals
326 AI Ice Auger View Diagrams & Manuals
P5X 327 Pole Pruner View Diagrams & Manuals
P4 327 Pole Pruner View Diagrams & Manuals
525 P4S Pole Pruner View Diagrams & Manuals
323P (2002-05) 4 Saw Attachment View Diagrams & Manuals
323P (2002-01) 4 Saw Attachment View Diagrams & Manuals
323P (2006-07) 4 Pole Pruner View Diagrams & Manuals
323P (2004-06) 4 Pole Pruner View Diagrams & Manuals
525 P5S Pole Pruner View Diagrams & Manuals
325P (2004-06) 5 X-Series View Diagrams & Manuals
325P (2006-07) 5 Pole Pruner View Diagrams & Manuals
325P (2002-05) 4 X-Series Saw Attachment View Diagrams & Manuals
325P (2002-01) 4 X-Series Saw Attachment View Diagrams & Manuals
325P (2001-02) 4 X-Series View Diagrams & Manuals
525 PT5S Pole Pruner View Diagrams & Manuals
326P 5 (2006-07) X-Series Pole Saw View Diagrams & Manuals
326P (2001-09) 4 X-Series View Diagrams & Manuals
326P (2004-06) 4 Saw Attachment View Diagrams & Manuals
326P 4 (2002-05) Saw Attachment View Diagrams & Manuals
325 P5 (2002-05) X-Series Saw Attachment View Diagrams & Manuals
326 P5 (2006-07) X-Series Saw Attachment View Diagrams & Manuals
326 P5 (2002-05) X-Series Saw Attachment View Diagrams & Manuals
326 P5 (2004-06) Saw Attachment View Diagrams & Manuals
326 CX (2002-08) Trimmer View Diagrams & Manuals
326 LDX (2009-05) Trimmer View Diagrams & Manuals
326 LDX (2007-01) Trimmer View Diagrams & Manuals
326 LDX (2006-04) Trimmer View Diagrams & Manuals
326 LDX (2004-03) Trimmer View Diagrams & Manuals
326 LDX (2002-08) Trimmer View Diagrams & Manuals
326 LS (966763205) (2009-05) Trimmer View Diagrams & Manuals
326 LS (966763205) (2007-01) Trimmer View Diagrams & Manuals
327 ES (2014-12) From Trimmer View Diagrams & Manuals
327 ES (2010-05) Trimmer View Diagrams & Manuals
123 C (2004-03) Trimmer View Diagrams & Manuals
327 LDX (2012-01) Trimmer View Diagrams & Manuals
327 LDX (2009, 2010) 2009, 2010 Trimmer View Diagrams & Manuals
327 LS (2012-01) Trimmer View Diagrams & Manuals
327 LS (2009, 2010) 2009, 2010 Trimmer View Diagrams & Manuals
123 LD (2004-03) Trimmer View Diagrams & Manuals
327 LX (2012-01) Trimmer View Diagrams & Manuals
327 LX (2009, 2010) 2009, 2010 Trimmer View Diagrams & Manuals
327 LX (2008-03) Trimmer View Diagrams & Manuals
335 LS (2014-12) From Trimmer View Diagrams & Manuals
335 LS (2008, 2009, 2010) 2008, 2009, 2010 Trimmer View Diagrams & Manuals
335 LS (2007-01) Trimmer View Diagrams & Manuals
335 LX (2014-12) From Trimmer View Diagrams & Manuals
335 LX (2008, 2009, 2010) 2008, 2009, 2010 Trimmer View Diagrams & Manuals
335 LX (2007-01) Trimmer View Diagrams & Manuals
335 LX (2006-10) Trimmer View Diagrams & Manuals
522 L (2015-10) Trimmer View Diagrams & Manuals
524 L Trimmer View Diagrams & Manuals
322 E (2001-01) Trimmer View Diagrams & Manuals
322 E (1999-10) Trimmer View Diagrams & Manuals
525 ECS (2015-11) Trimmer View Diagrams & Manuals
322 T (2001-02) Trimmer View Diagrams & Manuals
322 T (2000-05) Trimmer View Diagrams & Manuals
525 ES Trimmer View Diagrams & Manuals
323 C (2008-03) Trimmer View Diagrams & Manuals
323 C (2005-05) Trimmer View Diagrams & Manuals
323 C (2002-01) Trimmer View Diagrams & Manuals
535 LK Trimmer View Diagrams & Manuals
323 E (2002-03) Trimmer View Diagrams & Manuals
323 EX Trimmer View Diagrams & Manuals
323 LD (2008-03) Trimmer View Diagrams & Manuals
323 LD (2005-05) Trimmer View Diagrams & Manuals
323 LD (2002-01) Trimmer View Diagrams & Manuals
325 E (2002-03) X-Series View Diagrams & Manuals
325 E (2001-01) X-Series View Diagrams & Manuals
325 E (1999-10) X-Series View Diagrams & Manuals
325 L (2002-01) Trimmer View Diagrams & Manuals
325 LDX (2008-03) Trimmer View Diagrams & Manuals
325 LDX (2005-05) Trimmer View Diagrams & Manuals
325 TX (2001-02) Trimmer View Diagrams & Manuals
325 TX (2000-05) Trimmer View Diagrams & Manuals
225 AI (1998-09) Ice Auger View Diagrams & Manuals
323 LD (2005-05) Trimmer View Diagrams & Manuals
325 P5 (2002-05) X-Series Saw Attachment View Diagrams & Manuals
326 P5 (2006-07) X-Series Saw Attachment View Diagrams & Manuals
326 P5 (2002-05) X-Series Saw Attachment View Diagrams & Manuals
326 P5 (2004-06) Saw Attachment View Diagrams & Manuals
535 LST Brushcutter View Diagrams & Manuals
326 R (20010900001-20020500000) X-Series View Diagrams & Manuals
135 MARK II Chainsaw View Diagrams & Manuals
545 MARK II (545G Mark II) Chainsaw View Diagrams & Manuals
550 XP MARK II (550 Xp G Mark Ii) Chainsaw View Diagrams & Manuals
327 HE4 (20091400001-20145299999) Pole Hedge Trimmer View Diagrams & Manuals
325 HD75 (20062300001-20081400000) X-Series Pole Hedge Trimmer View Diagrams & Manuals
325 HDA55 (20053600001-20054000000) X-Series Pole Hedge Trimmer View Diagrams & Manuals
325 HDA65 (20090900001-Current) X-Series Pole Hedge Trimmer View Diagrams & Manuals
325 HDA65 (20070100001-20090900000) X-Series Pole Hedge Trimmer View Diagrams & Manuals
326 HD60 (20062700001-20082200000) X-Series Pole Hedge Trimmer View Diagrams & Manuals
326 HD60 (20030100001-20062700000) X-Series Pole Hedge Trimmer View Diagrams & Manuals
326 HD60 (20020500001-20030100000) X-Series Pole Hedge Trimmer View Diagrams & Manuals
326 HD75 (20062700001-20082200000) X-Series Pole Hedge Trimmer View Diagrams & Manuals
326 HD75 (20020500001-20030100000) X-Series Pole Hedge Trimmer View Diagrams & Manuals
326 HDA55 (20054000001-20090900000) X-Series Pole Hedge Trimmer View Diagrams & Manuals
326 HDA55 (20013500001-20033100000) X-Series Pole Hedge Trimmer View Diagrams & Manuals
326 HS75 (20020100001-20030100000) X-Series Pole Hedge Trimmer View Diagrams & Manuals
326 HS99 (20030100001-Current) X-Series Pole Hedge Trimmer View Diagrams & Manuals
326 HS99 (20020100001-20030100000) X-Series Pole Hedge Trimmer View Diagrams & Manuals
327 HDA65 (20150500001-current) Pole Hedge Trimmer View Diagrams & Manuals
325P 4 (20020100001-20021800000) X-Series Saw Attachment View Diagrams & Manuals
326 E (20144900001-Current) X-Series Trimmer Edger View Diagrams & Manuals
326 E (20020500001-20144799999) X-Series Trimmer Edger View Diagrams & Manuals
525 LX Trimmer View Diagrams & Manuals
327 HE3 (20091400001-20150400000) Pole Hedge Trimmer View Diagrams & Manuals
327 HDA65 (20091400001-Current) Pole Hedge Trimmer View Diagrams & Manuals
325 HE3 (966787601) Hedge Trimmer View Diagrams & Manuals
450 II Chainsaw View Diagrams & Manuals
460 Rancher Chainsaw View Diagrams & Manuals
545 Mark II Chainsaw View Diagrams & Manuals
550 XP G Mark II Chainsaw View Diagrams & Manuals
550 XP Mark II Chainsaw View Diagrams & Manuals
562 XP G Chainsaw View Diagrams & Manuals
562 XP GW Chainsaw View Diagrams & Manuals
562 XP W Chainsaw View Diagrams & Manuals
572 XP Chainsaw View Diagrams & Manuals
572 XP G Chainsaw View Diagrams & Manuals
572 XP GW Chainsaw View Diagrams & Manuals
572 XP W Chainsaw View Diagrams & Manuals
525DEPS Pole Saw View Diagrams & Manuals
525HE3 Hedge Trimmer View Diagrams & Manuals
525HE4 Hedge Trimmer View Diagrams & Manuals
525LS Mark II String Trimmer View Diagrams & Manuals
525LST Mark II String Trimmer View Diagrams & Manuals
Jonsered
BC2125 (2003-03) Brushcutter View Diagrams & Manuals
BC2125 (2004-01) Brushcutter View Diagrams & Manuals
BC2125 (2005-01) Brushcutter View Diagrams & Manuals
BC2125 (2008-09) Brushcutter View Diagrams & Manuals
BC2145 (2004-08) Brushcutter View Diagrams & Manuals
BC2145 (2006-01) Brushcutter View Diagrams & Manuals
BC2145 (2006-10) Brushcutter View Diagrams & Manuals
BC2145 (2008-05) Brushcutter View Diagrams & Manuals
BC2145 (2010-09) Brushcutter View Diagrams & Manuals
BC2145 (2011-02) Brushcutter View Diagrams & Manuals
BC2235 (2011-02) Brushcutter View Diagrams & Manuals
BC2236 (2007-01) Brushcutter View Diagrams & Manuals
BC2236 (2008-09) Brushcutter View Diagrams & Manuals
BC2236 (2010-11) Brushcutter View Diagrams & Manuals
BC2255 (2007-08) Brushcutter View Diagrams & Manuals
BC2255 (2011-01) Brushcutter View Diagrams & Manuals
BC2256 (2011-01) Brushcutter View Diagrams & Manuals
BP2040 (2000-10) Brushcutter View Diagrams & Manuals
BP2040 C (2000-02) Brushcutter View Diagrams & Manuals
CC2036 (2008-08) Brushcutter View Diagrams & Manuals
CC2145 (2008-05) Brushcutter View Diagrams & Manuals
CC2145 (2010-09) Brushcutter View Diagrams & Manuals
CC2145 (2011-02) Brushcutter View Diagrams & Manuals
CC2235 (2011-02) Brushcutter View Diagrams & Manuals
CC2236 (2008-09) Brushcutter View Diagrams & Manuals
CC2236 (2010-11) Brushcutter View Diagrams & Manuals
CC2245 (2011-03) Brushcutter View Diagrams & Manuals
FC2145 (2004-08) Brushcutter View Diagrams & Manuals
FC2145 (2006-01) Brushcutter View Diagrams & Manuals
FC2145 (2006-10) Brushcutter View Diagrams & Manuals
FC2145 (2008-05) Brushcutter View Diagrams & Manuals
FC2145 (2010-09) Brushcutter View Diagrams & Manuals
FC2145 (2011-02) Brushcutter View Diagrams & Manuals
FC2145 S (2004-08) Brushcutter View Diagrams & Manuals
FC2145 S (2006-01) Brushcutter View Diagrams & Manuals
FC2145 S (2006-10) Brushcutter View Diagrams & Manuals
FC2145 S (2008-05) Brushcutter View Diagrams & Manuals
FC2145 S (2010-09) Brushcutter View Diagrams & Manuals
FC2145 S (2011-02) Brushcutter View Diagrams & Manuals
FC2145 W (2006-01) Brushcutter View Diagrams & Manuals
FC2145 W (2006-10) Brushcutter View Diagrams & Manuals
FC2145 W (2008-05) Brushcutter View Diagrams & Manuals
FC2145 W (2010-09) Brushcutter View Diagrams & Manuals
FC2145 W (2011-02) Brushcutter View Diagrams & Manuals
FC2245 (2011-03) Brushcutter View Diagrams & Manuals
FC2245 (2012-12) Brushcutter View Diagrams & Manuals
FC2245 W (2011-03) Brushcutter View Diagrams & Manuals
FC2245 W (2012-12) Brushcutter View Diagrams & Manuals
FC2255 (2007-08) Brushcutter View Diagrams & Manuals
FC2255 (2011-01) Brushcutter View Diagrams & Manuals
FC2255 W (2007-08) Brushcutter View Diagrams & Manuals
FC2255 W (2011-01) Brushcutter View Diagrams & Manuals
FC2256 (2011-01) Brushcutter View Diagrams & Manuals
FC2256 W (2011-01) Brushcutter View Diagrams & Manuals
GC2236 (2010-11) Brushcutter View Diagrams & Manuals
GC2236 (2011-02) Brushcutter View Diagrams & Manuals
GR2026 (2000-10) Brushcutter View Diagrams & Manuals
GR2026 (2002-08) Brushcutter View Diagrams & Manuals
GR2032 (2000-10) Brushcutter View Diagrams & Manuals
GR2032 (2002-08) Brushcutter View Diagrams & Manuals
GR2032 (2006-10) Brushcutter View Diagrams & Manuals
GR2036 (2000-10) Brushcutter View Diagrams & Manuals
GR2036 (2002-08) Brushcutter View Diagrams & Manuals
GR2036 (2006-10) Brushcutter View Diagrams & Manuals
MC2255 (2011-01) Brushcutter View Diagrams & Manuals
MC2256 (2011-01) Brushcutter View Diagrams & Manuals
CS2135 T (2005-03) Chain Saw View Diagrams & Manuals
CS2135 T (2007-01) Chain Saw View Diagrams & Manuals
CS2139 T (2008-02) Chain Saw View Diagrams & Manuals
CS2139 T (2010-03) Chain Saw View Diagrams & Manuals
CS2141 (2007-01) Chain Saw View Diagrams & Manuals
CS2145 (2007-01) Chain Saw View Diagrams & Manuals
CS2150 (2007-01) Chain Saw View Diagrams & Manuals
CS2152 (2007-08) Chain Saw View Diagrams & Manuals
CS2152 (2009-02) Chain Saw View Diagrams & Manuals
CS2152 (2011-05) Chain Saw View Diagrams & Manuals
CS2153 (2007-08) Chain Saw View Diagrams & Manuals
CS2153 (2009-02) Chain Saw View Diagrams & Manuals
CS2153 (2011-05) Chain Saw View Diagrams & Manuals
CS2240 (2009-02) Chain Saw View Diagrams & Manuals
CS2240 (2010-06) Chain Saw View Diagrams & Manuals
CS2240 (2011-05) Chain Saw View Diagrams & Manuals
CS2240 S (2009-02) Chain Saw View Diagrams & Manuals
CS2240 S (2010-06) Chain Saw View Diagrams & Manuals
CS2240 S (2011-05) Chain Saw View Diagrams & Manuals
CS2245 (2008-09) Chain Saw View Diagrams & Manuals
CS2245 (2009-02) Chain Saw View Diagrams & Manuals
CS2245 (2010-07) Chain Saw View Diagrams & Manuals
CS2245 (2011-07) Chain Saw View Diagrams & Manuals
CS2245 S (2008-09) Chain Saw View Diagrams & Manuals
CS2245 S (2009-02) Chain Saw View Diagrams & Manuals
CS2245 S (2010-07) Chain Saw View Diagrams & Manuals
CS2245 S (2011-07) Chain Saw View Diagrams & Manuals
CS2250 S (2008-09) Chain Saw View Diagrams & Manuals
CS2250 S (2009-02) Chain Saw View Diagrams & Manuals
CS2250 S (2010-07) Chain Saw View Diagrams & Manuals
CS2250 S (2011-07) Chain Saw View Diagrams & Manuals
CS2252 (2012-07) Chain Saw View Diagrams & Manuals
CS2253 (2012-07) Chain Saw View Diagrams & Manuals
CS2255 (2008-03) Chain Saw View Diagrams & Manuals
CS2255 (2009-03) Chain Saw View Diagrams & Manuals
CS2255 (2011-01) Chain Saw View Diagrams & Manuals
CS2258 (2012-05) Chain Saw View Diagrams & Manuals
CS2260 (2012-05) Chain Saw View Diagrams & Manuals
GC2125 (2003-03) Trimmer View Diagrams & Manuals
GC2125 (2004-01) Trimmer View Diagrams & Manuals
GC2125 (2005-01) Trimmer View Diagrams & Manuals
GC2125 (2008-09) Trimmer View Diagrams & Manuals
GC2125 C (2005-01) Trimmer View Diagrams & Manuals
GC2125 C (2008-09) Trimmer View Diagrams & Manuals
GC2236 (2007-01) Trimmer View Diagrams & Manuals
GC2236 (2008-09) Trimmer View Diagrams & Manuals
GR2126 D (2002-01) Trimmer View Diagrams & Manuals
GR2126 L (2002-01) Trimmer View Diagrams & Manuals
GT2125 (2003-03) Trimmer View Diagrams & Manuals
GT2125 (2004-01) Trimmer View Diagrams & Manuals
GT2125 (2005-01) Trimmer View Diagrams & Manuals
GT2125 (2008-09) Trimmer View Diagrams & Manuals
GT2125 L (2002-01) Trimmer View Diagrams & Manuals
Show More Compatible Models
This item works with the following types of products:
- Chain Saw Parts
- Saw Parts
- Blower Parts
- Trimmer Parts
- Pole Saw Parts
- Edger Parts
- Hedge Trimmer Parts
- Pruner Parts
Customer Part Reviews ?
Average Rating (out of 5):
Click to filter by ratings:
5 stars
19
4 stars
1
3 stars
0
2 stars
0
1 stars
0
< PREV
- 1
- 2
Easy repair great fit
These air purges are the most frequent repairs I have on all my gasoline equipment. This one came quickly, fit well, was easy to put in, and has me up and running again.
Raymond -
September 29, 2023
Verified Purchase
Fixed
Perfect fit
Richard -
August 25, 2023
Verified Purchase
Chainsaw repair
Part came in on time and fit perfectly!
Guest -
June 12, 2023
Verified Purchase
Simple but essential
This part is simple but essential to priming and starting the tool. It has a limited three to four year lifespan, but replacement is easy, especially with the fast shipping, exact part and minimal cost.
Guest -
May 10, 2022
Verified Purchase
Easy, Fast Order, Perfect Part
Great and fast service. Part was perfect and easy to order.
Danny -
June 29, 2021
Verified Purchase
Air Purge
Arrived very fast and fit perfectly. My ice auger runs again.
Guest -
February 8, 2021
Verified Purchase
Just what was needed
The original primer bulb was cracked and made the saw impossible to start since it couldn't be primed. Getting to the bulb to replace it on a K760 gas saw takes a little bit of work. You have to pull off the top pieces and loosen the carburetor to get to the fuel lines with needle nose pliers. Once there the bulb pops right out and the new one snaps right in. Push on the fuel lines and re-bolt the pieces back on and you're done. A few pushes on the bulb to get the gas flowing and the saw started right up. Just what the saw needed to continue it's service life. A twenty dollar part and 45 minutes time saved a $900 saw.
Thomas -
November 6, 2020
Verified Purchase
Install was easy works great !
Weed eater starts and runs perfectly.
Guest -
October 13, 2020
Verified Purchase
Perfect match
Easy to replace once housing removed
Guest -
August 20, 2020
Verified Purchase
Works perfect.
Exact fit. Quick shipping.
Stephen -
August 17, 2020
Verified Purchase
t
t
t -
t days ago
Verified Purchase
eReplacementParts Team
t
Questions & Answers ?
Our customer Service team is at the ready daily to answer your part and product questions.

Ask our Team
We have a dedicated staff with decades of collective experience in helping customers just like you purchase parts to repair their products.
Does this fit my product?Questions & Answers for Air Purge
No questions have been asked yet
Customer Repair Instructions ?
All our customer repair instructions are solicited directly from other customers just like you who have purchased and replaced this exact part.
Air purge was cracked
dave - February 18, 2016
👍 31 of 32 people found this instruction helpful
Tool Type
Chain Saw
Difficulty
Easy
Time
15-30 minutes
Tools Used
Screwdriver, Pliers
Parts Used
Remove top cowl from saw --- remove air filter from carburetor --- disconnect fuel lines from purge with pliers --- remove damaged purge by pinching keeper tabs --- snap new purge in place --- connect fuel lines --- install air filter & cowl --- voila'
Did you find this story helpful?
Thanks for voting and helping fellow customers!
Air purge cracked due to age.
David - August 16, 2017
👍 6 of 6 people found this instruction helpful
Tool Type
Trimmer
Difficulty
Easy
Time
Less than 15 minutes
Tools Used
Screwdriver, Allen wrench
Parts Used
Removed engine cover.
Used small screw driver to depress the tabs on air purge.
Pulled off both fuel lines from air purge, paying attention to which one connected where.
Attached fuel lines to new air purge and snapped it in place.
It was a very easy and straightforward repair.
Used small screw driver to depress the tabs on air purge.
Pulled off both fuel lines from air purge, paying attention to which one connected where.
Attached fuel lines to new air purge and snapped it in place.
It was a very easy and straightforward repair.
Did you find this story helpful?
Thanks for voting and helping fellow customers!
Prime bulb return line dry rotted, leaking gas.
brandon - September 11, 2016
👍 6 of 6 people found this instruction helpful
Tool Type
Chain Saw
Difficulty
Hard
Time
1-2 hours
Tools Used
Screwdriver, Pliers, Nutdriver, Two picks, one straight, one 90 degrees, knife
1. Remove chain and bar( for easy maneuverability), empty gas in tank, then top cover, followed by handle and throttle grip. The throttle has to be disconnected from carb, and you have to spin the linkage to remove because it does not come straight out.
2. You can choose to remove carb, I was able to do repair without removing, probably more difficult, but might have saved a little time. I removed return line and fuel lines and prime bulb from saw, followed by grommets. To remove fuel line you have to open gas tank and pull out filter and fuel line with your 90 degree pick. Remove filter and hose, replace with new.
3. When I replaced grommets and hose, I put a little oil on them to make things go on a little easier. I found it is easier to install grommets on hose first and then install grommets on saw. You can always push and pull hose through.
4. Once all hoses are on and secure, reinstall your filter on line and replace inside tank. I cut about two inches off the tank line before installing filter, just because it seemed a little long, your choice. I only had one line that was bad, but I figured while I was replacing one, might as well do them all, the others are probably going to fail soon.
5. In order to replace exhaust screen, you will have to remove chain break handle, two hex head bolts, slide screen out, slide new one in and done.
6. Once installed, I reassembled everything in the reverse order it come out. Chain brake handle, main handle then throttle cover, remember to install throttle linkage, you have to spin it to get back next to the carb, this can be a little tedious, but make sure it is where it needs to go before bolting main handle on, or you have to take it apart again(my mistake).
7. After throttle cover, replace your top cover, and chain and bar, add gas and your good to go.
Did you find this story helpful?
Thanks for voting and helping fellow customers!
Would not start cracked air purge bulb
Ted - February 25, 2017
👍 3 of 3 people found this instruction helpful
Tool Type
Trimmer
Difficulty
Easy
Time
15-30 minutes
Tools Used
, allen wrench
Parts Used
Removed rope starter mechanism to gain access to air purge.
Note the purge bulb is clocked so it will only seat in one direction.
reassembled.
Note the purge bulb is clocked so it will only seat in one direction.
reassembled.
Did you find this story helpful?
Thanks for voting and helping fellow customers!
Leaking gas, and would not run for a full min.
william - June 30, 2016
👍 2 of 3 people found this instruction helpful
Tool Type
Trimmer
Difficulty
Medium
Time
30-60 minutes
Tools Used
Screwdriver, Socket set, Wrench Set
Parts Used
Pulled starter recoil
Pulled bottom plate
Removed gas tank
Removed fuel line and air purge line
Replaced purge bubble
Reinstalled all other parts
Pulled bottom plate
Removed gas tank
Removed fuel line and air purge line
Replaced purge bubble
Reinstalled all other parts
Did you find this story helpful?
Thanks for voting and helping fellow customers!
Primer punctured
Michael - July 30, 2016
👍 1 of 1 people found this instruction helpful
Tool Type
Trimmer
Difficulty
Easy
Time
15-30 minutes
Tools Used
Screwdriver, Pliers
Parts Used
1. Removed screws for the frame
2. Pulled out old primer
3. Removed two fuel lines
4. Placed in the new primer and connected both fuel lines
5. Placed frame back on and screwed in.
2. Pulled out old primer
3. Removed two fuel lines
4. Placed in the new primer and connected both fuel lines
5. Placed frame back on and screwed in.
Did you find this story helpful?
Thanks for voting and helping fellow customers!
Purge cracked would not prime, upon inspection throttle cable appeared severely frayed near the carb, after removing throttle cable, spring was found broken
Terry - April 2, 2016
👍 1 of 1 people found this instruction helpful
Tool Type
Trimmer
Difficulty
Medium
Time
30-60 minutes
Tools Used
Nutdriver, Star bit
The purge is fairly simple to replace, it's kinda like a snap tight. I broke the old one taking it off, which informed to be careful putting the new one in. I put a little lithium white on the two ears that snap it into place. That helped go in without me putting to much muscle on it. The throttle cable and spring was not so simple and requires a bit of patience. The main thing is pay close attention to how you take it apart. Everything has its place it just may take a moment to figure it out. I advise that if you need to replace the cable, buy the spring as well. Even if it's not broken that way you can leave it assembled till your parts come in and taking it apart is fresh on your mind.
Did you find this story helpful?
Thanks for voting and helping fellow customers!
Air purge pump bulb hardened and split open
Robert - September 7, 2018
Tool Type
Trimmer
Difficulty
Medium
Time
15-30 minutes
Tools Used
Screwdriver, Pliers, Nutdriver
Parts Used
1. Removed to top casing to completely expose the air purge pump.
2. Disconnected the two fuel lines from the broken air purge pump.
3. Removed the air purge pump by depressing the snap in bottom with a flat edge screw driver.
4. Positioned the new air purge pump to align with the two fuel lines and made the connection.
5. Being careful not to disconnect the fuel lines, aligned the air purge pump with the snap in cut- outs and pushed into place.
6. Depressed the air purge pump to be sure it worked.
7. Re-installed the top assembly.
Did you find this story helpful?
Thanks for voting and helping fellow customers!
fuel lines and air purge old and brittle ('09) Husqvarna 223L Trimmer
CHAD - August 22, 2018
Tool Type
Trimmer
Difficulty
Easy
Time
15-30 minutes
Tools Used
Pliers, Allen wrench
Removed starter assy housing ( 3allen screws ) just for easier accessability , removed top cover ( 1 allen screw ) - took picture of three fuel lines (routing) - simply removed and replaced all above items mentioned . RUNS GREAT ! Cheaper than buying a new trimmer !
Did you find this story helpful?
Thanks for voting and helping fellow customers!
Drive shaft broke on one trimmer and air pump for fuel line leaked for other trimmer.
Michael - August 1, 2018
Tool Type
Trimmer
Difficulty
Medium
Time
15-30 minutes
Tools Used
Screwdriver, Pliers, Nutdriver, Allen wrenches
Air pump on Husquavarna:
1. Remove side cover and fuel lines from air pump.
2. With screwdriver, push in tab on rear of pump to release from frame.
3. Align new pump in frame and snap into place.
4. Use needle nose pliers to carefully attach fuel lines.
5. Press air pump bulb 3 or 4 times to check for leaks.
6. Reinstall side cover.
Drive shaft on Homelite:
1. Remove trimmer head assembly on end of shaft.
2. Remove safety guard from end of shaft.
3. Remove handle from shaft.
4. Remove throttle assembly from shaft noting how the linkage fits back in casing.
5. Remove clamp noting location.
6. Remove shaft assembly from engine.
7. Install new shaft and tighten clamp in same location as removed. You may need to turn end of the shaft so the new drive shaft slides into engine.
8. Install throttle assembly assuring throttle linkage works as you assemble.
9. Replace handle and safety guard on shaft.
10. Replace trimmer head.
Did you find this story helpful?
Thanks for voting and helping fellow customers!
Load More Install Stories
OEM stands for Original Equipment Manufacturer and means the part you’re buying is sourced directly from the manufacturer who made your product. At eReplacementParts, we sell only genuine OEM parts, guaranteeing the part you’re purchasing is of better design and of higher quality than aftermarket parts.
Our product descriptions are a combination of data sourced directly from the manufacturers who made your product as well as content researched and curated by our content & customer service teams. This content is edited and reviewed internally before being made public to customers.
Our customer service team are at the ready daily to answer your part and product questions. We have a dedicated staff with decades of collective experience in helping customers just like you purchase parts to repair their products.
All our part reviews are solicited directly from other customers who have purchased this exact part. While we moderate these reviews for profanity, offensive language or personally identifiable information, these reviews are posted exactly as submitted and no alterations are made by our team.
All our customer repair instructions are solicited directly from other customers just like you who have purchased and replaced this exact part. While we moderate these reviews for profanity, offensive language or personally identifiable information, these reviews are posted exactly as submitted and no alterations are made by our team.
Based on data from past customer purchasing behaviors, these parts are most commonly purchased together along with the part you are viewing. These parts may be necessary or helpful to replace to complete your current repair.
All our installation videos are created and produced in collaboration with our in-house repair technician, Mark Sodja, who has helped millions of eReplacementParts customers over the last 13 years repair their products. Mark has years of experience in selling and repairing both commercial and residential products with a specialty in gas-powered equipment.
This data is collected from customers who submitted a repair instruction after replacing this exact part. Customers can rate how easy the repair was to complete and how long it took. We aggregate this data to provide a repair rating that allows customers to quickly determine the difficulty and time needed to perform their own repair.