
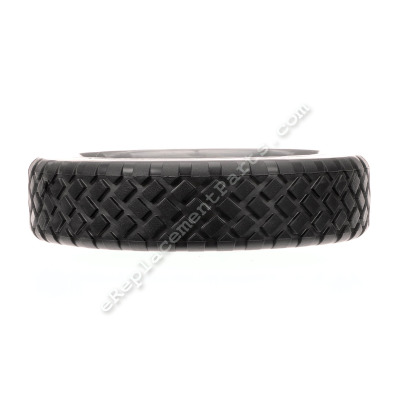


This is a genuine manufacturer sourced replacement wheel. It is specially designed for use with walk-behind/push lawn mowers. This is the drive wheel that allows mower to move. This part consists of a plastic tire and a plastic rim. This assembly includes one (1) wheel.
To replace this part you would need a wrench.
• Make sure the unit is unplugged
• First you want to remove the bolt that holds the wheel
• This will allow you to separate the wheel and remove it
• Align the new wheel with the gears
• Secure the wheel using the bolt
7inch Wheel 242600-01
OEM part for: DeWALT, Black and Decker
Part Number: 242600-01
$13.70
In Stock
Jump To:
Product Description ?
- Classification: Part
- Weight: 0.80 lbs.
- Shipping: Ships Worldwide
Frequently Purchased Together ?


Compatibility
This part will fit the following 32 machines
Black and Decker
CMM1200 Type 1 24V Cordless Mulching Mower View Diagrams & Manuals
CMM1200 Type 2 24V Cordless Mulching Mower View Diagrams & Manuals
MM675 Type 2 18" Electric "LAWNHOG&trade" Mulching Mower with Flip-Over Handle View Diagrams & Manuals
MM875 Type 1 19" Electric LAWNHOG&trade Mulching Mower with Rear-Bag View Diagrams & Manuals
37051 Type 1 19 Crafts Electric Mower View Diagrams & Manuals
37051 Type 2 19 Crafts Electric Mower View Diagrams & Manuals
37052 Type 1 19 Crafts Cordless Mower View Diagrams & Manuals
CMM1000 Type 1 19 Mulching Mower View Diagrams & Manuals
CMM1000 Type 2 19 Mulching Mower View Diagrams & Manuals
CMM1000 Type 2A 19 Mulching Mower View Diagrams & Manuals
CMM1000 Type 3 19 Mulching Mower View Diagrams & Manuals
CMM1000 Type 4 19 Mulching Mower View Diagrams & Manuals
CMM1000 Type 5 19 Mulching Mower View Diagrams & Manuals
CMM625 Type 1 Cordless Mulch Mower View Diagrams & Manuals
CMM625 Type 2 Cordless Mulch Mower View Diagrams & Manuals
CMM625 Type 3 Cordless Mulch Mower View Diagrams & Manuals
CMM625 Type 4 Cordless Mulch Mower View Diagrams & Manuals
CMM630 Type 1 18 High Wheel Cordless Mower View Diagrams & Manuals
CMM630 Type 2 18 High Wheel Cordless Mower View Diagrams & Manuals
MM850S Type 4 19 Electric Mower View Diagrams & Manuals
MM850 Type 1 19 Mulching Mower View Diagrams & Manuals
MM850 Type 2 19 Mulching Mower View Diagrams & Manuals
MM850 Type 3 19 Mulching Mower View Diagrams & Manuals
MM850 Type 4 19 Mulching Mower View Diagrams & Manuals
MM850 Type 5 19 Mulching Mower View Diagrams & Manuals
MM1800 Type 1 18 Inch Mulching Mower View Diagrams & Manuals
CM1836 Type 1 36V 18in Mower View Diagrams & Manuals
CM1936 Type 1 36V 19in Mower View Diagrams & Manuals
CM1936 Type 2 36V 19in Mower View Diagrams & Manuals
CMM1200 Type 3 Lawn Mower View Diagrams & Manuals
CM1836 (Type 2) 18" Cordless Mulching Rear bag Mower View Diagrams & Manuals
CMM1200 (Type 2A) 24v Lawn Mower Power Tool View Diagrams & Manuals
Show More Compatible Models
This item works with the following types of products:
- Lawn Mower Parts
This part replaces obsolete part #: 242600-00
Customer Part Reviews ?
Average Rating (out of 5):
Click to filter by ratings:
5 stars
6
4 stars
0
3 stars
0
2 stars
0
1 stars
0
< PREV
- 1
Best soruce for parts
I have purchsaed from eReplacmentParts before and every time the items arrive quicky and and the part is qccurate. Nothing worse than ordering something and you recifve the wrong item...that doesnt happen with eReplacementParts. I also appreciate their updates on shipping and delivery. HIGHLY recommend for AMAZING service
Guest -
0 days ago
Verified Purchase
7 inch front wheels for lawnmower
Shipping was great, received order in two days.
The wheels themselves are an exact replacement for my 19" Black and Decker Cordless mower. I would suggest getting a set of the retainer washer/clips that hold the wheel in place. Just in case the old ones get damaged during removal.
Overall great product.
Guest -
May 9, 2023
Verified Purchase
Lawnmower Wheels
The wheels were exactly as advertised. Quick delivery.
Vincent -
November 1, 2022
Verified Purchase
Very happy to be able to receive replacement so quickly for my new mower that was damaged in transit!
Easy to install and works perfectly- thank you!
Pamela -
October 9, 2021
Verified Purchase
Exactly what my mower requires
Arrived quickly and was exactly as described
STAN -
September 18, 2021
Verified Purchase
New wheels
Wheel fit great. Easy install.
Guest -
August 6, 2021
Verified Purchase
t
t
t -
t days ago
Verified Purchase
eReplacementParts Team
t
Questions & Answers ?
Our customer Service team is at the ready daily to answer your part and product questions.

Ask our Team
We have a dedicated staff with decades of collective experience in helping customers just like you purchase parts to repair their products.
Does this fit my product?Questions & Answers for 7inch Wheel
No questions have been asked yet
Customer Repair Instructions ?
All our customer repair instructions are solicited directly from other customers just like you who have purchased and replaced this exact part.
Replaced numerous replacement parts, front wheels had no rubber, flap was broken and blade was dull.
Mary - May 22, 2017
👍 1 of 1 people found this instruction helpful
Tool Type
Lawn Mower
Difficulty
Easy
Time
30-60 minutes
Tools Used
Screwdriver, Wrench Set, Mallet
I first replaced the front wheels by removing cap on wheel, taking off flange that holds wheel on rod and put on new wheels and then reversed the process. To replace the flap the back wheels have to be removed first , take the old flap off, slide the new one on and replace the wheels just like on the front. The flange ( not sure that's what it is called) had to be pried off and used a mallet to put back on. Mine were rusty so used WD 40 to clean up. The blade was simple to replace . Remove a nut, put a new blade on and replace and tighten nut. I am a 69 year old woman so if I can do it, anyone can.
Did you find this story helpful?
Thanks for voting and helping fellow customers!
Rubber wore off tire, needed to replace tire
Bruce - September 14, 2021
Tool Type
Lawn Mower
Difficulty
Easy
Time
Less than 15 minutes
Tools Used
Screwdriver, Socket set, hammer
Parts Used
Removed little cap
Pried fastener off
replaced tire
replaced fastener, tapping down using a socket
Replaced little cap
Pried fastener off
replaced tire
replaced fastener, tapping down using a socket
Replaced little cap
Did you find this story helpful?
Thanks for voting and helping fellow customers!
wheel tire tread wore out and flap wore out
Francis - April 21, 2021
Tool Type
Lawn Mower
Difficulty
Easy
Time
30-60 minutes
Tools Used
Screwdriver, Pliers, Adjustable Wrench
Parts Used
Remove old wheels and flap and replace
Did you find this story helpful?
Thanks for voting and helping fellow customers!
The plastic wheel (left rear) broke.
Larry - May 18, 2019
Tool Type
Lawn Mower
Difficulty
Medium
Time
30-60 minutes
Tools Used
Screwdriver, Socket set, Dremel tool with cutting disc, hammer
Struggled trying to remove the push ring. Decided to use the Dremel tool to cut into the ring and could then pop the ring off with a screwdriver.
Had some difficulty putting the new push ring on. My wife suggested trying a socket. I put a small extension rod into the back of the socket and tapped the end of the rod with a hammer to push the ring on the axel. Worked great!
Suggestions for the removal and installation of the push ring would be very helpful.
Since I had one broken wheel, I replaced all four wheels at the same time.
Did you find this story helpful?
Thanks for voting and helping fellow customers!
Rubber flat was coming apart. Front wheels worn
Robert - June 23, 2018
Tool Type
Lawn Mower
Difficulty
Medium
Time
15-30 minutes
Tools Used
Screwdriver, Pliers, Socket set, hammer
Parts Used
1. Remove one rear wheel to get the flap off and install new. Tricky to get the push nut off.
2. Could not save the old push nut. Realized should have purchased push nuts with the flap and for two front wheel replacement.
3. Went to Lowe's and purchased some 1/2" push nuts to install the rear wheel and two front wheels.
4. Removed the push nuts on front wheels and installed new wheels. One of the push nuts popped into the air -- could be a safety issue.
5. Used ~9/16" socket to put over the push nut to allow even pressure when hammering in place.
Did you find this story helpful?
Thanks for voting and helping fellow customers!
Old electric mower wouldn't start and had bad blade and wheels.
Roger - May 14, 2018
Tool Type
Lawn Mower
Difficulty
Medium
Time
30-60 minutes
Tools Used
Screwdriver, Power Drill, Adjustable Wrench
Replaced blade and wheels easily. Switch component swapped out easily but part of the old plastic housing snapped in the process, causing the switch handle to come free. Drilled out the broken peg and replaced it with a machine screw to serve the same purpose. Now back in action!
Did you find this story helpful?
Thanks for voting and helping fellow customers!
Wheels worn out after 13 years of service
STEVEN - September 13, 2017
Tool Type
Lawn Mower
Difficulty
Easy
Time
1-2 hours
Tools Used
Screwdriver, Socket set
Used hand tools, standard procedure, easy parts replacement.
Push rings needed to be pressed onto shafts carefully - used a wrench socket as a push tool.
Push rings needed to be pressed onto shafts carefully - used a wrench socket as a push tool.
Did you find this story helpful?
Thanks for voting and helping fellow customers!
Replaced wheel
Barbara - September 10, 2017
Tool Type
Lawn Mower
Difficulty
Easy
Time
Less than 15 minutes
Tools Used
Pliers
Remove the hub cap, remove the push ring and the old wheel
Install the new wheel, push ring and hub cap
Install the new wheel, push ring and hub cap
Did you find this story helpful?
Thanks for voting and helping fellow customers!
Wheel tread worn / broken.
Ronald - July 12, 2017
Tool Type
Lawn Mower
Difficulty
Easy
Time
1-2 hours
Tools Used
Screwdriver, Socket set, Hammer, grease gun
1. Turn mower on its left side.
2. Use a regular screwdriver to pry off the front right hubcap.
3. Use the screwdriver to gradually pry off the front right push ring.
4. Remove and discard the front right wheel. Leave the washer in place.
5. Apply grease to the bearing surface of one 7" wheel.
6. Apply grease to the outer surface of the wheel in the area that will be under the push ring.
7. Slide the wheel onto the front right axle.
8. Place a new push ring over the end of the axle.
9. Position a large socket over the push ring. Hammer on the free end of the socket, so that the push ring slides down the axle and holds the wheel tightly enough that it doesn't wobble, but loosely enough that the wheel spins freely.
10. Push a new hubcap into place on the wheel.
11. Repeat steps 2 though 10 to remove the right rear wheel and replace it with an 8" wheel.
12. Turn the mower onto its right side.
13. Repeat steps 2 through 11 to remove and replace the left front (7") and rear (8") wheels.
Did you find this story helpful?
Thanks for voting and helping fellow customers!
Rubber came off the wheel. Lost one knob
Wayne - September 13, 2016
Tool Type
Lawn Mower
Difficulty
Easy
Time
15-30 minutes
Tools Used
Screwdriver, Wrench Set
Removed the hub cap then the retainer clip, pulled wheel off, put new wheel on , replaced new retainer clip. Then replaced the lost knob.
Did you find this story helpful?
Thanks for voting and helping fellow customers!
OEM stands for Original Equipment Manufacturer and means the part you’re buying is sourced directly from the manufacturer who made your product. At eReplacementParts, we sell only genuine OEM parts, guaranteeing the part you’re purchasing is of better design and of higher quality than aftermarket parts.
Our product descriptions are a combination of data sourced directly from the manufacturers who made your product as well as content researched and curated by our content & customer service teams. This content is edited and reviewed internally before being made public to customers.
Our customer service team are at the ready daily to answer your part and product questions. We have a dedicated staff with decades of collective experience in helping customers just like you purchase parts to repair their products.
All our part reviews are solicited directly from other customers who have purchased this exact part. While we moderate these reviews for profanity, offensive language or personally identifiable information, these reviews are posted exactly as submitted and no alterations are made by our team.
All our customer repair instructions are solicited directly from other customers just like you who have purchased and replaced this exact part. While we moderate these reviews for profanity, offensive language or personally identifiable information, these reviews are posted exactly as submitted and no alterations are made by our team.
Based on data from past customer purchasing behaviors, these parts are most commonly purchased together along with the part you are viewing. These parts may be necessary or helpful to replace to complete your current repair.
All our installation videos are created and produced in collaboration with our in-house repair technician, Mark Sodja, who has helped millions of eReplacementParts customers over the last 13 years repair their products. Mark has years of experience in selling and repairing both commercial and residential products with a specialty in gas-powered equipment.
This data is collected from customers who submitted a repair instruction after replacing this exact part. Customers can rate how easy the repair was to complete and how long it took. We aggregate this data to provide a repair rating that allows customers to quickly determine the difficulty and time needed to perform their own repair.