
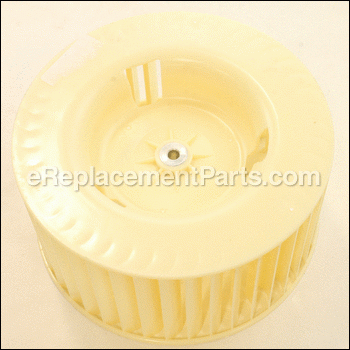
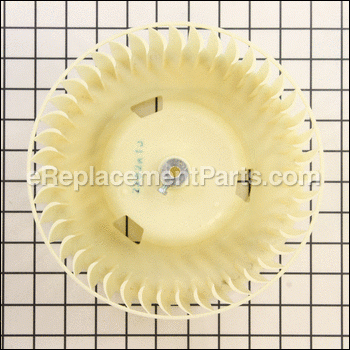
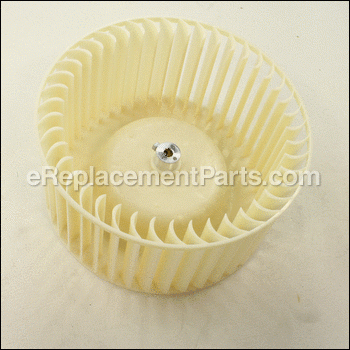
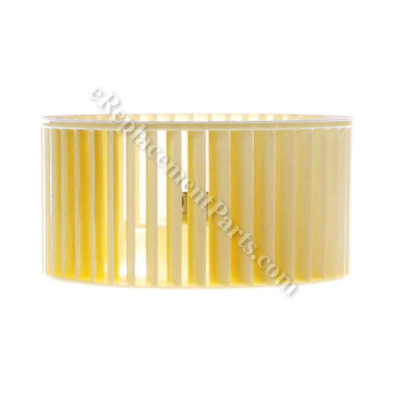


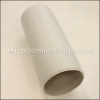
This is a genuine OEM sourced part. It is specially designed for use with DeLonghi portable air conditioners. It is the main fan which connects to the motor and it is what moves the air producing the air flow. Over time it may wear out or get damaged eventually requiring a replacement. This fan is made of high-quality plastic and is sold as an individual component. To complete this repair you will need a screwdriver and a wrench. Note, the hardware to secure it is sold separately.
Air Conditioner Blower NE1639
OEM part for: DeLonghi
Part Number: NE1639
$29.87
In Stock
Jump To:
Frequently Purchased Together ?

Compatibility
This part will fit the following 68 machines
DeLonghi
PACN100EL Air Conditioner View Diagrams & Manuals
PACN110 (MY SG) Portable Air Conditioner View Diagrams & Manuals
PACN130HPE Pinguino N Series View Diagrams & Manuals
PACAN120HPE Air Conditioner View Diagrams & Manuals
PACCN120E Portable Air Conditioner View Diagrams & Manuals
PACAN125HPEC Portable Air Conditioner View Diagrams & Manuals
PACAN130HPEL Portable Air Conditioner View Diagrams & Manuals
PACEX270LN3ADG (0151854002) Portable Air Conditioners View Diagrams & Manuals
PACAN125ES (0151801013) Air Conditioner View Diagrams & Manuals
PACAN130HPESWH3AEX1 (0151801228) Air Conditioner View Diagrams & Manuals
PACAN130ESLG3A 13000 Btu Portable Air Conditioner View Diagrams & Manuals
PACAN140HPEC (0151801203) 14000 Btu Portable Air Conditioner View Diagrams & Manuals
PACAN135ESBK (0151801036) Portable Air Conditioner View Diagrams & Manuals
PACN140E Portable Air Conditioners View Diagrams & Manuals
PACAN140ES 14000 Btu Portable Air Conditioner View Diagrams & Manuals
PACAN135ESLG (0151801037) Air Conditioner View Diagrams & Manuals
35821 (0151801007) Portable Air Conditioner View Diagrams & Manuals
NF90B (151100044) Portable Air Conditioner View Diagrams & Manuals
PACAN270G1W3AWH (0151801046) Portable Air Conditioner View Diagrams & Manuals
PACN100E (151800021) Portable Air Conditioner View Diagrams & Manuals
PACAN140HPECA (151801203) Portable Air Conditioner View Diagrams & Manuals
PACN130HPE (0151800202) 13000 Btuportable Air Conditioner View Diagrams & Manuals
PACN115EC Portable Air Conditioner View Diagrams & Manuals
PACN115EC2014 Portable Air Conditioner View Diagrams & Manuals
NF100D (151100046) Portable Air Conditioner View Diagrams & Manuals
PACAN120HPE (151801200) Portable Air Conditioner View Diagrams & Manuals
PACAN125HPEC (0151801207) 12000 Btu Portable Air Conditioner View Diagrams & Manuals
PACEX270LN3ABW (0151854004) Portable Air Conditioner View Diagrams & Manuals
NF100C (151100046) Portable Air Conditioner View Diagrams & Manuals
PACAN135EWSLG Portable Air Conditioner View Diagrams & Manuals
PACAN125HPEC (0151801205) 12000 Btu Portable Air Conditioner View Diagrams & Manuals
PACAN140HPEC (0151801208) 14000 Btu Portable Air Conditioner View Diagrams & Manuals
PACN115ECWH3A Portable Air Conditioner View Diagrams & Manuals
PACN110EC3AEX1 (0151800041) Portable Air Conditioner View Diagrams & Manuals
PACCN120E (0151802000V1)(2014) Portable Air Conditioners View Diagrams & Manuals
35824 (0151801008) Portable Air Conditioner View Diagrams & Manuals
NF90A (151100044) Portable Air Conditioner View Diagrams & Manuals
PACAN140HPEC (0151801202) 14000 Btu Portable Air Conditioner View Diagrams & Manuals
35824EX1 (0151801031) Portable Air Conditioner View Diagrams & Manuals
PACAN130ESWH3A 13000 Btuportable Air Conditioner View Diagrams & Manuals
PACN120E (151800022) Portable Air Conditioner View Diagrams & Manuals
NF100B (151100046) Portable Air Conditioner View Diagrams & Manuals
PACAN140HPEWS 14000 Btu Portable Air Conditioner View Diagrams & Manuals
PACN130HPE (0151800205) 13000 Btu Portable Air Conditioner View Diagrams & Manuals
PACN110EC (0151800033) 11000 Btu Portable Air Conditioner View Diagrams & Manuals
PACAN130HPESDG3A 13000 Btu Portable Air Conditioner View Diagrams & Manuals
PACAN140HPEWC 14000 Btu Portable Air Conditioner View Diagrams & Manuals
PACAN130HPEL 13000 Btu Portable Air Conditioner View Diagrams & Manuals
PACN270GN3AWH (0151800051) Portable Air Conditioner View Diagrams & Manuals
PACAN130ESDG3A 13000 Btu Portable Air Conditioner View Diagrams & Manuals
PACAN125ESB Portable Air Conditioner View Diagrams & Manuals
PACAN130HPESDG3AEX1 (0151801229) Portable Air Conditioner View Diagrams & Manuals
PACN130HPE (0151800202V1) Portable Air Conditioner View Diagrams & Manuals
PACCN120E (0151802000)(2014) Portable Air Conditioner View Diagrams & Manuals
PACAN135ESWH3A Portable Air Conditioner View Diagrams & Manuals
PACN110EC (0151800027) 11000 Btu Portable Air Conditioner View Diagrams & Manuals
PACAN120EWEX1 (0151801032) Portable Air Conditioner View Diagrams & Manuals
PACAN140HPECB (151801202) Portable Air Conditioner View Diagrams & Manuals
PACAN120EW Portable Air Conditioner View Diagrams & Manuals
PACAN120ES 12000 Btu Portable Air Conditioner View Diagrams & Manuals
PACN135EC (0151800032) Portable Air Conditioner View Diagrams & Manuals
PACAN270G1W1AWH (0151801044) Portable Air Conditioner View Diagrams & Manuals
PACAN135ESWH (0151801035) Portable Air Conditioner View Diagrams & Manuals
NF100A (151100045) Portable Air Conditioner View Diagrams & Manuals
PACAN130HPESWH3A 13000 Btu Portable Air Conditioner View Diagrams & Manuals
PACAN130HPESLG3A (0151801224) Portable Air Conditioner View Diagrams & Manuals
PACN130HPES 13000 Btuportable Air Conditioner View Diagrams & Manuals
PACCN120EEX1 Portable Air Conditioner View Diagrams & Manuals
Show More Compatible Models
This item works with the following types of products:
- Air Conditioner Parts
This part replaces obsolete part #: NE1726, NE1084
Customer Part Reviews ?
Average Rating (out of 5):
Click to filter by ratings:
5 stars
25
4 stars
3
3 stars
0
2 stars
1
1 stars
0
< PREV
- 1
- 2
- 3
Fast service
Part fit perfectly. Cool air flowing again.
clysta -
July 17, 2023
Verified Purchase
Great part, easy repair, worked as expected!
Excellent customer service! We're back in business!
Guest -
June 17, 2022
Verified Purchase
Fit and description spot on
It fit well and was shipped fast!!
Guest -
October 6, 2021
Verified Purchase
Works as expected.
It's quite a job getting this replaced in the unit.
Patrick -
July 8, 2021
Verified Purchase
Perfect!
This was the exact part I needed to replace my broken one: ) I put my machine back together and now my portable AC works again, Yay! Thank you ereplacementparts!!!
Nina -
July 6, 2021
Verified Purchase
Replacement blower wheel
Great service and fast delivering.
Guest -
June 21, 2021
Verified Purchase
Replacement Part
Right part and arrived promptly. Good deal !
iGlobal -
June 3, 2021
Verified Purchase
Great Part worked as designed
Part was what I ordered and came in on time.
Guest -
February 4, 2021
Verified Purchase
Works great
Thanks, received quickly and it fit perfectly.
Guest -
August 5, 2020
Verified Purchase
Great part did the job
This company is fast and Efficient and gets the correct part to you to help you out on a job very thankful for that
Guest -
August 3, 2020
Verified Purchase
t
t
t -
t days ago
Verified Purchase
eReplacementParts Team
t
Questions & Answers ?
Our customer Service team is at the ready daily to answer your part and product questions.

Ask our Team
We have a dedicated staff with decades of collective experience in helping customers just like you purchase parts to repair their products.
Does this fit my product?Questions & Answers for Air Conditioner Blower
Hello, is this fan from the bottom? Send to Brazil?
Douglas
for model number PACWE125
asked on 2022-12-26
Hello Douglas, Thank you for the question. This is the main fan which connects to the motor and it is what moves the air. We have researched the model you have provided and have found the part you are looking for is Part Number:TL1831. We hope this helps, good luck with this repair!
eReplacementParts Team December 26, 2022
What are the measurements
Celeste
asked on 2022-08-04
Hello Celeste, thank you for your question. This blower Wheel is 8 3/4" width, 4 3/8" height, 3/8" shaft size. Hope this helps! If you need help placing an order, customer service is open 7 days a week. Please feel free to give us a call. We look forward to hearing from you.
eReplacementParts Team August 04, 2022
Customer Repair Instructions ?
All our customer repair instructions are solicited directly from other customers just like you who have purchased and replaced this exact part.
Fan disintegrated
Mike - March 10, 2017
👍 41 of 46 people found this instruction helpful
Tool Type
Air Conditioner
Difficulty
Hard
Time
More than 2 hours
Tools Used
Screwdriver, Socket set, Pocket knife
Parts Used
1. Remove 7 screws on rear cover. Use a pocket knife or similar slim tool to pop out the screw covers in the center and top of the unit. Remove back cover.
2. Remove two screws at top of front cover. Pop the cover off the middle and bottom side edge retainers.
3. Remove the white cover over the electronic control board using a small common blade screw driver to help release the pop together catches.
4. Unplug the white ribbon cable that goes to front cover controls. This allows the front cover to be completely separated from the unit. Remove the 2 wire black sensor connector next to the one just removed.
5. Remove the 4 screws retaining the upper blower assembly to allow access to the screw located below the fan motor.
6. Now you can move forward to replace the squirrel cage. Remove the rear exhaust grate.
remove the 4 screws holding the blower to the bottom cabinet and the assembly together.
7. Locate and remove the screws holding the top separation plate from the blower and lower area to allow the blower enough clearance to be removed out of the separate the half with the motor and loosen the screw retaining blower wheel. Note the distance the shaft protrudes past blower hub before removing. You will need to put the new blower wheel into the same spot so that it does not rub.
8. Replace the wheel and remove and broken pieces from the enclosure. Be sure to check for fan blades that may have fallen to the bottom and fallen between the two halves.
9. Reverse the steps until the lower blower is back in position and the halves are tightened together. Through the exhaust port move the wheel gently to test for free motion.
10. Continue assembly until you get to the point where the cable are connected. At this point you can test the unit. If the unit comes on with the exhaust blower working during the cool cycle you should be done and ok to replace the covers. If the unit starts cooling down and does not have exhaust blower operation and it shuts off cooling in about a minute then the blower motor is defective. This can be caused by the motor burning out an internal 2 amp 115 degree over temp protector in the coil winding. This is an expert repair to replace or a hard repair because you have to go through the same steps to replace the fan motor or risk breaking a fan blade to short cutting the blower wheel removal.
11. Mine was both and is now assembled and operating normally. My unit was a PACN120E
Did you find this story helpful?
Thanks for voting and helping fellow customers!
Fan Blade(s) disintegrated on compressor side of AC
Bruce - May 9, 2017
👍 9 of 9 people found this instruction helpful
Tool Type
Air Conditioner
Difficulty
Hard
Time
1-2 hours
Tools Used
Screwdriver
Parts Used
I followed directions on the web site which were very helpful. If you are good with following directions and basic tools (screwdrivers) you can complete this. Remember to note where all of the screws came from and their sizes. The part was correct and easy to replace once you get to it .... which is the hard part.
Did you find this story helpful?
Thanks for voting and helping fellow customers!
Squirrel cage fan had disintegrated
Daniel - February 8, 2017
👍 6 of 7 people found this instruction helpful
Tool Type
Air Conditioner
Difficulty
Hard
Time
More than 2 hours
Tools Used
Screwdriver, Pliers, Power Drill, Nutdriver
Parts Used
1. Removed front and back of portable AC unit, marking electrical hook ups.
2. Disconnected framing from base, and loosened compressor bolts and any other items to allow blower case to be opened and blower to be removed and replaced.
2. Disconnected framing from base, and loosened compressor bolts and any other items to allow blower case to be opened and blower to be removed and replaced.
Did you find this story helpful?
Thanks for voting and helping fellow customers!
Fan blades blew off
Jon - November 3, 2017
👍 2 of 2 people found this instruction helpful
Tool Type
Air Conditioner
Difficulty
Expert
Time
1-2 hours
Tools Used
Screwdriver, Pliers, Wrench Set, Nutdriver, Adjustable Wrench, Wire cutters
Parts Used
Take off the grill
Unscrew the bolt that secures the fan
Cut the zip ties
Install new fan and secure the screw
Unscrew the bolt that secures the fan
Cut the zip ties
Install new fan and secure the screw
Did you find this story helpful?
Thanks for voting and helping fellow customers!
Blower fan was broken
PAUL - October 9, 2021
Tool Type
Air Conditioner
Difficulty
Medium
Time
More than 2 hours
Tools Used
Screwdriver, Socket set, Brush
Parts Used
I removed all the screws and adjusted the cover and stretched them, installed the new blower wheel and assembled back together but I still have a small adjustment too make then will be finished. I have had the pleasure testing it and ran it for one hour an then for the afternoon and again later in the evening for little while. It work like new and I mean like new it was a used air conditioner I have twins now and they are the greatest thing too have DeLonghi portable air conditioner 12000 but works great and is easy too repair. If wheel or cord need it. Thanks for having part I needed an at the time super find
Did you find this story helpful?
Thanks for voting and helping fellow customers!
Blower wheel broke
Justin - August 13, 2021
Tool Type
Air Conditioner
Difficulty
Medium
Time
15-30 minutes
Tools Used
Screwdriver, Pliers, Socket set
Parts Used
Removed back cover
Removed condenser assembly
Removed Blower assembly
Separated blower housing
Replaced broken blower wheel
Cleaned internals of dust and broken plastics
reassembled the unit
Worked perfectly!
Removed condenser assembly
Removed Blower assembly
Separated blower housing
Replaced broken blower wheel
Cleaned internals of dust and broken plastics
reassembled the unit
Worked perfectly!
Did you find this story helpful?
Thanks for voting and helping fellow customers!
Blower fan outer ring broke off blades
Patrick - July 8, 2021
Tool Type
Air Conditioner
Difficulty
Hard
Time
More than 2 hours
Tools Used
Screwdriver, Wrench Set, Nutdriver
Parts Used
Very complicated disassembly of the air conditioner to replace the blower fan.
Did you find this story helpful?
Thanks for voting and helping fellow customers!
Old blower wheel disintegrated due to age of unit
Ronald - July 5, 2021
Tool Type
Air Conditioner
Difficulty
Easy
Time
1-2 hours
Tools Used
Screwdriver, 5/16\\
Parts Used
Followed instructions noted on previous completed repair for this replacement except used a 5/16" box gear wrench to tighten set screw on blower wheel to fan motor shaft, not enough room to use a socket and ratchet to properly tighten set screw.
Did you find this story helpful?
Thanks for voting and helping fellow customers!
Blower wheel in AC came apart, could not exhaust hot air.
Sue - December 11, 2020
Tool Type
Air Conditioner
Difficulty
Hard
Time
More than 2 hours
Tools Used
Screwdriver, Pliers, Adjustable Wrench, Flashlight or Trouble Light, Shop Vac
Parts Used
Removed screws holding outer cabinet halves. Unclipped cabinet halves and set rear half aside.
Carefully removed front cabinet half without straining control panel cable. Removed cover on internal circuit board. Disconnected control panel cable, air temperature cable and motor-capacitor leads. Removed screws holding evaporator coil. Removed screws holding evaporator fan housing and set aside. Removed screws holding evaporator pan. Lifted evaporator pan on one side. Removed screws holding blower fan grill and removed grill. Removed screws holding together halves of condenser blower housing. Lifted half out half of housing containing motor and blower wheel. Using adjustable wrench, loosened set screw holding blower wheel. Discarded any pieces of blower wheel remaining in blower housing. Installed new blower wheel on motor shaft, lining up set screw on flat of motor shaft. Tightened blower set screw securely. Replaced blower housing in position temporarily and checked alignment of blower wheel for free rotation. Installed screws in blower housing. Replaced blower fan grill and installed screws. Installed screws in evaporator pan. Replaced evaporator fan housing and installed screws. Installed screws holding evaporator coil. Replaced leads to motor-capacitor and cables to control panel and air temperature cable. Replaced cover on internal circuit board. Using shop-vac, removed accumulated dust and lint on condenser coils. Replaced both cabinet halves, aligning the clips and installing the screws. Cleaned rear cabinet air filter. Installed plug in outlet. Performed test run of AC, setting desired temperature low enough to engage compressor and condenser blower. Checked for smooth running of blower wheel. Checked for cold air at front grill. Checked for high-volume air flow at rear exhaust.
Carefully removed front cabinet half without straining control panel cable. Removed cover on internal circuit board. Disconnected control panel cable, air temperature cable and motor-capacitor leads. Removed screws holding evaporator coil. Removed screws holding evaporator fan housing and set aside. Removed screws holding evaporator pan. Lifted evaporator pan on one side. Removed screws holding blower fan grill and removed grill. Removed screws holding together halves of condenser blower housing. Lifted half out half of housing containing motor and blower wheel. Using adjustable wrench, loosened set screw holding blower wheel. Discarded any pieces of blower wheel remaining in blower housing. Installed new blower wheel on motor shaft, lining up set screw on flat of motor shaft. Tightened blower set screw securely. Replaced blower housing in position temporarily and checked alignment of blower wheel for free rotation. Installed screws in blower housing. Replaced blower fan grill and installed screws. Installed screws in evaporator pan. Replaced evaporator fan housing and installed screws. Installed screws holding evaporator coil. Replaced leads to motor-capacitor and cables to control panel and air temperature cable. Replaced cover on internal circuit board. Using shop-vac, removed accumulated dust and lint on condenser coils. Replaced both cabinet halves, aligning the clips and installing the screws. Cleaned rear cabinet air filter. Installed plug in outlet. Performed test run of AC, setting desired temperature low enough to engage compressor and condenser blower. Checked for smooth running of blower wheel. Checked for cold air at front grill. Checked for high-volume air flow at rear exhaust.
Did you find this story helpful?
Thanks for voting and helping fellow customers!
Blower motor wheel came apart in my indoor ac unit.
Mario - August 8, 2020
Tool Type
Air Conditioner
Difficulty
Medium
Time
1-2 hours
Tools Used
Screwdriver, Power Drill, Vacuum attachment to clean internal components.
Parts Used
Watched several YouTube videos on blower motor repair in similar ac units, and then took my unit apart. I kept items in order as to not lose any screws because you'll end up with about 20 of them. Most are the same size, but mark extraction areas. Removing the original blower wheel is difficult, and I wouldn't recommend prying while still attached to unit. Most casings on the unit are plastic and will probably be damaged very easily. I was able to wedge a long screw driver between wheel and metal base it attaches to. Good Luck
Did you find this story helpful?
Thanks for voting and helping fellow customers!
Load More Install Stories
OEM stands for Original Equipment Manufacturer and means the part you’re buying is sourced directly from the manufacturer who made your product. At eReplacementParts, we sell only genuine OEM parts, guaranteeing the part you’re purchasing is of better design and of higher quality than aftermarket parts.
Our product descriptions are a combination of data sourced directly from the manufacturers who made your product as well as content researched and curated by our content & customer service teams. This content is edited and reviewed internally before being made public to customers.
Our customer service team are at the ready daily to answer your part and product questions. We have a dedicated staff with decades of collective experience in helping customers just like you purchase parts to repair their products.
All our part reviews are solicited directly from other customers who have purchased this exact part. While we moderate these reviews for profanity, offensive language or personally identifiable information, these reviews are posted exactly as submitted and no alterations are made by our team.
All our customer repair instructions are solicited directly from other customers just like you who have purchased and replaced this exact part. While we moderate these reviews for profanity, offensive language or personally identifiable information, these reviews are posted exactly as submitted and no alterations are made by our team.
Based on data from past customer purchasing behaviors, these parts are most commonly purchased together along with the part you are viewing. These parts may be necessary or helpful to replace to complete your current repair.
All our installation videos are created and produced in collaboration with our in-house repair technician, Mark Sodja, who has helped millions of eReplacementParts customers over the last 13 years repair their products. Mark has years of experience in selling and repairing both commercial and residential products with a specialty in gas-powered equipment.
This data is collected from customers who submitted a repair instruction after replacing this exact part. Customers can rate how easy the repair was to complete and how long it took. We aggregate this data to provide a repair rating that allows customers to quickly determine the difficulty and time needed to perform their own repair.