
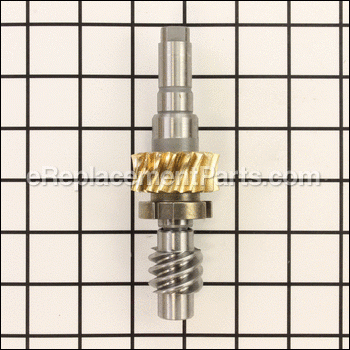


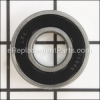
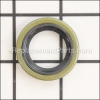
This genuine OEM replacement part is manufactured for worm driven circular saws. This worm gear set includes both gears, and the bearing for the gear on the arbor shaft. It is recommended to replace the gaskets to ensure a seal when reassembling the tool. The set is sold individually, please see model diagram for additional parts.
Worm Gear Set 2826164001
OEM part for: Skil, Bosch
Part Number: 2826164001
$64.81
In Stock
Jump To:
Frequently Purchased Together ?


Compatibility
This part will fit the following 24 machines
Skil
5825 TYPE 2 (F01258250A) 6-1/2 in. Worm Drive Saw View Diagrams & Manuals
HD77 Type 17 Worm Drive Saw (Skilsaw 77) View Diagrams & Manuals
5860 (F012586099) Circular Saw View Diagrams & Manuals
HD77M (F012HM7702) 7 1/4" Magnesium Worm Drive Skilsaw View Diagrams & Manuals
SHD77 (F012SD7700) 7 1/4" Worm Drive Skilsaw View Diagrams & Manuals
SHD77 (F012SD7705) 7 1/4" Worm Drive Skilsaw View Diagrams & Manuals
SHD77M (F012SD7702) 7 1/4" Magnesium Worm Drive Skilsaw View Diagrams & Manuals
SHD77M (F012SD7707) 7 1/4" Magnesium Worm Drive Skilsaw View Diagrams & Manuals
HD77M-72 (F012HM7772) 7 1/4" Magnesium Worm Drive Skilsaw View Diagrams & Manuals
HD5860 (F01258600A) Worm Drive Skilsaw View Diagrams & Manuals
HD77-72 7-1/4 Worm Drive Saw w/Twist Lock View Diagrams & Manuals
HD77 (F012HD77LA) Circular Hand Saw View Diagrams & Manuals
SHD77M (F012SD7712) Circular Hand Saw View Diagrams & Manuals
HD77M (F012HM7700) Circular Hand Saw View Diagrams & Manuals
MAG77-75 7-1/4" Skilsaw View Diagrams & Manuals
SHD77-72 7-1/4" Skilsaw Worm Drive Skilsaw with Twist Lock View Diagrams & Manuals
SPT78W-01 Circular Saw View Diagrams & Manuals
SPT78W-22 Circular Saw View Diagrams & Manuals
Bosch
1677M (0601677039) 7-1/4" Worm Drive Saw View Diagrams & Manuals
1678A (0601678039) 7-1/4" Worm Drive Saw View Diagrams & Manuals
1677MD (0601677139) Circular Saw View Diagrams & Manuals
1677MDT (0601677239) Circular Saw View Diagrams & Manuals
1677C-100 (0601677168) Circular Saw View Diagrams & Manuals
1677DC-100 (0601677190) Circular Saw View Diagrams & Manuals
Show More Compatible Models
This item works with the following types of products:
- Saw Parts
- Circular Saw Parts
This part replaces obsolete part #: 2610357524
Questions & Answers ?
Our customer Service team is at the ready daily to answer your part and product questions.

Ask our Team
We have a dedicated staff with decades of collective experience in helping customers just like you purchase parts to repair their products.
Does this fit my product?Questions & Answers for Worm Gear Set
No questions have been asked yet
Customer Repair Instructions ?
All our customer repair instructions are solicited directly from other customers just like you who have purchased and replaced this exact part.
Worm gears were shot
Mark - December 25, 2016
👍 4 of 4 people found this instruction helpful
Tool Type
Circular Saw
Difficulty
Medium
Time
1-2 hours
Tools Used
Screwdriver, Socket set, Wrench Set, , Patience
Removal. Not too difficult.
1. Remove front screw from base to allow it to swing away
2. Remove guard. It has a retainer ring to pop loose, then it slips off with some persuasion
3. Remove the 'big bolt' on the front of the saw which exposes the nut to remove to get the spiral worm gear out
4. Behind the guard, remove the four allen screw to remove the other worm gear. It was easier to remove this first, since it so worn. that more openly exposes the spiral gear which can be pried forward to remove.
I cleaned everything at this point, to get all the ground up bits of the old gear out of the saw to help the new ones last longer.
Replacement.
1. Install the spindle first with the big gear/bearing/seal/gasket, and replace the allen screws. I was sure I had the wrong spindle because I took this out first, and thought I should put it in last. It only came out easily because it was worn. My bad.
2. Look down the hole in the front of the saw to see that it's centered correctly. I tapped the shaft lightly to move it a bit. Not sure its really important or if it will center itself
3. Put the spiral gear back in through the front. The new spindle where the blade mounts is now squared off so you can hold that with a wrench to make tightening easier. My old 77 was round with a keyway, which is different
4. Replace the cap in front, the blade guard, and fill with oil.
5. I will have to grind away the tabs on the blade-retaining washer to fit the square off spindle, but my 77 is from around 1980 so yours may not have this issue.
I'm sure I missed something, but sequencing the reassembly was my biggest issue. You can use the parts diagram to figure out most everything else.
Did you find this story helpful?
Thanks for voting and helping fellow customers!
No grease, worn out worm gear.
Gary - January 23, 2018
Tool Type
Circular Saw
Difficulty
Medium
Time
1-2 hours
Tools Used
Screwdriver, Pliers, Socket set, Wrench Set, Torx bits
Took it apart and put it back together. Your parts diagrams really helped out a lot.
Did you find this story helpful?
Thanks for voting and helping fellow customers!
Gears were chewed up, no oil in the case.
Charles - July 19, 2017
👍 1 of 2 people found this instruction helpful
Tool Type
Circular Saw
Difficulty
Medium
Time
1-2 hours
Tools Used
Screwdriver, Socket set, Nutdriver
Parts Used
Took the saw apart and replaced the worn gears. Reassembled and tested. Works great!
Did you find this story helpful?
Thanks for voting and helping fellow customers!
someone let the oil run out on a worm drive saw which destroyed the gear set and welded the bearings
Rich - February 1, 2017
Tool Type
Circular Saw
Difficulty
Easy
Time
1-2 hours
Tools Used
Screwdriver, Socket set, Torx set
I completely disassembled the saw ,all except the field . identified the parts I needed to replace and ordered online. then I cleaned the gear housing making sure to get all the gear debris out. sand blasted the gear housing the field housing the saw guards and powder coated everything .cleaned and polished the armature contacts .as soon as the parts showed up reassembled it .PUT OIL IN IT and was good to go just like new
Did you find this story helpful?
Thanks for voting and helping fellow customers!
OEM stands for Original Equipment Manufacturer and means the part you’re buying is sourced directly from the manufacturer who made your product. At eReplacementParts, we sell only genuine OEM parts, guaranteeing the part you’re purchasing is of better design and of higher quality than aftermarket parts.
Our product descriptions are a combination of data sourced directly from the manufacturers who made your product as well as content researched and curated by our content & customer service teams. This content is edited and reviewed internally before being made public to customers.
Our customer service team are at the ready daily to answer your part and product questions. We have a dedicated staff with decades of collective experience in helping customers just like you purchase parts to repair their products.
All our part reviews are solicited directly from other customers who have purchased this exact part. While we moderate these reviews for profanity, offensive language or personally identifiable information, these reviews are posted exactly as submitted and no alterations are made by our team.
All our customer repair instructions are solicited directly from other customers just like you who have purchased and replaced this exact part. While we moderate these reviews for profanity, offensive language or personally identifiable information, these reviews are posted exactly as submitted and no alterations are made by our team.
Based on data from past customer purchasing behaviors, these parts are most commonly purchased together along with the part you are viewing. These parts may be necessary or helpful to replace to complete your current repair.
All our installation videos are created and produced in collaboration with our in-house repair technician, Mark Sodja, who has helped millions of eReplacementParts customers over the last 13 years repair their products. Mark has years of experience in selling and repairing both commercial and residential products with a specialty in gas-powered equipment.
This data is collected from customers who submitted a repair instruction after replacing this exact part. Customers can rate how easy the repair was to complete and how long it took. We aggregate this data to provide a repair rating that allows customers to quickly determine the difficulty and time needed to perform their own repair.