
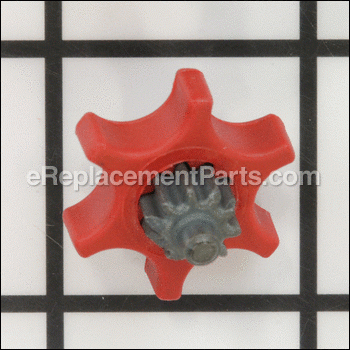
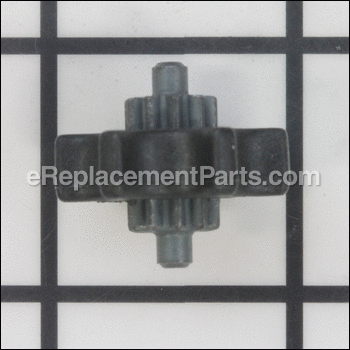
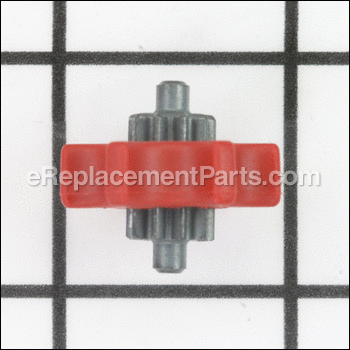

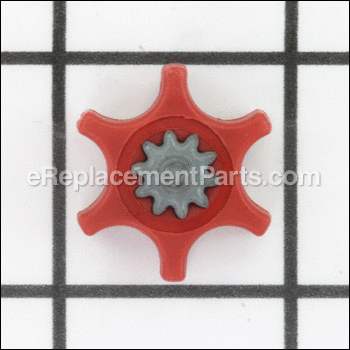
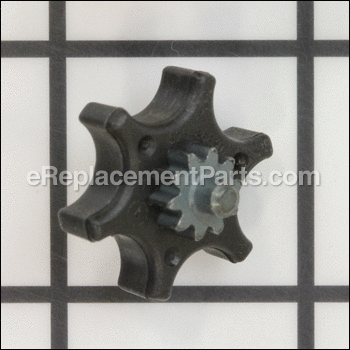

This is an authentic Craftsman replacement part, sourced from the original manufacturer for use with chainsaws. The special thumb assembly is commonly used to adjust the tension of the chain around the bar. This thumb assembly is available as an individual replacement part, please see model diagram for associative parts.
Wheel Gear Adjustment 525884202
OEM part for: Poulan, Craftsman, Jonsered, Husqvarna
Part Number: 525884202
$4.99
In Stock
Jump To:
Frequently Purchased Together ?


Compatibility
This part will fit the following 20 machines
Poulan
PP4620AVX Gas Chainsaw View Diagrams & Manuals
PP3516AVX Gas Chainsaw View Diagrams & Manuals
PP4218AVX Gas Chainsaw View Diagrams & Manuals
ES400 Electric Saw View Diagrams & Manuals
SM4218AVX Gas Chainsaw View Diagrams & Manuals
SM4518AVX Gas Chainsaw View Diagrams & Manuals
Craftsman
358351700 Chainsaw View Diagrams & Manuals
358350990 Chainsaw View Diagrams & Manuals
358350240 Chainsaw View Diagrams & Manuals
358351810 Chainsaw View Diagrams & Manuals
358341180 Chainsaw View Diagrams & Manuals
358350870 Chainsaw View Diagrams & Manuals
358350880 Chainsaw View Diagrams & Manuals
358351610 Chainsaw View Diagrams & Manuals
358360690 Chainsaw View Diagrams & Manuals
944415371 Chainsaw View Diagrams & Manuals
944415370 Chainsaw View Diagrams & Manuals
Jonsered
CS2234 S (2010-04) Chain Saw View Diagrams & Manuals
CS2238 S (2010-04) Chain Saw View Diagrams & Manuals
Husqvarna
SM4218AVX (2008-09) Chain Saw View Diagrams & Manuals
Show More Compatible Models
This item works with the following types of products:
- Chain Saw Parts
- Saw Parts
This part replaces obsolete part #: 525884203, 545039501, 545090501
Customer Part Reviews ?
Average Rating (out of 5):
Click to filter by ratings:
5 stars
12
4 stars
1
3 stars
1
2 stars
0
1 stars
0
< PREV
- 1
- 2
Poulan chainsaw part
Quick and easy and received part in two days great service
Anonymous -
September 22, 2021
Verified Purchase
Easy to replace.gear made of metal instead of original plastic one. Saw works perfect again.
Great replacement parts. Will surely buy my parts from here again.
Guest -
July 6, 2021
Verified Purchase
Perfect
I've owned my chainsaw for many years and the adjustment knob was gone when I purchased it. So, I've been dealing with the chain coming off for quite a while since I haven't been able to properly keep tension on the chain, cause, well, I've been too lazy to order the part. I finally, did and it works perfectly, installed in about 15 minutes and the chain hasn't come off since. The order processing was easy and the shipping was quick.
Guest -
March 17, 2021
Verified Purchase
Quality replacment part
As promised, quality part, speedy delivery affordable price. Will be ordering from these people again.
Guest -
December 24, 2020
Verified Purchase
Easy part swap and good quality
Item was in great condition and fixed my problem!!
Lonnie -
August 13, 2020
Verified Purchase
Part worked as expected
No problem installing or in function after my install.
Guest -
October 30, 2019
Verified Purchase
Part received was the perfect choice for what I needed.
Prompt delivery and quality product received.
HAL -
October 26, 2019
Verified Purchase
Great part fit perfectly
Was the right part for a great price
william -
September 28, 2019
Verified Purchase
Metal Gear Better
The gear is made of metal instead of plastic, so expect it to last longer.
Guest -
September 5, 2019
Verified Purchase
Better than original part
Better than original part fit like a charm
Guest -
August 7, 2019
Verified Purchase
t
t
t -
t days ago
Verified Purchase
eReplacementParts Team
t
Questions & Answers ?
Our customer Service team is at the ready daily to answer your part and product questions.

Ask our Team
We have a dedicated staff with decades of collective experience in helping customers just like you purchase parts to repair their products.
Does this fit my product?Questions & Answers for Wheel Gear Adjustment
No questions have been asked yet
Customer Repair Instructions ?
All our customer repair instructions are solicited directly from other customers just like you who have purchased and replaced this exact part.
Plastic adjusting wheel for the chain tightened stripped.
Brett - November 10, 2015
👍 7 of 7 people found this instruction helpful
Tool Type
Chain Saw
Difficulty
Easy
Time
Less than 15 minutes
Tools Used
Screwdriver
Parts Used
Removed chain brake assembly and installed new adjusting wheel. Glad to see the replacement was made of steel.
Did you find this story helpful?
Thanks for voting and helping fellow customers!
Could not tighten the chain.
Don - December 4, 2017
👍 3 of 3 people found this instruction helpful
Tool Type
Chain Saw
Difficulty
Easy
Time
Less than 15 minutes
Tools Used
Screwdriver
Parts Used
1. Removed the chain break cover.
2. Removed the cover over the wheel gear adjustment.
3. Replaced the wheel.
4. Replaced the cover and 3 screws.
5. Aligned up the chain bar and break away.
6. Used the new wheel to tighten the chain. Very easy fix.
2. Removed the cover over the wheel gear adjustment.
3. Replaced the wheel.
4. Replaced the cover and 3 screws.
5. Aligned up the chain bar and break away.
6. Used the new wheel to tighten the chain. Very easy fix.
Did you find this story helpful?
Thanks for voting and helping fellow customers!
Teeth on wheel gear were stripped.
Sherrell - September 13, 2016
👍 2 of 2 people found this instruction helpful
Tool Type
Chain Saw
Difficulty
Easy
Time
Less than 15 minutes
Tools Used
Screwdriver, Power Drill, Socket set
Parts Used
1. Removed blade bar housing.
2. Removed screws securing wheel gear cover
3. Replaced stripped gears
4. Secured wheel gear cover
5. Secured blade bar housing
2. Removed screws securing wheel gear cover
3. Replaced stripped gears
4. Secured wheel gear cover
5. Secured blade bar housing
Did you find this story helpful?
Thanks for voting and helping fellow customers!
The chain tensioner wheel was stripped
Michael - March 12, 2016
👍 2 of 2 people found this instruction helpful
Tool Type
Chain Saw
Difficulty
Easy
Time
Less than 15 minutes
Tools Used
, No tools except my fingers
Parts Used
I first removed the brake unit, then I was able to remove the broken gear and replace it with the new one. Didn't take long at all and rather easy to do.
Did you find this story helpful?
Thanks for voting and helping fellow customers!
The assembly thumb wheel is paired with a gear which was made of plastic. This gear was worn and damaged.
Jerry - December 16, 2021
👍 1 of 1 people found this instruction helpful
Tool Type
Chain Saw
Difficulty
Easy
Time
Less than 15 minutes
Tools Used
Screwdriver, N/A
Parts Used
The assembly thumb wheel is paired with a plastic gear. The gear is inside a housing held with two little screws.
Remove the chain saw tensioning wheel and remove the chain saw cover. Now you’ll be able to access the gear housing. Open the gear housing cover by removing the two little screws. Remove the old gear and replaced it with a new steel gear. The replacement gear was made of steel. The right way to build it. Reinstall the gear housing cover and tighten the two little screws. Reinstall the chain saw cover and the tensioning wheel and tighten the chain. The chain saw now works great.
Remove the chain saw tensioning wheel and remove the chain saw cover. Now you’ll be able to access the gear housing. Open the gear housing cover by removing the two little screws. Remove the old gear and replaced it with a new steel gear. The replacement gear was made of steel. The right way to build it. Reinstall the gear housing cover and tighten the two little screws. Reinstall the chain saw cover and the tensioning wheel and tighten the chain. The chain saw now works great.
Did you find this story helpful?
Thanks for voting and helping fellow customers!
Nothing
John - September 23, 2021
Tool Type
Chain Saw
Difficulty
Easy
Time
Less than 15 minutes
Tools Used
Screwdriver
Parts Used
Replaced gear that tightens the chain
Did you find this story helpful?
Thanks for voting and helping fellow customers!
missing screws and needed new parts
Bruce - July 14, 2021
Tool Type
Chain Saw
Difficulty
Easy
Time
15-30 minutes
Tools Used
Screwdriver
replaced missing parts and replaced worn parts
Did you find this story helpful?
Thanks for voting and helping fellow customers!
Wheel gear was stripped causing chain to not tighten
Lonnie - August 14, 2020
Tool Type
Chain Saw
Difficulty
Easy
Time
Less than 15 minutes
Tools Used
Screwdriver, Nutdriver
Parts Used
Remove the clutch cover, unscrew the chain tensioner mechanism, replace gear and sew back up together
Did you find this story helpful?
Thanks for voting and helping fellow customers!
Poulan had a plastic gear That meshed with a steel gear to adjust chain tensions . Obviously the plastic gear wore out.
Robert - May 20, 2019
Tool Type
Chain Saw
Difficulty
Easy
Time
15-30 minutes
Tools Used
Screwdriver, None
Parts Used
Removed chainsaw gear cover.
Removed gear housing by removing two Phillips head screws.
Ensured that the gear housing cover sat flush and did not have any debris between it and the body of the housing.
Very happy to see that the replacement part had a steel gear cog, instead of the original plastic.
The adjust sprocket was also more user friendly.
Did you find this story helpful?
Thanks for voting and helping fellow customers!
Wheel gear adjustment gear stripped
brian - April 25, 2018
Tool Type
Chain Saw
Difficulty
Medium
Time
30-60 minutes
Tools Used
, Grease
1) Remove cover
2) Replaced gear
3) Put a little grease on the gears
4) Put cover back on
** Toughest part was getting the pin bar adjust to line up with the bar and get cover back on.
2) Replaced gear
3) Put a little grease on the gears
4) Put cover back on
** Toughest part was getting the pin bar adjust to line up with the bar and get cover back on.
Did you find this story helpful?
Thanks for voting and helping fellow customers!
Load More Install Stories
OEM stands for Original Equipment Manufacturer and means the part you’re buying is sourced directly from the manufacturer who made your product. At eReplacementParts, we sell only genuine OEM parts, guaranteeing the part you’re purchasing is of better design and of higher quality than aftermarket parts.
Our product descriptions are a combination of data sourced directly from the manufacturers who made your product as well as content researched and curated by our content & customer service teams. This content is edited and reviewed internally before being made public to customers.
Our customer service team are at the ready daily to answer your part and product questions. We have a dedicated staff with decades of collective experience in helping customers just like you purchase parts to repair their products.
All our part reviews are solicited directly from other customers who have purchased this exact part. While we moderate these reviews for profanity, offensive language or personally identifiable information, these reviews are posted exactly as submitted and no alterations are made by our team.
All our customer repair instructions are solicited directly from other customers just like you who have purchased and replaced this exact part. While we moderate these reviews for profanity, offensive language or personally identifiable information, these reviews are posted exactly as submitted and no alterations are made by our team.
Based on data from past customer purchasing behaviors, these parts are most commonly purchased together along with the part you are viewing. These parts may be necessary or helpful to replace to complete your current repair.
All our installation videos are created and produced in collaboration with our in-house repair technician, Mark Sodja, who has helped millions of eReplacementParts customers over the last 13 years repair their products. Mark has years of experience in selling and repairing both commercial and residential products with a specialty in gas-powered equipment.
This data is collected from customers who submitted a repair instruction after replacing this exact part. Customers can rate how easy the repair was to complete and how long it took. We aggregate this data to provide a repair rating that allows customers to quickly determine the difficulty and time needed to perform their own repair.