Product Information
Description:
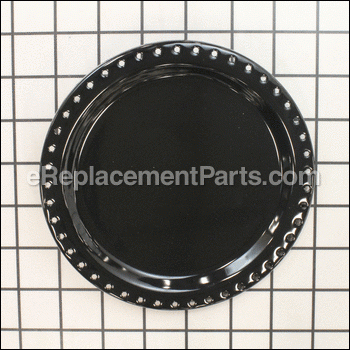
| This is an OEM part sourced directly from the manufacturer for use with Bunn coffee brewers. The metal warming dish provides a stable surface for the carafe and prevents brewed coffee from getting cold. This part is a component of the warmer assembly and sits on top of the warming element. A screwdriver will be needed to replace this part. Please make sure to check the appropriate diagrams of your model for the correct location and application of this hardware. This item is sold individually. |
Compatibility
the 33 compatible machines
This part is compatible with the following machines:
BUNN
Axiom APS (Series) Coffee Brewer with Airpots or Thermal Servers
Axiom (Series) Coffee Brewer with Warmer
Axiom TC (Series) Coffee Brewer with Airpots or Thermal Servers
Axiom-3 (Series) Pour-Over Brewer with Warmer
CRT5 Coffee Brewer with Warmer
CRTF5 Coffee Brewer with Warmer
C (Series) Automatic Coffee Brewer With Warmers
CT (Series) Automatic Coffee Brewer With Warmers
CWTF (Series) Automatic Coffee Brewer With Warmers
CW (Series) Automatic Coffee Brewer With Warmers
OL Coffee Brewer With Warmer
RL Coffee Brewer With Warmer
OT Coffee Brewer With Warmer
RT Coffee Brewer With Warmer
S Pour-Over Brewer With Warmer
ST Coffee Brewer With Warmer
STF Coffee Brewer With Warmer
VLPF Coffee Brewer With Warmer
VP17 (Series) Coffee Brewer With Warmer
VPR (29999.0000-39065.0000) Coffee Brewer With Warmer
VPR-APS (29999.0000-39065.0000) Coffee Brewer With Warmer
VPR (S.N. VPR0270000 and Before) Coffee Brewer With Warmer
VPS (Without Lighted Switch) Coffee Brewer With Warmer
VPS (With Lighted Switch) Coffee Brewer With Warmer
SA Pour-Over Brewer With Warmer
STA Pour-Over Brewer With Warmer
STFA Pour-Over Brewer With Warmer
WL2 Coffee Warmer
WS2 Coffee Warmer
WX1 Single Burner Coffee Warmer
WX2 Double Burner Coffee Warmer
CDBCF-35 Auto Coffee Brewer
VP17-2 Pourover Coffee Brewer with Warmer
Products Compatibility
This item works with the following types of products:
- • Coffee Maker
Questions & Answers for Warmer Dish
No questions have been asked yet
Repair Instructions: Submitted by Customers Like You
Tool Type:
Coffee Maker
Parts Used:
Repair Difficulty:
Easy
Time Spent Repairing:
15-30 minutes
Tools Used:
Screwdriver
6 hole sprayhead was missing, warmer plate slightly rusted and flip to was cracked
Unscrewed flip top assemble and popped it out
Replace the new assembly, snapped it in and replaced screw.
Screwed on 6 hole spray head
Unscrewed burner plate. removed 2 screws holding heating element.
Placed new burner plate, re screwed nuts on burner plate over heating element.
Placed burner plate in place and placed the 3 screws in designated holes.
Did you find this story helpful?
Thanks for voting and helping fellow customers!
Tool Type:
Coffee Maker
Parts Used:
Repair Difficulty:
Easy
Time Spent Repairing:
Less than 15 minutes
Tools Used:
Screwdriver, Adjustable Wrench
Plastic melted on warmer dish
1. Unplug unit.
2. Remove 3 screws holding plate in place.
3. Remove 2 nuts holding wiring in place.
4. Attach wiring with the two nuts onto the new plate.
5. Place metal spacers between the plate and the unit in the location where the screws will be placed.
6. Tighten screw.
7. Repeat steps 5 and 6 two more times.
Did you find this story helpful?
Thanks for voting and helping fellow customers!
Product Information

