

Product Information
Description:
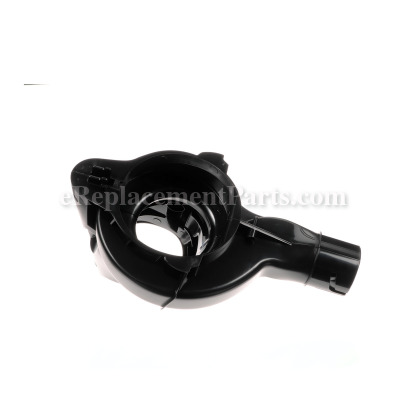
| This is an OEM part used for Black and Decker leaf blower/vacuums. The plastic clamshell set includes both sides. It is used when the tool is operating as a vacuum, the vac tubes, and leaf collection bag would attach to this part. This item includes one clamshell set, however the vacuum tubes, bag assembly, and hardware are sold separately. |
Frequently Purchased With

Compatibility
the 16 compatible machines
This part is compatible with the following machines:
Black and Decker
BV2500 Type 3 High Performance Blower Vac
BV2500 Type 4 High Performance Blower Vac
BV2500 Type 5 High Performance Blower Vac
BV2500 Type 6 High Performance Blower Vac
BV2500 Type 8 High Performance Blower Vac
BV2800 Type 1 Leaf Hog
BV9000 Type 1 Leaf Hog
BV9000 Type 2 Leaf Hog
BV2500 Type 4 High Performance Blower Vac
BV2500 Type 5 High Performance Blower Vac
BV2500 Type 6 High Performance Blower Vac
BV2500 Type 8 High Performance Blower Vac
BV2800 Type 1 Leaf Hog
BV9000 Type 1 Leaf Hog
BV9000 Type 2 Leaf Hog
BV2500 Type 7 Blower Vac
BV2100 (Type 1) Mpp Blower Vac
BV2500-AR (Type 1) Blower/Vac W/Push Button Power Tool
BV2500-B2 (Type 1) Blower/Vac W/Push Button Power Tool
BV2500-B2C (Type 1) Blower/Vac W/Push Button Power Tool
BV2500-B3LZ (Type 8) High Performance Blower V Power Tool
BV2500-BR (Type 1) Blower/Vac W/Push Button Power Tool
BV2550-AR (Type 1) High Perf Blower And Vac Power Tool
Products Compatibility
This item works with the following types of products:
- • Blower
Questions & Answers for Vac. Clamshell
No questions have been asked yet
Repair Instructions: Submitted by Customers Like You
1 of 1 people found this instruction helpful
Tool Type:
Blower
Parts Used:
Repair Difficulty:
Easy
Time Spent Repairing:
15-30 minutes
Tools Used:
Screwdriver
Broken housing
Removed the screws from the housing and separated them
Mad sure all the parts were in their correct place
Then placed the two housing together with the screws
Mad sure all the parts were in their correct place
Then placed the two housing together with the screws
Did you find this story helpful?
Thanks for voting and helping fellow customers!
Tool Type:
Blower
Parts Used:
Repair Difficulty:
Easy
Time Spent Repairing:
15-30 minutes
Tools Used:
Screwdriver
Hole in housing
Replaced housing
Did you find this story helpful?
Thanks for voting and helping fellow customers!
Tool Type:
Blower
Parts Used:
Repair Difficulty:
Easy
Time Spent Repairing:
Less than 15 minutes
Tools Used:
Screwdriver, None
Clamshell was cracked
Remove screws from tub and reattached to new clamshell. Done in less then 15 minutes
Did you find this story helpful?
Thanks for voting and helping fellow customers!
Tool Type:
Blower
Parts Used:
Repair Difficulty:
Medium
Time Spent Repairing:
15-30 minutes
Tools Used:
Screwdriver
Vacuum up to many gumballs. Broke the housing
Removed the old housing and replaced it.
Did you find this story helpful?
Thanks for voting and helping fellow customers!
Tool Type:
Blower
Repair Difficulty:
Easy
Time Spent Repairing:
15-30 minutes
Tools Used:
Screwdriver, Socket set, Required a Torx T15 long-shaft screwdriver
The plastic clamshell housing cracked and a hole formed, allowing leaves, rocks, sticks, etc. to fly out instead of going into the vac bag.
1. Disassembled the blower/vac clamshell housing by unscrewing the six Torx T15-head screws. Two of the screws are sunk deep below the housing surface, so I could not use the T15 head that I already owned as part of my ratchet set. Went to hardware store to buy a Torx T15 screwdriver with a shaft long enough to reach the screw heads from outside the shell.
2. Removed the hard plastic "fan" that shreds the leaves, etc. This required removing the plastic nut that holds it on, which I did using my socket set.
3. Put the new fan on after recycling the old one, screwing on a new plastic nut with my socket wrench.
4. Fit the old vacuum tube, which was not damaged, into the new clamshell housing and reassembled the clamshell using the original screws, which were all in excellent condition.
5. Cleaned off the old clamshell housing and put it into the recycling bin.
6. All done, literally as good as new, in about 20 minutes.
Did you find this story helpful?
Thanks for voting and helping fellow customers!
Tool Type:
Blower
Repair Difficulty:
Medium
Time Spent Repairing:
15-30 minutes
Tools Used:
, Torx driver
Took old tube from damaged shell. Installed tube in new shell. Completed assembly worked fine.
Did you find this story helpful?
Thanks for voting and helping fellow customers!
Tool Type:
Blower
Parts Used:
Repair Difficulty:
Easy
Time Spent Repairing:
Less than 15 minutes
Tools Used:
Screwdriver, Torx wrench
Plastic housing developed a hole.
1. Disassembled the housing.
2. Replaced the damaged part.
3. Reassembled the housing.
2. Replaced the damaged part.
3. Reassembled the housing.
Did you find this story helpful?
Thanks for voting and helping fellow customers!
Tool Type:
Vacuum
Parts Used:
Repair Difficulty:
Medium
Time Spent Repairing:
30-60 minutes
Tools Used:
Screwdriver, hacksaw
Screw heads stripped out
Used hacksaw to cut screw bosses and then old parts came right off. Used screwdriver to pry apart. Putting new parts on was easy, everything fit like it was supposed to. Used a screw gun to put screws in.
Did you find this story helpful?
Thanks for voting and helping fellow customers!
Tool Type:
Vacuum
Parts Used:
Repair Difficulty:
Easy
Time Spent Repairing:
Less than 15 minutes
Tools Used:
Screwdriver
Vacuum clamshell had a 1 inch hole in it.
Removed 5 screws, replaced part, put screws back in
Did you find this story helpful?
Thanks for voting and helping fellow customers!
Reviews
4 Reviews
Average Rating (out of 5):
Click to filter by ratings:
5 stars
3
4 stars
0
3 stars
0
2 stars
1
1 stars
0
< PREV
- 1
Fast shipping, perfect part, good price
I will definitely buy from these guys again. Everything was perfect!
Guest -
May 10, 2021
Verified Purchase
Renewed Life for my Yard Machine
Seamless service - found my part that would facilitate repair to my yard equipment. Reasonable price paid for the part and rapid delivery to my door. Thanks "eReplacementParts.com" for being there when I needed find a new life for my equipment.
Guest -
July 7, 2020
Verified Purchase
Excellent part
The clamshell was a good fit, easy to install.
Guest -
May 30, 2020
Verified Purchase
No screws
Received the correct part, but no screws. When I requested the screws, I received an auto-email requesting I send the part back instead of just sending me the screws. I only had 30 days to return the part so time ran out. When a company's entire business is over the internet, customer service should be better.
Guest -
June 6, 2020
Verified Purchase
Verified Purchase
eReplacementParts Team
< PREV
- 1
Product Information