
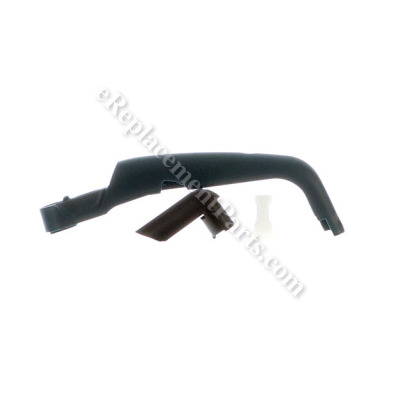


Genuine OEM Replacement part compatible with certain Bosch Power Tools. This part is made out of Plastic and it is Sold Individually. Please note Screws used to attach this handle are Sold Separately.
Top Handle Assembly 2602025901
OEM part for: Bosch
Part Number: 2602025901
$14.47
In Stock
Jump To:
Frequently Purchased Together ?


Compatibility
This part will fit the following 6 machines
Bosch
B4201 (0601587635) Jig Saw View Diagrams & Manuals
1587VS (0601587639) "Clic" Jig Saw View Diagrams & Manuals
1587AVS (0601587651) Jig Saw View Diagrams & Manuals
1587DVS (0601587839) Dustless "Clic" Jig Saw View Diagrams & Manuals
1587AVS (0601587683) Jig Saw View Diagrams & Manuals
1587AVS (0601587684) Jig Saw View Diagrams & Manuals
Show More Compatible Models
This item works with the following types of products:
- Jig saw Parts
- Saw Parts
This part replaces obsolete part #: 2610911118
Repair Videos ?
Watch the Repair Video for
Top Handle Assembly

Articles:
|
If your Bosch jigsaw has a broken blade clamp ratchet or top handle, you will want to replace it. This article will show...
January 04, 2012
|

Customer Part Reviews ?
Average Rating (out of 5):
Click to filter by ratings:
5 stars
11
4 stars
0
3 stars
0
2 stars
0
1 stars
0
< PREV
- 1
- 2
fixed the problem. I love my Bosch jigsaw and was happy to be able to find the right part.
I was happy with the quick arrival to my home. I thought the price was very reasonable too.
Guest -
November 3, 2022
Verified Purchase
Excellent
Easy ordering - speedy delivery - great instructional video - perfect fit - quick and complete repair
Guest -
June 23, 2022
Verified Purchase
Fit perfectly
eReplacement always seems to have what I need with fast delivery.
Guest -
February 21, 2022
Verified Purchase
work good
got here quick
Guest -
January 18, 2022
Verified Purchase
Easy repair...thanks
Part fit perfectly.....thanks
Guest -
January 11, 2021
Verified Purchase
Excellent customer service and online installation video. Easy repair and I am back up and running like new.
It was the exact OEM part from Bosch and very easy to install. Pricing was excellent and I received it very quickly.
Guest -
August 18, 2020
Verified Purchase
Total satisfaction
Great blow-up diagrams and model specificity - easy to find what I needed, quick shipping.
Guest -
February 18, 2020
Verified Purchase
$11 in parts
Department store wanted $110 to repair saw. Followed directions on the video and saved $99.Thank you again !
Guest -
August 28, 2019
Verified Purchase
Easy repair
They have utube videos that are very helpful
Guest -
July 12, 2019
Verified Purchase
bosch jigsaw 1587vs
parts received were genuine Bosch. my 20 year old saw runs as good as new due to new brushes . Blade lock mechanism is also like new. My experience was effortless as the sales person spoke so I could understand him and made that experience pleasant and efficient. Will go back again without question.Thank you.
Guest -
July 7, 2019
Verified Purchase
t
t
t -
t days ago
Verified Purchase
eReplacementParts Team
t
Questions & Answers ?
Our customer Service team is at the ready daily to answer your part and product questions.

Ask our Team
We have a dedicated staff with decades of collective experience in helping customers just like you purchase parts to repair their products.
Does this fit my product?Questions & Answers for Top Handle Assembly
No questions have been asked yet
Customer Repair Instructions ?
All our customer repair instructions are solicited directly from other customers just like you who have purchased and replaced this exact part.
Upon a blade change, the new blade wouldn't tighten down.
Noreen - January 16, 2016
👍 11 of 11 people found this instruction helpful
Tool Type
Jig saw
Difficulty
Easy
Time
Less than 15 minutes
Tools Used
Screwdriver
Parts Used
Simply unscrewed the original screws, replaced the inner plastic piece that was stripped,
reset the spring, and placed the new handle back on top, then replaced all the screws.
The only thing I did not watch for, was to make sure the wires at the back side of the handle ran back into their allotted grooves. One of mine was slightly off, and this would not allow the handle to seat properly.
Did you find this story helpful?
Thanks for voting and helping fellow customers!
Quick release handle for blade broke off.
Russell - August 8, 2016
👍 3 of 4 people found this instruction helpful
Tool Type
Jig saw
Difficulty
Easy
Time
Less than 15 minutes
Tools Used
Screwdriver
Parts Used
1. Remove 4 screws and take off old top handle.
2. Remove broken blade release gear
3. Push new gear on the shaft
4. Snap in new top handle
5. Replace assembly and tighten the 4 screws
2. Remove broken blade release gear
3. Push new gear on the shaft
4. Snap in new top handle
5. Replace assembly and tighten the 4 screws
Did you find this story helpful?
Thanks for voting and helping fellow customers!
Top handle assembly couldn't tighten blade
Howard - March 20, 2018
👍 1 of 1 people found this instruction helpful
Tool Type
Jig saw
Difficulty
Easy
Time
15-30 minutes
Tools Used
Screwdriver
Parts Used
Took the old Top Handle Assembly off and installed the new one. Easy.
Did you find this story helpful?
Thanks for voting and helping fellow customers!
Could not remove the blade.
Jeffrey - December 19, 2017
👍 1 of 1 people found this instruction helpful
Tool Type
Jig saw
Difficulty
Easy
Time
15-30 minutes
Tools Used
Screwdriver
Removed the top handle after removing the 4 screws. Installed the new parts with the old spring and the washer. Installed the new top handle, the 4 screws, then small turn handle to loosen and tighten the blades. Works like new. 21 years old but you wouldn't know it.
Did you find this story helpful?
Thanks for voting and helping fellow customers!
Blade didn’t lock in place
Kenneth - December 14, 2017
👍 1 of 1 people found this instruction helpful
Tool Type
Jig saw
Difficulty
Easy
Time
15-30 minutes
Tools Used
Screwdriver
Parts Used
Replaced handle assy, helpful hint replace spring also.
Did you find this story helpful?
Thanks for voting and helping fellow customers!
Saw blades not locking in place
Russell - October 26, 2017
👍 1 of 1 people found this instruction helpful
Tool Type
Jig saw
Difficulty
Easy
Time
15-30 minutes
Tools Used
Screwdriver
Parts Used
Followed a You Tube video. This solution fixed my problem.
Did you find this story helpful?
Thanks for voting and helping fellow customers!
Handle assembly to tighten blade was broke
Roger - August 2, 2017
👍 1 of 1 people found this instruction helpful
Tool Type
Jig saw
Difficulty
Easy
Time
Less than 15 minutes
Tools Used
Screwdriver, Pliers
Parts Used
1. Removed screws from top and rear of handle assembly
2. Removed top handle assembly (There is a spring under the handle assembly. Not under any tension, just be aware and not lose it)
3. Straight forward repair with the parts that come with the new assembly
4. When installing new handle assembly make sure switch and wires are in proper placement before tightening down screws to reinstall handle. I had to lift off the new handle and re-position my wires that had moved out of place. Just take care and it is a simple process.
5. Reinstall screws, check to make sure blade tightens correctly, and begin building on your next project.
Did you find this story helpful?
Thanks for voting and helping fellow customers!
Blade would not stay secure
Tracy - April 23, 2017
👍 1 of 1 people found this instruction helpful
Tool Type
Jig saw
Difficulty
Easy
Time
Less than 15 minutes
Tools Used
Screwdriver, Torx driver
Parts Used
Replaced the top handle assembly and the plastic lug thing that came with it. Watched the short video on the top handle assembly part page and just did what the guy said. It was quite easy. I had need of it several days this past week and it worked great.
Did you find this story helpful?
Thanks for voting and helping fellow customers!
Handle was broken, after it fell on the floor.
Lance - January 25, 2023
Tool Type
Jig saw
Difficulty
Easy
Time
Less than 15 minutes
Tools Used
Screwdriver, Power Drill, None
Parts Used
1. Removed the screws
2. Removed the handle assembly
3. Replaced the handle assembly with the new one
4. Replaced the screws
2. Removed the handle assembly
3. Replaced the handle assembly with the new one
4. Replaced the screws
Did you find this story helpful?
Thanks for voting and helping fellow customers!
Could not tighten blade down
Steven - February 9, 2022
Tool Type
Jig saw
Difficulty
Easy
Time
Less than 15 minutes
Tools Used
Screwdriver, None
Parts Used
Removed the 4 screws holding handle on. Replaced the handle that tightens the blade and reassembled. Easy Peasy.
Did you find this story helpful?
Thanks for voting and helping fellow customers!
Load More Install Stories
OEM stands for Original Equipment Manufacturer and means the part you’re buying is sourced directly from the manufacturer who made your product. At eReplacementParts, we sell only genuine OEM parts, guaranteeing the part you’re purchasing is of better design and of higher quality than aftermarket parts.
Our product descriptions are a combination of data sourced directly from the manufacturers who made your product as well as content researched and curated by our content & customer service teams. This content is edited and reviewed internally before being made public to customers.
Our customer service team are at the ready daily to answer your part and product questions. We have a dedicated staff with decades of collective experience in helping customers just like you purchase parts to repair their products.
All our part reviews are solicited directly from other customers who have purchased this exact part. While we moderate these reviews for profanity, offensive language or personally identifiable information, these reviews are posted exactly as submitted and no alterations are made by our team.
All our customer repair instructions are solicited directly from other customers just like you who have purchased and replaced this exact part. While we moderate these reviews for profanity, offensive language or personally identifiable information, these reviews are posted exactly as submitted and no alterations are made by our team.
Based on data from past customer purchasing behaviors, these parts are most commonly purchased together along with the part you are viewing. These parts may be necessary or helpful to replace to complete your current repair.
All our installation videos are created and produced in collaboration with our in-house repair technician, Mark Sodja, who has helped millions of eReplacementParts customers over the last 13 years repair their products. Mark has years of experience in selling and repairing both commercial and residential products with a specialty in gas-powered equipment.
This data is collected from customers who submitted a repair instruction after replacing this exact part. Customers can rate how easy the repair was to complete and how long it took. We aggregate this data to provide a repair rating that allows customers to quickly determine the difficulty and time needed to perform their own repair.