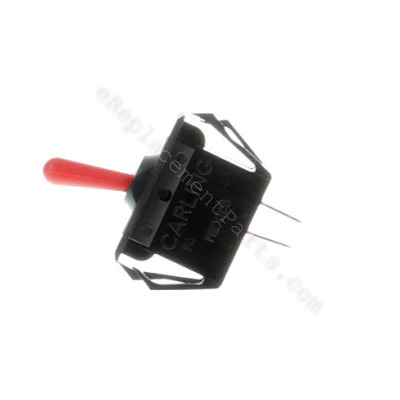
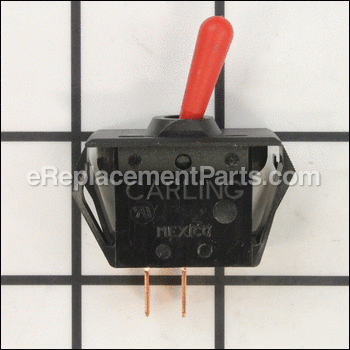


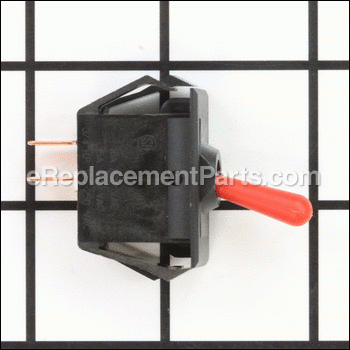

This high quality Ridgid replacement part is used with wet and dry vacuums. It is an authentic OEM sourced item, not an aftermarket imitation. This toggle switch allows user to turn the unit on and off. Because switches use mechanical internals, they will degrade and wear out over time, eventually requiring replacement. Please note, this plastic item is sold individually.
Toggle Switch 12313R
OEM part for: Ridgid
Part Number: 12313R
$7.28
In Stock
Compatibility
This part will fit the following 27 machines
Ridgid
WD09450 9 Gallon Wet/Dry Vac View Diagrams & Manuals
WD06350 6 Gallon Wet/Dry Vac View Diagrams & Manuals
RV2400A Wet/Dry Vacuum View Diagrams & Manuals
RV2600B Wet/Dry Vacuum View Diagrams & Manuals
WD5500 Wet/Dry Vacuum View Diagrams & Manuals
WD1850 Wet/Dry Vacuum View Diagrams & Manuals
WD1950 Wet/Dry Vacuum View Diagrams & Manuals
WD1850M Wet/Dry Vacuum View Diagrams & Manuals
WD1735 Wet/Dry Vacuum View Diagrams & Manuals
WD1700 Wet/Dry Vacuum View Diagrams & Manuals
WD1730 Wet/Dry Vacuum View Diagrams & Manuals
WD1635 Wet/Dry Vacuum View Diagrams & Manuals
WD1635M Wet/Dry Vacuum View Diagrams & Manuals
WD1245M Wet/Dry Vacuum View Diagrams & Manuals
WD1200 Wet/Dry Vacuum View Diagrams & Manuals
WD1625 Wet/Dry Vacuum View Diagrams & Manuals
WD1630 Wet/Dry Vacuum View Diagrams & Manuals
WD620 Wet/Dry Vacuum View Diagrams & Manuals
WD935 Wet/Dry Vacuum View Diagrams & Manuals
WD625M Wet/Dry Vacuum View Diagrams & Manuals
WD635M Wet/Dry Vacuum View Diagrams & Manuals
WD09350 9 Gallon Wet/Dry Vac View Diagrams & Manuals
WD06200 9 Gallon Wet/Dry Vac View Diagrams & Manuals
WD06250 6 Gallon Wet/Dry Vac View Diagrams & Manuals
WD16250 Wet / Dry Vac View Diagrams & Manuals
WD08000 8 Gallon Wet/Dry Vac View Diagrams & Manuals
Show More Compatible Models
This item works with the following types of products:
- Vacuum Parts
This part replaces obsolete part #: 47832, 12313, 823871, 813213
Customer Part Reviews ?
Average Rating (out of 5):
Click to filter by ratings:
5 stars
48
4 stars
3
3 stars
2
2 stars
0
1 stars
0
< PREV
- 1
- 2
- 3
Great customer service
Exact new part. Easy to install. Thanks
Guest -
15 days ago
Verified Purchase
Perfect fit
Fast shipping, great lady I spoke with, price was right. Fit and repaired my 12 gallon Ridged shop vac even though my original switch was out of production. This switch is spot on.
Guest -
August 10, 2023
Verified Purchase
Glad you had the part
Glad you had the part
Guest -
March 27, 2023
Verified Purchase
Shop vac toggle switch
Before ordering the replacement switch I check a "how to" video to see if an ordinary person could make the repair. The part was a perfect fit. The shop vac is back in business. By the way it is 24 years old and still going strong.
Guest -
January 12, 2023
Verified Purchase
Exact replica of the original
It worked perfectly for my shop-vac
John -
November 28, 2022
Verified Purchase
Great service
I ordered a switch for my wet dry vac. It arrived in great condition and in a timely manner..
Guest -
November 24, 2022
Verified Purchase
Received part.
Good service.
Guest -
July 10, 2022
Verified Purchase
Repair was quick and easy
Delivery was quick and the new switch was easy to install. Nice to have the shop vac working again!
Guest -
November 27, 2021
Verified Purchase
Ease repair
Great condition and fast.
Guest -
November 18, 2021
Verified Purchase
Exact replacement
The original manufacturer said that this was no longer available--yet here was an exact replacement at Replacement Parts! It arrived quickly in great protective packaging. Works just like it should.
Guest -
November 8, 2021
Verified Purchase
t
t
t -
t days ago
Verified Purchase
eReplacementParts Team
t
Questions & Answers ?
Our customer Service team is at the ready daily to answer your part and product questions.

Ask our Team
We have a dedicated staff with decades of collective experience in helping customers just like you purchase parts to repair their products.
Does this fit my product?Questions & Answers for Toggle Switch
No questions have been asked yet
Customer Repair Instructions ?
All our customer repair instructions are solicited directly from other customers just like you who have purchased and replaced this exact part.
The on/off switch was broken off so I was unable to use my shop vac.
Gary - July 19, 2017
👍 7 of 7 people found this instruction helpful
Tool Type
Vacuum
Difficulty
Easy
Time
Less than 15 minutes
Tools Used
Screwdriver
Parts Used
Removed a couple screws, pulled the switch unit out, detached the old switch, hooked up the replacement switch, replaced the new unit and screwed it back in. It works great.
Did you find this story helpful?
Thanks for voting and helping fellow customers!
Rocker switch would not work
Joseph - February 19, 2018
👍 6 of 8 people found this instruction helpful
Tool Type
Vacuum
Difficulty
Easy
Time
Less than 15 minutes
Tools Used
Screwdriver
Parts Used
1. Remove motor housing cover [6 screws] to access inner cover
2. Remove [4 screws] to access switch
3. Unplug black and red wire from switch and push switch out of top cover
4. Install new toggle switch and connect wires
5. Replace covers in reverse order [rotating housing cover until it sets correctly]
6. Done
2. Remove [4 screws] to access switch
3. Unplug black and red wire from switch and push switch out of top cover
4. Install new toggle switch and connect wires
5. Replace covers in reverse order [rotating housing cover until it sets correctly]
6. Done
Did you find this story helpful?
Thanks for voting and helping fellow customers!
Switch broke from over zealous vacuum switch operator.
John - March 20, 2018
👍 1 of 1 people found this instruction helpful
Tool Type
Vacuum
Difficulty
Easy
Time
Less than 15 minutes
Tools Used
Screwdriver, None
Parts Used
Made sure vacuum was unplugged before beginning. Took the top of the vacuum off. Removed the four screws underneath holding it together. Pulled motor off shroud. Pulled off two wires to switch. Squeezed tabs to release old switch. Threw it away. Pushed in new switch till it popped into place. Replugged in wires into new switch. Lined up motor to screw holes on top. Screwed it back in. Locked top back onto vacuum container. Plugged it in. Switched it on and vacuumed up my mess. Really straight forward
Did you find this story helpful?
Thanks for voting and helping fellow customers!
Wouldn't turn on
Don - March 18, 2018
👍 1 of 1 people found this instruction helpful
Tool Type
Vacuum
Difficulty
Easy
Time
15-30 minutes
Tools Used
Screwdriver, Pliers
Parts Used
Removed old toggle switch and replaced with the new one.
Did you find this story helpful?
Thanks for voting and helping fellow customers!
Switch broke
Richard - February 13, 2018
👍 1 of 1 people found this instruction helpful
Tool Type
Vacuum
Difficulty
Easy
Time
15-30 minutes
Tools Used
Power Drill
Parts Used
Removed broken switch replaced with new switch
Did you find this story helpful?
Thanks for voting and helping fellow customers!
Broken switch
Tom - December 13, 2017
👍 2 of 3 people found this instruction helpful
Tool Type
Vacuum
Difficulty
Easy
Time
Less than 15 minutes
Tools Used
Screwdriver, Pliers
Parts Used
Removed old switch and replaced it with a new one.
Did you find this story helpful?
Thanks for voting and helping fellow customers!
Toggle switch was broken.
Rensselaer - December 12, 2017
👍 1 of 1 people found this instruction helpful
Tool Type
Vacuum
Difficulty
Easy
Time
Less than 15 minutes
Tools Used
Screwdriver
Parts Used
Removed the old switch and replaced it with the new one.
Did you find this story helpful?
Thanks for voting and helping fellow customers!
Switch malfunction.
frankie - December 3, 2017
👍 1 of 1 people found this instruction helpful
Tool Type
Vacuum
Difficulty
Easy
Time
Less than 15 minutes
Tools Used
Screwdriver
Parts Used
Unscrew the plastic housing, remove the old switch and replace it with the new one.
Did you find this story helpful?
Thanks for voting and helping fellow customers!
Toggle switch was faulty.
Bob - November 5, 2017
👍 1 of 1 people found this instruction helpful
Tool Type
Vacuum
Difficulty
Easy
Time
15-30 minutes
Tools Used
Screwdriver
Parts Used
Removed the vac cover to access the switch. Removed the switch. Installed the new switch. Replaced the cover.
Did you find this story helpful?
Thanks for voting and helping fellow customers!
Would not turn and work
ROBERT - October 18, 2017
👍 1 of 1 people found this instruction helpful
Tool Type
Vacuum
Difficulty
Medium
Time
30-60 minutes
Tools Used
Screwdriver
Parts Used
Replaced the off and on switch. It was a little difficult to take switch assembly apart. Used a little straight edge screwdriver to get it to come apart. Lined up toggle switch and replaced it. Lined up vacuum switch pieces and pushed together. Installed switch in vacuum by taking it apart to have room to plug in wires on switch. Then assembled vacuum
Did you find this story helpful?
Thanks for voting and helping fellow customers!
Load More Install Stories
OEM stands for Original Equipment Manufacturer and means the part you’re buying is sourced directly from the manufacturer who made your product. At eReplacementParts, we sell only genuine OEM parts, guaranteeing the part you’re purchasing is of better design and of higher quality than aftermarket parts.
Our product descriptions are a combination of data sourced directly from the manufacturers who made your product as well as content researched and curated by our content & customer service teams. This content is edited and reviewed internally before being made public to customers.
Our customer service team are at the ready daily to answer your part and product questions. We have a dedicated staff with decades of collective experience in helping customers just like you purchase parts to repair their products.
All our part reviews are solicited directly from other customers who have purchased this exact part. While we moderate these reviews for profanity, offensive language or personally identifiable information, these reviews are posted exactly as submitted and no alterations are made by our team.
All our customer repair instructions are solicited directly from other customers just like you who have purchased and replaced this exact part. While we moderate these reviews for profanity, offensive language or personally identifiable information, these reviews are posted exactly as submitted and no alterations are made by our team.
Based on data from past customer purchasing behaviors, these parts are most commonly purchased together along with the part you are viewing. These parts may be necessary or helpful to replace to complete your current repair.
All our installation videos are created and produced in collaboration with our in-house repair technician, Mark Sodja, who has helped millions of eReplacementParts customers over the last 13 years repair their products. Mark has years of experience in selling and repairing both commercial and residential products with a specialty in gas-powered equipment.
This data is collected from customers who submitted a repair instruction after replacing this exact part. Customers can rate how easy the repair was to complete and how long it took. We aggregate this data to provide a repair rating that allows customers to quickly determine the difficulty and time needed to perform their own repair.