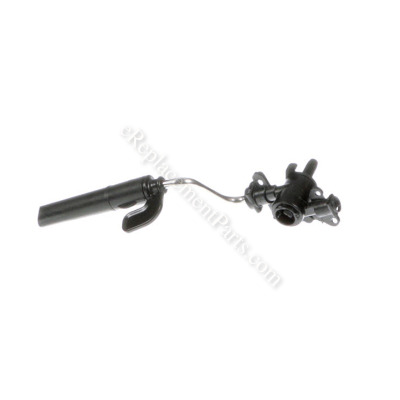
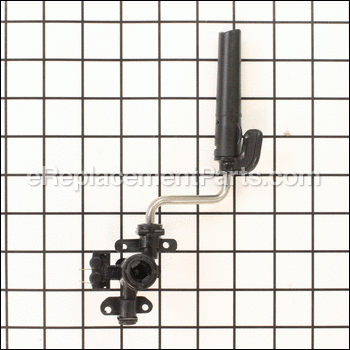


Valve Assembly With Frother AS13200153
Part Number: AS13200153
Order within the next 11 hours
and your part ships today!
and your part ships today!
*This part replaces obsolete part #: 7332180500, 7313216621, 7332183200 and 7332165700.
Product Information
Description:
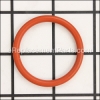
| This is an Original Manufacturer Sourced replacement part used on Delonghi Espresso Makers. It is the part that delivers Steam. This Steam Valve Tap Assembly is made out Plastic and Metal. It is Sold Individually. Please note the O-Ring for the tube is Sold Separately. You would need a Screwdriver and Pliers to complete this job. • Make sure to Unplug the unit before starting the repair • First you want to remove all Screws from the back of the Espresso Machine • This will allow you to slide Two (2) Side Panels backwards to remove them • Remove Two (2) Screws that hold Display/Control Panel • Then you want to remove the Steamer Knob • Lift up the Panel and remove the Pin • Disconnect the Tube from the Old Tap Assembly • Connect the New Tap Assembly and re-connect the tube • Reassemble the unit |
Frequently Purchased With


Compatibility
the 19 compatible machines
This part is compatible with the following machines:
DeLonghi
EAM3200 Magnifica
EAM3300 Magnifica
EAM3400 Magnifica
EAM3400.N Magnifica
EAM4000 Magnifica
EAM4000.B Magnifica
EAM4400 Magnifica
ESAM3300 Magnifica
ESAM3300.S Magnifica
ESAM4400 Magnifica
EAM3300 Magnifica
EAM3400 Magnifica
EAM3400.N Magnifica
EAM4000 Magnifica
EAM4000.B Magnifica
EAM4400 Magnifica
ESAM3300 Magnifica
ESAM3300.S Magnifica
ESAM4400 Magnifica
ESAM4400 (132214013) Coffee Maker
ESAM2000 (132212063) Caffe Venezia Super Automatic
EAM3200 (132212006) Magnifica Super Automatic Espresso/Coffee Machine
EAM3300 (132213001) Magnifica Fully Automatic Expresso
EAM3400 (0132214004) Magnifica Fully Automatic Expresso
ESAM3300EXD Superautomatic Capachino System
ESAM3300EXHD Super Automatic Capachino System
EAM4000 (0132212014) Magnifica Expresso
ESAM3300S Magnifica Automatic Espresso/Cappuccino
Products Compatibility
This item works with the following types of products:
- • Coffee Maker
Questions & Answers for Valve Assembly With Frother
No questions have been asked yet
Repair Instructions: Submitted by Customers Like You
7 of 8 people found this instruction helpful
Tool Type:
Coffee Maker
Parts Used:
Repair Difficulty:
Easy
Time Spent Repairing:
Less than 15 minutes
Tools Used:
Screwdriver, Pliers
Leaking steam wand valve
Follow the repair process as outlined extensively by others on eReplacement. One suggestion is to also buy the o-ring that fits into the valve where the water line attaches. The valve does not come with one and I was able to use the one from the old valve with no leaks.
Did you find this story helpful?
Thanks for voting and helping fellow customers!
3 of 3 people found this instruction helpful
Tool Type:
Coffee Maker
Parts Used:
Repair Difficulty:
Medium
Time Spent Repairing:
15-30 minutes
Tools Used:
Screwdriver, Power Drill
The tap got jammed and blew apart somehow
I found your YouTube video on just this repair. Thank you. I will post it for other with this problem.
https://www.youtube.com/watch?v=G7jLrL78byM
https://www.youtube.com/watch?v=G7jLrL78byM
Did you find this story helpful?
Thanks for voting and helping fellow customers!
1 of 1 people found this instruction helpful
Tool Type:
Coffee Maker
Repair Difficulty:
Medium
Time Spent Repairing:
30-60 minutes
Tools Used:
Screwdriver
Broken knob; tap dripping when machine powered on
I just followed the online video found on YouTube made by your company. Had to pause it a few times, but everything went just as pictured. Quick delivery on parts and we were up and running again. Works like brand new. Thanks!
Did you find this story helpful?
Thanks for voting and helping fellow customers!
1 of 1 people found this instruction helpful
Tool Type:
Coffee Maker
Parts Used:
Repair Difficulty:
Medium
Time Spent Repairing:
15-30 minutes
Tools Used:
Screwdriver, Pliers
Steaming head needed replacement
We inherited this really nice espresso maker, but the one catch was that the plastic steamer wand piece was broken. We weren't able to order just the wand piece, because it appeared to be a molded unit, we ordered the whole tap assembly. When we received it however, we noticed that the lower metal & plastic piece that you put into the cup to steam is removable from the main assembly. So this instruction only covers how to replace that small piece.
----BEFORE ANYTHING ELSE MAKE SURE TO UNPLUG THE MACHINE!!! BE SAFE----
First, using a phillips head screwdriver, remove all the screws from the back of the espresso machine.
Once that is done you should be able to remove the two side panels by sliding them backwards.
The display piece/control unit where all of the buttons are housed has two screws on each side, remove those as well.
Remove the steamer knob carefully (nearly broke the tap unit removing ours, be gentle)
At this point you should be able to gently flip up the front cover/control section, revealing some of the mechanicals underneath.
For us, we just needed to replace the lower piece, there is a small clip that holds it in place. I removed that clip with pliers, and did the same with the new unit. I then slid the new piece into place on the machine and replaced the clip.
After that, just reinstall the panels in the reverse of removal.
Did you find this story helpful?
Thanks for voting and helping fellow customers!
Tool Type:
Coffee Maker
Repair Difficulty:
Medium
Time Spent Repairing:
30-60 minutes
Tools Used:
Screwdriver, Pliers, needlenose pliers
frother and water tank leaks
1.Tank soaked in hot water to loosen end cover which was not replaced. with some force popped it off cause it did not want to slide.
2. dissembled back cover first by removing screws. took a little force to remove it. each side then was removed. would have been nice to know to slide it up since it has some hooks at the top.
3. frother was just 3 screws. The small o ring inside the cavity where the plastic water line attached was retrieved with a toothpick and reused in the new frother assembly.
4. reassembled sides and then back cover making sure the panels were positioned properly. I had to do this several times as the water tank side panel needed to interlock properly with the bottom.
5. After about 45 minutes, I tested the frother and tank. success-no leaks.
Did you find this story helpful?
Thanks for voting and helping fellow customers!
Tool Type:
Coffee Maker
Parts Used:
Repair Difficulty:
Easy
Time Spent Repairing:
15-30 minutes
Tools Used:
Screwdriver, Pliers
Steam valve was leaking water, not producing steam
1. Unplug appliance
2. Remove left and right side panels.
3. Carefully pry off steam knob with 2 bladed screwdrivers.
4. Remove 4 screws that hold front control panel and move panel to the side. ( no need to disconnect wire harness)
5. Steam valve now exposed. Carefully remove spring clip for plastic hose that goes into valve. Needlenose pliers work best.
6. Remove 3 screws for steam valve.
7. Fit new valve and screws. Seat hose fully in valve and secure with spring clip.
8. Reverse procedure to reinstall panels.
9. Turn on machine and test steam function.
10. Make a cappuccino and enjoy.
Did you find this story helpful?
Thanks for voting and helping fellow customers!
Tool Type:
Coffee Maker
Parts Used:
Repair Difficulty:
Easy
Time Spent Repairing:
30-60 minutes
Tools Used:
Screwdriver, Pliers, pick, lube
Tap does not come with new o-ring for water supply line.
Removed side, back and top panels.
Removed steam/water knob.
Removed front panel.
Removed two wires to tap microswitch.
Removed 3 screws holding existing tap.
Removed water line to tap.
Removed existing tap.
Mounted new tap.
Replaced O-ring on water line and reinstalled water line.
Connected wires to micro switch.
Tested, no leaks.
Reinstalled steam knob and panels.
Did you find this story helpful?
Thanks for voting and helping fellow customers!
Tool Type:
Coffee Maker
Parts Used:
Repair Difficulty:
Easy
Time Spent Repairing:
30-60 minutes
Tools Used:
Socket set, Wrench Set
caffee maker
Broken the steamer
Did you find this story helpful?
Thanks for voting and helping fellow customers!
Tool Type:
Coffee Maker
Parts Used:
Repair Difficulty:
Medium
Time Spent Repairing:
30-60 minutes
Tools Used:
Screwdriver, Pliers
Low water pressure because of leak in valve for steamer.
Removed old valve and installed new.
Did you find this story helpful?
Thanks for voting and helping fellow customers!
Tool Type:
Coffee Maker
Parts Used:
Repair Difficulty:
Medium
Time Spent Repairing:
15-30 minutes
Tools Used:
Screwdriver
Leaking water
Took the back off then the sides which allowed the front control panel to removed then removed 3 screws in the tap. Installed new one and reassembled.
Did you find this story helpful?
Thanks for voting and helping fellow customers!
show more
Reviews
8 Reviews
Average Rating (out of 5):
Click to filter by ratings:
5 stars
7
4 stars
0
3 stars
0
2 stars
0
1 stars
1
< PREV
- 1
Works great
The part arrived quickly and had exact specifications as the original part. The espresso machine works like a new.
Guest -
November 26, 2022
Verified Purchase
I can make cappuccinos again!
Part fit perfectly. Easy to replace. Best $32 (tax in) that I have spent to be steaming milk again.
Guest -
November 22, 2022
Verified Purchase
Been using site for years; easy as expected
Always have the correct parts. And good videos to show how to repair any type of appliance.
Guest -
September 13, 2022
Verified Purchase
Fast
Arrived early
Guest -
June 25, 2022
Verified Purchase
Delongi ESAM leaking water from frother
The frother I ordered was an exact replacement and easy to install. The leak was gone but I woud have replaced the O-ring if you carried it.
Great web display of the parts you carry.
Guest -
November 1, 2021
Verified Purchase
Espresso machine part
Part arrived quickly, good condition and fixed the problem. thanks for having the part available!
Teri -
July 14, 2021
Verified Purchase
Part was perfect, video critical.
Had to remove 6 parts to get to the repair part. Video critical to making things go smoothly.
Guest -
January 22, 2020
Verified Purchase
The part was faulty :(
I ordered this part not because the frother didn't work but because steam/water was leaking from the top of the frother wand. We installed the NEW frother part & now the frother would NOT work at all! :( So we installed the old part again to see if the frother would work & the frother worked however it was still leaking at the wand. I was about to return the defective part to eReplacement Parts & my friend suggested taking the top of the old part & attaching it to the frother wand on the NEW part and it WORKED!!
Guest -
July 2, 2019
Verified Purchase
Verified Purchase
eReplacementParts Team
< PREV
- 1
Product Information