eReplacementParts.com
877-346-4815
Eureka Parts
Repair Parts Home
  
Vacuum Parts
  
Eureka Parts
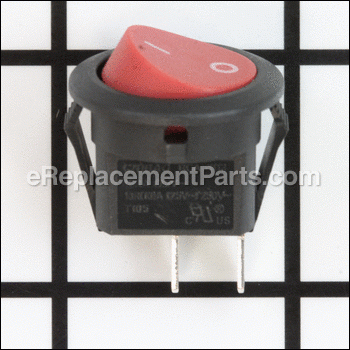
  E-76464 Switch - 2 Position

Switch - 2 Position E-76464

OEM part for: Eureka, Hoover

Part Number: E-76464


Install
Videos!
Grid squares measure 1x1 inch
Switch - 2 Position - E-76464:EurekaSwitch - 2 Position - E-76464:Eureka
Usually ships in 7 - 12 business days
Leaves our warehouse within
7 - 12 business days
Easy 15-30 minutes (4 rated repairs)?
OEM: Original Equipment Manufacturer ?
EurekaHoover
Does this d-block d-md-none fit my product?

Product Description ?

This is an authentic Hoover made replacement part. It is compatible with Hoover vacuums, including editions of the WindTunnel 2. This on-off switch is made of plastic material and is sold individually. A Philips head screwdriver and needle nose pliers are needed for this repair. During repair, access both the front and back of the machine.

• Unplug the vacuum
• Detach the handle
• Remove bag housing door from front of machine
• Remove all attachment tools in the front storage caddy
• Remove tool caddy
• Gently remove wires attached to old on-off switch
• Pry out old switch
• Push in new switch and attach wires
• Test vacuum before reassembling

  • Classification: Part
  • Weight: 0.01 lbs.
  • Shipping: Ships Worldwide

Frequently Purchased Together ?

Compatibility

This part will fit the following 75 machines

Eureka

2961AVZ Upright Vacuum View Diagrams & Manuals
2961BVZ Upright Vacuum View Diagrams & Manuals
2961TUR Upright Vacuum View Diagrams & Manuals
2976AVZ Upright Vacuum View Diagrams & Manuals
2996BVZ Upright Vacuum View Diagrams & Manuals
2996DVZ Upright Vacuum View Diagrams & Manuals
2997AZ Upright Vacuum View Diagrams & Manuals
2997BVZ Upright Vacuum View Diagrams & Manuals
2998AZ Upright Vacuum View Diagrams & Manuals
2998BZ Upright Vacuum View Diagrams & Manuals
2999AVZ Upright Vacuum View Diagrams & Manuals
2999BV Upright Vacuum View Diagrams & Manuals
3271AVZ Upright Vacuum View Diagrams & Manuals
3276AVZ Upright Vacuum View Diagrams & Manuals
3276AZ Upright Vacuum View Diagrams & Manuals
3276BVZ Upright Vacuum View Diagrams & Manuals
3277AVZ Upright Vacuum View Diagrams & Manuals
3279AZ Upright Vacuum View Diagrams & Manuals
3281AZ Upright Vacuum View Diagrams & Manuals
3282AVZ Upright Vacuum View Diagrams & Manuals
8802AVZ Upright Vacuum View Diagrams & Manuals
8802AVZ-1 Upright Vacuum View Diagrams & Manuals
8803AVZ Upright Vacuum View Diagrams & Manuals
8803AVZ-1 Upright Vacuum View Diagrams & Manuals
8803BVZ Upright Vacuum View Diagrams & Manuals
8806AVZ Upright Vacuum View Diagrams & Manuals
8806AVZ-1 Upright Vacuum View Diagrams & Manuals
8806BVZ Upright Vacuum View Diagrams & Manuals
8806BVZ-1 Upright Vacuum View Diagrams & Manuals
8807AVZ Upright Vacuum View Diagrams & Manuals
8807AVZ-1 Upright Vacuum View Diagrams & Manuals
8811AVZ Upright Vacuum View Diagrams & Manuals
8851AVZ-1 Upright Vacuum View Diagrams & Manuals
8851AVZ-2 Upright Vacuum View Diagrams & Manuals
8852AVZ Upright Vacuum View Diagrams & Manuals
8852AVZ-1 Upright Vacuum View Diagrams & Manuals
8852AVZ-2 Upright Vacuum View Diagrams & Manuals
8852BVZ Upright Vacuum View Diagrams & Manuals
8852BVZ-1 Upright Vacuum View Diagrams & Manuals
8852DVZ Upright Vacuum View Diagrams & Manuals
8852DVZ-1 Upright Vacuum View Diagrams & Manuals
8853AVZ Upright Vacuum View Diagrams & Manuals
8853AVZ-1 Upright Vacuum View Diagrams & Manuals
8853AVZ-2 Upright Vacuum View Diagrams & Manuals
3271BLU Upright Vacuum View Diagrams & Manuals
3271BZ Upright Vacuum View Diagrams & Manuals
3272AV Upright Vacuum View Diagrams & Manuals
3281BZ Upright Vacuum View Diagrams & Manuals
8810AVZ Bagless Upright Vacuum View Diagrams & Manuals
8851AVZ Bagless Upright Vacuum View Diagrams & Manuals
8862AVZ Bagless Upright Vacuum View Diagrams & Manuals
8863AVZ Bagless Upright Vacuum View Diagrams & Manuals
8871AZ Bagless Upright Vacuum View Diagrams & Manuals
8873AZ Bagless Upright Vacuum View Diagrams & Manuals

Hoover

UH70831 WindTunnel 2 Rewind Pet Bagless Upright View Diagrams & Manuals
UH70820 WindTunnel 2 Rewind Bagless Upright View Diagrams & Manuals
UH70816 WindTunnel High Capacity Pet Bagless Upright View Diagrams & Manuals
UH70809 WindTunnel 2 High Capacity View Diagrams & Manuals
UH70800 WindTunnel 2 High Capacity Bagless Upright View Diagrams & Manuals
Uh70830 Windtunnel2 Rewind Pet View Diagrams & Manuals
Uh70825 Windtunnel 2 Rewind Bagless View Diagrams & Manuals
Uh70831Pc Windtunnel 2 Rewind Pet Bagless View Diagrams & Manuals
UH70801 WindTunnel 2 - High Capacity View Diagrams & Manuals
UH70805 WindTunnel 2 - High Capacity View Diagrams & Manuals
UH70810 WindTunnel 2 - High Capacity Pet View Diagrams & Manuals
UH70811 WindTunnel 2 - High Capacity Pet View Diagrams & Manuals
UH70815 WindTunnel 2 - High Capacity Pet View Diagrams & Manuals
UH70819 WindTunnel 2 - High Capacity Pet View Diagrams & Manuals
UH70821 WindTunnel 2 Rewind View Diagrams & Manuals
UH70829 WindTunnel 2 Rewind View Diagrams & Manuals
UH70832 WindTunnel 2 Rewind View Diagrams & Manuals
UH70839 WindTunnel 2 Rewind View Diagrams & Manuals
UH71230 Whole House Elite View Diagrams & Manuals
UH71250 Elite Rewind Upright View Diagrams & Manuals
UH71251 Windtunnel 2 Whole House Rewind View Diagrams & Manuals
Show More Compatible Models
Don't see yours? Try searching our site for :

This item works with the following types of products:

  • Vacuum Parts

This part replaces obsolete part #: H-440003992, 440003992, 76621-1, 76464

Customer Part Reviews ?

4.7
Average Rating (out of 5):
3 Reviews
Click to filter by ratings:
5 stars
2
4 stars
1
3 stars
0
2 stars
0
1 stars
0
  • Highest Rating
  • Most Recent
< PREV
  • 1
NEXT >
  • vacuum switch
    fast service, got part I needed.
    Guest - October 24, 2023 Verified Purchase
    Easy fix for vacuum cleaner
    great service, shipped quick. Replacement was simple and vacuum cleaner working again.
    Guest - May 30, 2023 Verified Purchase
    Vacuum Swiych
    Arrived in a timely manner. Installed and works great. Thank you. Only thing I would suggest is some type of tracking to protect your company and your customers.
    Guest - November 2, 2022 Verified Purchase
    t
    t
    t - t days ago Verified Purchase
    eReplacementParts Team
    t

    Questions & Answers ?

    Our customer Service team is at the ready daily to answer your part and product questions.

    photo of team member
    Ask our Team

    We have a dedicated staff with decades of collective experience in helping customers just like you purchase parts to repair their products.

    Does this fit my product?

    Questions & Answers for Switch - 2 Position


    Will this work with model UH71250? Thank you.
    DMBird for model number UH71250 asked on 2022-07-18
    Hello DM, Thank you for your inquiry. We have researched the model number you have provided and confirm that this part will fit your model. We hope this helps and if you need help placing an order, customer service is open 7 days a week. Please feel free to give us a call. We look forward to hearing from you!
    eReplacementParts Team July 18, 2022

    Customer Repair Instructions ?

    All our customer repair instructions are solicited directly from other customers just like you who have purchased and replaced this exact part.

    Easy 15-30 minutes (4 rated repairs)?

    On//off switch didn't work

    Judith - May 18, 2017
    👍 2 of 2 people found this instruction helpful
    Tool Type

    Vacuum

    Difficulty

    Easy

    Time

    15-30 minutes

    Tools Used

    Screwdriver, Pliers, Nutdriver

    1. Removed some screws.
    2. Removed the collection canister.
    3. Removed the plastic housing pieces above the yellow filter.
    4. Removed the wire connection on the spade terminal.
    5. Pushed the old switch out, put new switch in and reconnected the terminals.
    6. Did a power up to see that switch works. Started up. Shut off and unplugged the unit.
    7. Reverse the steps from above
    Would like to also say that I am a 64 yr. young, married, woman and did this by myself.
    Did you find this story helpful?
    Thanks for voting and helping fellow customers!

    Power switch broke

    James - December 14, 2016
    👍 2 of 2 people found this instruction helpful
    Tool Type

    Vacuum

    Difficulty

    Easy

    Time

    15-30 minutes

    Tools Used

    Screwdriver

    1- Took the vacuum cleaner partially apart
    2- Removed the original switch
    3- Replace the old switch with the new one
    4- Put the unit back together.
    Did you find this story helpful?
    Thanks for voting and helping fellow customers!

    ON/OFF switch quit working

    Eugene - December 25, 2021
    Tool Type

    Vacuum

    Difficulty

    Easy

    Time

    Less than 15 minutes

    Tools Used

    Screwdriver, Pliers

    Removed two screws from the switch plate, took off the two electric wires, pulled out the old switch and replaced it with the new one. Connected both wires and replaced the switch mount. DONE
    Did you find this story helpful?
    Thanks for voting and helping fellow customers!

    The on-off switch had a short.

    Derick - June 12, 2020
    Tool Type

    Vacuum

    Difficulty

    Easy

    Time

    Less than 15 minutes

    Tools Used

    Screwdriver

    I noticed when turning on the vacuum it would come on and off if you touched the switch. Figuring it had a short, I removed the old switch and installed the new one.
    Did you find this story helpful?
    Thanks for voting and helping fellow customers!

    OEM stands for Original Equipment Manufacturer and means the part you’re buying is sourced directly from the manufacturer who made your product. At eReplacementParts, we sell only genuine OEM parts, guaranteeing the part you’re purchasing is of better design and of higher quality than aftermarket parts.

    Our product descriptions are a combination of data sourced directly from the manufacturers who made your product as well as content researched and curated by our content & customer service teams. This content is edited and reviewed internally before being made public to customers.

    Our customer service team are at the ready daily to answer your part and product questions. We have a dedicated staff with decades of collective experience in helping customers just like you purchase parts to repair their products.

    All our part reviews are solicited directly from other customers who have purchased this exact part. While we moderate these reviews for profanity, offensive language or personally identifiable information, these reviews are posted exactly as submitted and no alterations are made by our team.

    All our customer repair instructions are solicited directly from other customers just like you who have purchased and replaced this exact part. While we moderate these reviews for profanity, offensive language or personally identifiable information, these reviews are posted exactly as submitted and no alterations are made by our team.

    Based on data from past customer purchasing behaviors, these parts are most commonly purchased together along with the part you are viewing. These parts may be necessary or helpful to replace to complete your current repair.

    All our installation videos are created and produced in collaboration with our in-house repair technician, Mark Sodja, who has helped millions of eReplacementParts customers over the last 13 years repair their products. Mark has years of experience in selling and repairing both commercial and residential products with a specialty in gas-powered equipment.

    This data is collected from customers who submitted a repair instruction after replacing this exact part. Customers can rate how easy the repair was to complete and how long it took. We aggregate this data to provide a repair rating that allows customers to quickly determine the difficulty and time needed to perform their own repair.

    eReplacementParts.com
    7174 South 400 West
    Suite 5
    Midvale, UT 84047
    visa mastercard discover american express PayPal