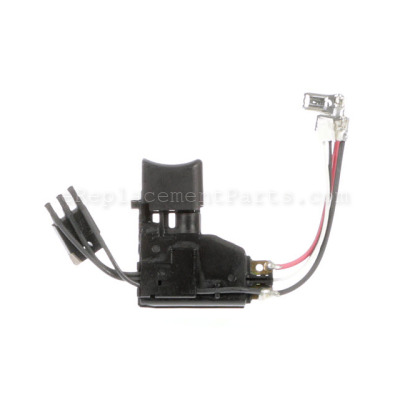


This is a Genuine OEM Approved replacement part used on Makita Drills/Drivers. This switch has a Plastic Body and it has Lead Wires attached. Switches are a commonly replaced part in power tools, handling on/off operations. Because switches use mechanical internals, they will degrade and wear out over time, eventually requiring replacement.
To replace this switch you would need a Screwdriver.
• First make sure the tools is not plugged in
• Then you want to remove Screws used to hold two pieces of Housing Set together
• Disconnect Wires from the old Switch and remove it from the Housing
• Place the new Switch in the Housing and connect Wires to it
• Reassembly the Housing
Switch 650583-6
OEM part for: Makita
Part Number: 650583-6
$37.89
In Stock
Jump To:
Product Description ?
- Classification: Part
- Weight: 0.06 lbs.
- Shipping: Ships Worldwide
Frequently Purchased Together ?
Compatibility
This part will fit the following 22 machines
Makita
BDF452HW Drill / Driver View Diagrams & Manuals
BHP452 18V LXT Lithium-Ion Cordless 1/2" Hammer Drill-Driver View Diagrams & Manuals
BDF452 Cordless 1/2" Driver-Drill View Diagrams & Manuals
BDF452H (Type 1) Drill View Diagrams & Manuals
BDF452H (Type 2) Drill View Diagrams & Manuals
BDF452H (Type 3) Drill View Diagrams & Manuals
BDF452HW (Type 2) Drill View Diagrams & Manuals
BDF452HW (Type 3) Drill View Diagrams & Manuals
BDF452 (Type 2) Drill View Diagrams & Manuals
BDF452 (Type 3) Drill View Diagrams & Manuals
BHP452H2 (Type 1) Drill View Diagrams & Manuals
BHP452H2 (Type 2) Drill View Diagrams & Manuals
BHP452H2 (Type 3) Drill View Diagrams & Manuals
BHP452H (Type 1) Drill View Diagrams & Manuals
BHP452H (Type 2) Drill View Diagrams & Manuals
BHP452H (Type 3) Drill View Diagrams & Manuals
BHP452HW (Type 1) Drill View Diagrams & Manuals
BHP452HW (Type 2) Drill View Diagrams & Manuals
BHP452HW (Type 3) Drill View Diagrams & Manuals
BHP452 (Type 2) Drill View Diagrams & Manuals
BHP452 (Type 3) Drill View Diagrams & Manuals
BHP452Z Drill View Diagrams & Manuals
Show More Compatible Models
This item works with the following types of products:
- Drill Parts
- Cordless Drill Parts
- Hammer Drill Parts
Customer Part Reviews ?
Average Rating (out of 5):
Click to filter by ratings:
5 stars
4
4 stars
0
3 stars
0
2 stars
0
1 stars
0
< PREV
- 1
Easy repair
Correct part
Fit and install were good
Guest -
November 21, 2022
Verified Purchase
Worked perfect service was quick and friendly.
A great place to do business with and I would definitely recommend them to anyone.
Guest -
August 2, 2020
Verified Purchase
Makita battery drill parts
Installed new parts that I received found all worked great, nice to get proper parts and at a timely time too.
Action Aire Trading -
July 7, 2020
Verified Purchase
Easy Repair Saved $50 labor
Easy peazy lemon squeezy, saved $50 from bringing it to a service center.
Guest -
October 22, 2019
Verified Purchase
t
t
t -
t days ago
Verified Purchase
eReplacementParts Team
t
Questions & Answers ?
Our customer Service team is at the ready daily to answer your part and product questions.

Ask our Team
We have a dedicated staff with decades of collective experience in helping customers just like you purchase parts to repair their products.
Does this fit my product?Questions & Answers for Switch
No questions have been asked yet
Customer Repair Instructions ?
All our customer repair instructions are solicited directly from other customers just like you who have purchased and replaced this exact part.
Drill motor quick working during use
Bruce - July 5, 2016
👍 4 of 4 people found this instruction helpful
Tool Type
Cordless Drill
Difficulty
Medium
Time
15-30 minutes
Tools Used
Screwdriver, Awl and small flat screwdriver
Parts Used
Disassemble the drill motor. You have to remove all the screws and then remove the cover to access the switch. I had to replace the switch on one of the 2 motors I repaired. If all you're doing is replacing the brushes, it's super easy. 2 screws to remove in the back cap and the brushes are easily accessible. The brushes in one unit came out really easy, but the other was very difficult. I had to use a sharp tool to dig and scrape the old brushes out. Success on the unit I replaced just the brushes on. That one is back in my tool bag being used on a regular basis. The other one needed a switch and brushes, but only works when I give it a smack. I need to take it apart again to find out why the brushes are sticking. All in all, I give thumbs up to eReplacementparts.com. Their website gives you some great breakdowns and also a list of probable parts that need replacing. They were absolutely correct in my case. I wouldn't hesitate to send anyone to this website. My experience was fantastic. Thanks eReplacementparts.com!!
Bruce
Bruce
Did you find this story helpful?
Thanks for voting and helping fellow customers!
the drill would keep drilling and not stop instantly when pressing the switch.
Greg - December 19, 2018
👍 1 of 1 people found this instruction helpful
Tool Type
Cordless Drill
Difficulty
Easy
Time
Less than 15 minutes
Tools Used
Screwdriver, Pliers
Parts Used
Replaced the switch assembly.
Did you find this story helpful?
Thanks for voting and helping fellow customers!
Broken forward/reverse switch
Stephen - May 27, 2018
👍 1 of 1 people found this instruction helpful
Tool Type
Cordless Drill
Difficulty
Easy
Time
15-30 minutes
Tools Used
Screwdriver, Pliers
Parts Used
Removed the cover from the rear and pulled the screws holding the sides together. Pulled the old switch noting where the wires attached and replaced it with a new one. Perfect and easy.
Did you find this story helpful?
Thanks for voting and helping fellow customers!
No variable speed on drill.
Mark - January 1, 2018
👍 1 of 1 people found this instruction helpful
Tool Type
Cordless Drill
Difficulty
Easy
Time
Less than 15 minutes
Tools Used
Screwdriver, Pliers
Parts Used
1. Opened up the drill by removing screws.
2. Removed the switch.
3. Unplugged the wire connectors with a screwdriver.
4. Connected the new switch wire connectors.
5. Replaced the switch.
6. Reassembled the drill.
7. Problem solved.
8. Take pictures of wire and parts orientation.
2. Removed the switch.
3. Unplugged the wire connectors with a screwdriver.
4. Connected the new switch wire connectors.
5. Replaced the switch.
6. Reassembled the drill.
7. Problem solved.
8. Take pictures of wire and parts orientation.
Did you find this story helpful?
Thanks for voting and helping fellow customers!
Bad switch.
Robert - December 6, 2023
Tool Type
Cordless Drill
Difficulty
Easy
Time
15-30 minutes
Tools Used
Screwdriver
Parts Used
Undid old switch & put in new one. No instructions needed.
Did you find this story helpful?
Thanks for voting and helping fellow customers!
Forward drill went out.
Paul - December 22, 2020
Tool Type
Cordless Drill
Difficulty
Medium
Time
15-30 minutes
Tools Used
Screwdriver, Pliers
Parts Used
Followed the you tube repair instructions.
Did you find this story helpful?
Thanks for voting and helping fellow customers!
Tiger switch didn't work, forward and reverse switch h was broken
Jack - February 20, 2019
Tool Type
Cordless Drill
Difficulty
Easy
Time
15-30 minutes
Tools Used
Screwdriver
Parts Used
Replaced parts
Did you find this story helpful?
Thanks for voting and helping fellow customers!
My Makita BDF452HW Drill-Dvr had two issues: No electric braking (would "coast" after releasing the switch), & gear assy would "disengage" at times.
Mark - November 2, 2016
👍 1 of 2 people found this instruction helpful
Tool Type
Cordless Drill
Difficulty
Medium
Time
30-60 minutes
Tools Used
Screwdriver, Toothbrush (to remove debris/dust from yoke, inner case).
To replace the gear assy, brush set, brush holder assy & switch (AFTER viewing the site's "Replacing the Leaf Spring" video), I
-Removed the rear cover (2 screws outside, 1 screw inside).
-Removed all outside screws from the RH side of the tool's outer case; *kept LH side of the tool lying on the work surface.
-Disengaged the (2) springs holding the brushes in place; separated the brush holder from the yoke.
-Separated the yoke from the gear assy (noting, from the video, that the yoke's "notch" is facing downward!).
-Proceeded to, one-by-one, replace the switch assy, brushes & brush holder, and gear assy.
-Once having all of the (above) parts/assemblies in the positions, re-attached the RH tool case half. This parts MAY require having to "re-work" the yoke into its proper position-- yoke's notch MUST properly seat onto the protrusion on the LH tool case half's.
-Re-attached all of the screws for the RH tool case half.
-Ensured the both brushes were in proper position-- in equal contact with the yoke unit; also ensured that new brushes were properly attached to the brush holder. *Per the Makita Technical Bulletin, the COPPER BRUSH LEADS must be arranged so that they are toward the "OUTSIDE" of the tool.
-Re-attached the rear cover.
Did you find this story helpful?
Thanks for voting and helping fellow customers!
OEM stands for Original Equipment Manufacturer and means the part you’re buying is sourced directly from the manufacturer who made your product. At eReplacementParts, we sell only genuine OEM parts, guaranteeing the part you’re purchasing is of better design and of higher quality than aftermarket parts.
Our product descriptions are a combination of data sourced directly from the manufacturers who made your product as well as content researched and curated by our content & customer service teams. This content is edited and reviewed internally before being made public to customers.
Our customer service team are at the ready daily to answer your part and product questions. We have a dedicated staff with decades of collective experience in helping customers just like you purchase parts to repair their products.
All our part reviews are solicited directly from other customers who have purchased this exact part. While we moderate these reviews for profanity, offensive language or personally identifiable information, these reviews are posted exactly as submitted and no alterations are made by our team.
All our customer repair instructions are solicited directly from other customers just like you who have purchased and replaced this exact part. While we moderate these reviews for profanity, offensive language or personally identifiable information, these reviews are posted exactly as submitted and no alterations are made by our team.
Based on data from past customer purchasing behaviors, these parts are most commonly purchased together along with the part you are viewing. These parts may be necessary or helpful to replace to complete your current repair.
All our installation videos are created and produced in collaboration with our in-house repair technician, Mark Sodja, who has helped millions of eReplacementParts customers over the last 13 years repair their products. Mark has years of experience in selling and repairing both commercial and residential products with a specialty in gas-powered equipment.
This data is collected from customers who submitted a repair instruction after replacing this exact part. Customers can rate how easy the repair was to complete and how long it took. We aggregate this data to provide a repair rating that allows customers to quickly determine the difficulty and time needed to perform their own repair.