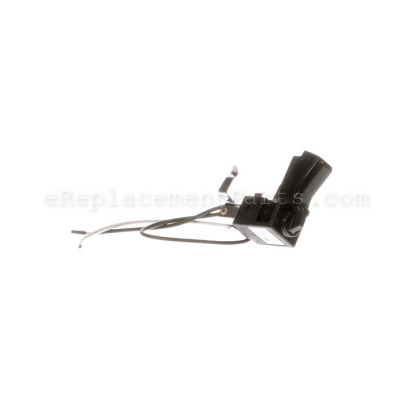
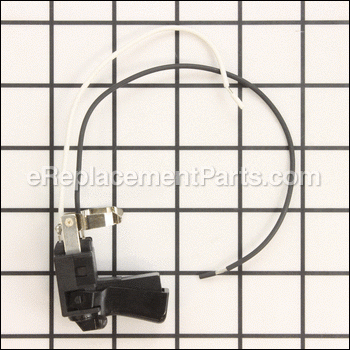


This replacement switch is an authentic manufacturer approved item that is designed for Makita drills. This switch plays an important role by handling the on/off function of a tool. Over time, these plastic mechanical switches will wear out requiring replacement. Please note, this includes one (1) trigger switch with lead wires attached.
To replace this switch you should only need a screwdriver.
• Remove screws that hold two pieces of housing together
• Carefully separate the housing pieces
• Disconnect wires from the old switch and remove it from the housing
• Place the new switch in the housing and connect wires to it
• Reassemble and test the drill
Switch 531043-6
OEM part for: Makita
Part Number: 531043-6
$24.49
In Stock
Product Description ?
- Classification: Part
- Weight: 0.01 lbs.
- Shipping: Ships Worldwide
Compatibility
This part will fit the following 9 machines
Makita
6010D Cordless Drill View Diagrams & Manuals
6012HD Cordless Drill View Diagrams & Manuals
8400D Drill View Diagrams & Manuals
6002D Cordless Drill View Diagrams & Manuals
DA3000D 3/8" Cordless Drill View Diagrams & Manuals
DA3000DW 3/8" Cordless Drill View Diagrams & Manuals
DA390D 3/8" Cordless Angle Drill View Diagrams & Manuals
DA390DW 3/8" Cordless Angle Drill View Diagrams & Manuals
8400DW Drill View Diagrams & Manuals
Show More Compatible Models
This item works with the following types of products:
- Cordless Drill Parts
- Drill Parts
This part replaces obsolete part #: 651851-0, 531044-4
Customer Part Reviews ?
Average Rating (out of 5):
Click to filter by ratings:
5 stars
10
4 stars
0
3 stars
1
2 stars
0
1 stars
0
< PREV
- 1
- 2
Easy repair, and the part worked as it should
Speedy delivery and it's good to know where to get Makita parts
Guest -
March 31, 2023
Verified Purchase
makita switch
installed easily and works like it should, I'm very happy with it.
Guest -
October 23, 2021
Verified Purchase
Refrigerator thermistor replacements
I was promptly notified that my parts order was delayed, it was shipped on the projected date, delivered to my door in perfect condition and as ordered. Installation was relatively easy and refer is now working as it should.
I’ve used Eparts before and will again. Highly recommend their easy to use website and service.
Guest -
August 31, 2021
Verified Purchase
Easy repair and I was able to get my drill working again.
The part was delivered exactly as expected, on time and in good condition.
Guest -
July 23, 2021
Verified Purchase
Quick and easy
Perfect fit, simple to find on website. Second time using site for power tool repairs and couldn’t be happier
Guest -
January 20, 2021
Verified Purchase
The right part
I have an older Makita cordless right angle drill. The switch was broken and had been replaced by a new part number. This worked great. Same thing happened on deicer light for my GE fridge. New part number and worked better than new. Great site to reference parts for older appliances and tools.
Jon -
February 12, 2020
Verified Purchase
The part was exactly what I needed. Worked great
just right
Leonard -
November 19, 2019
Verified Purchase
great part
Perfect fit, my drill is like new again
Guest -
October 6, 2019
Verified Purchase
Perfect. Good for another million miles.
The switch for my old Makita angle-drill arrived quickly and was a breeze to install. A few minutes soldering and I was back in business. So pleased that I found this place!
Guest -
July 30, 2019
Verified Purchase
easy repair
FAST shipping,worked as expected,thanks
Guest -
May 3, 2019
Verified Purchase
t
t
t -
t days ago
Verified Purchase
eReplacementParts Team
t
Questions & Answers ?
Our customer Service team is at the ready daily to answer your part and product questions.

Ask our Team
We have a dedicated staff with decades of collective experience in helping customers just like you purchase parts to repair their products.
Does this fit my product?Questions & Answers for Switch
No questions have been asked yet
Customer Repair Instructions ?
All our customer repair instructions are solicited directly from other customers just like you who have purchased and replaced this exact part.
My cordless drill switch broke
Elmer - January 26, 2016
👍 8 of 8 people found this instruction helpful
Tool Type
Cordless Drill
Difficulty
Easy
Time
15-30 minutes
Tools Used
Screwdriver, Pliers, soldering gun
Parts Used
On my Makita 9.6 volt electric cordless drill I removed the 8 phillips screws that hold the two case halves together , Very easy to do . Removed one half to access the trigger switch and replaced the switch and soldered on the two electric wires to the motor . Pay attention when you separate the case halves . Best to lay the drill on its side and gently pry them apart and make note of the placement of all internal parts . Good idea to take a picture to refer to . A pretty simple repair
Did you find this story helpful?
Thanks for voting and helping fellow customers!
Switch on Makita Drill failed
Mike - December 4, 2015
👍 4 of 4 people found this instruction helpful
Tool Type
Cordless Drill
Difficulty
Easy
Time
30-60 minutes
Tools Used
Screwdriver, Soldering gun
Parts Used
Clear an area on your work bench, remove screws, gently pull up on top side cover as it lays on the table. Remove solder from existing switch wires, trim wires to fit.
And solder back in place. Try Switch before you put drill back together. Very easy job.
And solder back in place. Try Switch before you put drill back together. Very easy job.
Did you find this story helpful?
Thanks for voting and helping fellow customers!
Broken switch - drill was dropped and landed on switch
Lee - February 27, 2016
👍 2 of 2 people found this instruction helpful
Tool Type
Cordless Drill
Difficulty
Easy
Time
15-30 minutes
Tools Used
Screwdriver, soldering iron
Parts Used
Take drill apart with screwdriver
Removed old broken switch
Soldered in new switch - perfect fit!
Back in business
Removed old broken switch
Soldered in new switch - perfect fit!
Back in business
Did you find this story helpful?
Thanks for voting and helping fellow customers!
Switch would not always work
Kevin - September 19, 2018
👍 1 of 1 people found this instruction helpful
Tool Type
Cordless Drill
Difficulty
Easy
Time
Less than 15 minutes
Tools Used
Screwdriver, Soldering iron
Parts Used
1..Removed several screws that holds both halves of drill together
2..Unsoldered and removed old switch
3..Soldered and installed new switch
4..Reassembled housings and its done.
2..Unsoldered and removed old switch
3..Soldered and installed new switch
4..Reassembled housings and its done.
Did you find this story helpful?
Thanks for voting and helping fellow customers!
I replaced a broken switch.
Jeffrey - June 14, 2018
👍 1 of 1 people found this instruction helpful
Tool Type
Cordless Drill
Difficulty
Easy
Time
Less than 15 minutes
Tools Used
Screwdriver, Soldering gun
Parts Used
1. Remove the battery.
2. Remove the drill housing screws.
3. Use the soldering gun to heat up and remove the two old switch wires from the motor terminals.
4. Cut the switch wires to the proper length and strip the ends of each wire back a quarter inch.
5. Twist wires clockwise two or three times.
6. Solder the two switch wires back onto the motor terminals.
7. Install the drill housing making sure everything lines back up.
8. Install the screws.
9. Done
Did you find this story helpful?
Thanks for voting and helping fellow customers!
Battery had leaked on old switch and drill would not operate
Jack - June 4, 2018
👍 1 of 1 people found this instruction helpful
Tool Type
Cordless Drill
Difficulty
Medium
Time
15-30 minutes
Tools Used
Screwdriver, Soldering iron
Parts Used
Removed old switch and soldered in new on and reassembled drill. Operates find, forward and reverse.
Did you find this story helpful?
Thanks for voting and helping fellow customers!
Forward/reverse switch was broken.
Charles - May 2, 2018
👍 1 of 1 people found this instruction helpful
Tool Type
Cordless Drill
Difficulty
Easy
Time
15-30 minutes
Tools Used
Screwdriver, Pliers, Soldering gun.
Parts Used
Removed what was left of the switch. Trimmed the wires to appropriate length on the new one and soldered them to the appropriate terminals. Note that the colors on the new switch wires do not match the the old ones and the wires were smaller/lighter than what was originally in the tool. Tool works just fine and I do not foresee any problems. Thank you for being there to help with this repair.
Did you find this story helpful?
Thanks for voting and helping fellow customers!
Broken trigger switch.
Louis - April 4, 2018
👍 1 of 1 people found this instruction helpful
Tool Type
Cordless Drill
Difficulty
Medium
Time
30-60 minutes
Tools Used
Screwdriver, Pliers, Solder iron and solder
Parts Used
1. Carefully dismantle the housing.
2. Remove the motor and the trigger.
3. Unsolder the connections.
4. Snip the trigger wires to the appropriate length, re-strip end.
5. Solder trigger w/rosin core solder to motor poles using a soldering iron.
6. Install the motor and the trigger in the drill body.
7. Reassemble the body.
Relatively easy repair requiring moderate skills. Make sure all parts are assembled in one half of drill body. To ease assembly lay tool half with internal parts flat on work surface. There is a small flat tension leaf spring at the hi/ low-speed switch that has to be manipulated into position.
Did you find this story helpful?
Thanks for voting and helping fellow customers!
Switch would not work
Larry - March 23, 2018
👍 1 of 1 people found this instruction helpful
Tool Type
Cordless Drill
Difficulty
Easy
Time
30-60 minutes
Tools Used
Screwdriver, Pliers, Power Drill, Soldering iron
Parts Used
1. Opened up the drill. Had to drill out one stripped screw head
2. Unsoldered the wires to the old switch
3. Soldered the new switch in place
4. Assembled the drill
2. Unsoldered the wires to the old switch
3. Soldered the new switch in place
4. Assembled the drill
Did you find this story helpful?
Thanks for voting and helping fellow customers!
Trigger no longer worked on 35 year old Makita cordless drill
Larry - February 16, 2018
👍 1 of 1 people found this instruction helpful
Tool Type
Cordless Drill
Difficulty
Easy
Time
15-30 minutes
Tools Used
Power Drill, Wire strippers, soldering gun, hot glue gun
Parts Used
1. Removed screws to split outer case.
2. Lifted out switch and cut off the two wire leads
3. Stripped the ends of the remaining wires
4. Twisted leads from new switch with motor leads in drill
5. Soldered wires together.
6. Used hot glue gun to put protective coat of glue on soldered spliced wires.
7. Pushed new switch and wires into place.
8. Replaced outer case and screws.
9. Tested drill operation and I was back in business.
Did you find this story helpful?
Thanks for voting and helping fellow customers!
Load More Install Stories
OEM stands for Original Equipment Manufacturer and means the part you’re buying is sourced directly from the manufacturer who made your product. At eReplacementParts, we sell only genuine OEM parts, guaranteeing the part you’re purchasing is of better design and of higher quality than aftermarket parts.
Our product descriptions are a combination of data sourced directly from the manufacturers who made your product as well as content researched and curated by our content & customer service teams. This content is edited and reviewed internally before being made public to customers.
Our customer service team are at the ready daily to answer your part and product questions. We have a dedicated staff with decades of collective experience in helping customers just like you purchase parts to repair their products.
All our part reviews are solicited directly from other customers who have purchased this exact part. While we moderate these reviews for profanity, offensive language or personally identifiable information, these reviews are posted exactly as submitted and no alterations are made by our team.
All our customer repair instructions are solicited directly from other customers just like you who have purchased and replaced this exact part. While we moderate these reviews for profanity, offensive language or personally identifiable information, these reviews are posted exactly as submitted and no alterations are made by our team.
Based on data from past customer purchasing behaviors, these parts are most commonly purchased together along with the part you are viewing. These parts may be necessary or helpful to replace to complete your current repair.
All our installation videos are created and produced in collaboration with our in-house repair technician, Mark Sodja, who has helped millions of eReplacementParts customers over the last 13 years repair their products. Mark has years of experience in selling and repairing both commercial and residential products with a specialty in gas-powered equipment.
This data is collected from customers who submitted a repair instruction after replacing this exact part. Customers can rate how easy the repair was to complete and how long it took. We aggregate this data to provide a repair rating that allows customers to quickly determine the difficulty and time needed to perform their own repair.