eReplacementParts.com
877-346-4815
Milwaukee Parts

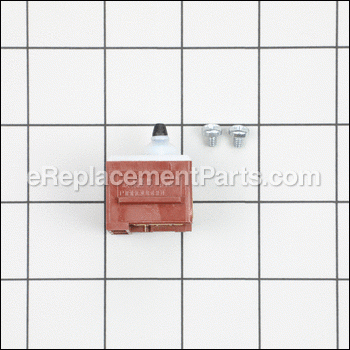
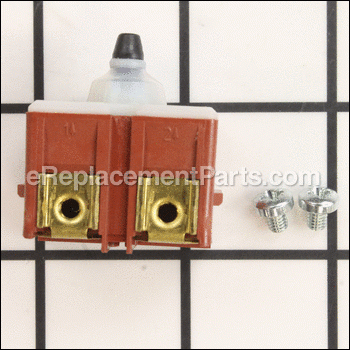
Switch 23-66-2665

OEM part for: Milwaukee

Part Number: 23-66-2665


Install
Videos!
Grid squares measure 1x1 inch
Switch - 23-66-2665:MilwaukeeSwitch - 23-66-2665:Milwaukee
In Stock
Ships within 1 business day
Easy 15-30 minutes (12 rated repairs)?
OEM: Original Equipment Manufacturer ?
Milwaukee
Does this d-block d-md-none fit my product?

Product Description ?

This is a Genuine OEM Milwaukee Replacement Push Button Switch used for Angle Grinders. It includes the screws used to attach the Lead Wires. Switches are commonly replaced part in power tools. A switch handles all on/off and variable speed functions. They also have a role in electric breaking because they can momentarily reverse electrical polarity. Since switches use mechanical internals, they tend to wear out over time and will eventually require replacement. A screw driver is needed to take the casing off of the tool to access the switch.

  • Classification: Part
  • Weight: 0.01 lbs.
  • Shipping: Ships Worldwide

Frequently Purchased Together ?

Compatibility

This part will fit the following 25 machines

Milwaukee

6140-33 (SER B70A) 4.5" Angle Grinder with Slide Switch View Diagrams & Manuals
6140-30 (SER B69A) 4.5" Angle Grinder with Paddle Switch w/Lock-Off View Diagrams & Manuals
6148-30 (SER B71A) 4.5" Angle Grinder View Diagrams & Manuals
6148-31 (SER B72A) 4.5" Angle Grinder With Paddle Switch View Diagrams & Manuals
6148-33 (SER B73A) 4.5" Angle Grinder With Slide Switch View Diagrams & Manuals
6116-30 (SER B62A) 4.5" Angle Grinder With Paddle Switch W/Lock-Off View Diagrams & Manuals
6116-31 (SER B63A) 4.5" Angle Grinder With Paddle Switch View Diagrams & Manuals
6116-33 (SER B64A) 5" Angle Grinder With Slide Switch View Diagrams & Manuals
6160-33 (SER B76A) 6" Angle Grinder With Slide Switch View Diagrams & Manuals
6160-30 (SER B74A) 6" Angle Grinder With Paddle Switch W/Lock-Off View Diagrams & Manuals
6160-31 (SER B75A) 6" Angle Grinder With Paddle Switch View Diagrams & Manuals
6146-30 (D02A) 4.5" Compact Angle Grinder View Diagrams & Manuals
6148-30 (B71B) 4.5" Angle Grinder View Diagrams & Manuals
6148-30 (B71C) 4.5" Angle Grinder View Diagrams & Manuals
6117-30 (C91A) 5" HP Angle Grinder With Paddle Switch View Diagrams & Manuals
6117-31 (C92A) 5" HP Angle Grinder With Paddle Switch View Diagrams & Manuals
6117-33 (C94A) 5" HP Angle Grinder With Slide Switch View Diagrams & Manuals
6117-33D (C95A) 5" HP Angle Grinder With Slide Switch View Diagrams & Manuals
6146-31 (D03A) 4.5" Compact Angle Grinder With Paddle Switch View Diagrams & Manuals
6146-33 (D04A) 4.5" Compact Angle Grinder With Slide Switch View Diagrams & Manuals
6147-30 (D05A) 4.5" Compact Angle Grinder With Paddle Switch View Diagrams & Manuals
6147-31 (D06A) 4.5" Compact Angle Grinder With Paddle Switch View Diagrams & Manuals
6161-30 (D07A) 6" HP Angle Grinder With Paddle Switch View Diagrams & Manuals
6161-31 (D08A) 6" HP Angle Grinder With Paddle Switch View Diagrams & Manuals
6161-33 (D09A) 6" HP Angle Grinder With Slide Switch View Diagrams & Manuals
Show More Compatible Models
Don't see yours? Try searching our site for :

This item works with the following types of products:

  • Grinder Parts

Customer Part Reviews ?

5
Average Rating (out of 5):
6 Reviews
Click to filter by ratings:
5 stars
6
4 stars
0
3 stars
0
2 stars
0
1 stars
0
  • Highest Rating
  • Most Recent
< PREV
  • 1
NEXT >
  • switch
    same as the orginal
    Guest - February 28, 2023 Verified Purchase
    Good experience
    What I wanted and delivered in a timely manner! What more could you ask for. Thanks!!!
    Guest - November 22, 2021 Verified Purchase
    Stuck Switch for grinder
    MY problem was not one I read so .. IF your grinder is staying on and not able to shut off like mine this will fix the problem... strange they usually wont work but mine stuck on and could of bee dangerous so if its old and you have time replace it ,. you might not be as lucky as I was ...
    Guest - May 6, 2021 Verified Purchase
    Saving my tool
    It was great to get a new switch to give my old grinder a new life. Thank you
    Guest - October 14, 2020 Verified Purchase
    Great Website!
    Worked perfectly!
    Guest - December 5, 2019 Verified Purchase
    Great service
    Web site was easy to used to look up the exact part i needed for my grinder. Switch came a timely manner and was a perfect match.
    Guest - April 22, 2019 Verified Purchase
    t
    t
    t - t days ago Verified Purchase
    eReplacementParts Team
    t

    Questions & Answers ?

    Our customer Service team is at the ready daily to answer your part and product questions.

    photo of team member
    Ask our Team

    We have a dedicated staff with decades of collective experience in helping customers just like you purchase parts to repair their products.

    Does this fit my product?

    Questions & Answers for Switch


    No questions have been asked yet

    Customer Repair Instructions ?

    All our customer repair instructions are solicited directly from other customers just like you who have purchased and replaced this exact part.

    Easy 15-30 minutes (12 rated repairs)?

    Unit would not turn off, would start as soon as plugged in.

    Gerald - April 15, 2016
    👍 1 of 1 people found this instruction helpful
    Tool Type

    Grinder

    Difficulty

    Easy

    Time

    15-30 minutes

    Tools Used

    Screwdriver

    Remove rear handle assembly make switch wiring diagram. Remove the wires from the old switch and replace them in the new switch. Attach handle assembly. Works great.
    Did you find this story helpful?
    Thanks for voting and helping fellow customers!

    Grinder switch stay on

    Paul - December 8, 2023
    Tool Type

    Grinder

    Difficulty

    Easy

    Time

    15-30 minutes

    Tools Used

    , Torks

    Removed 4 screws replaced switch replaced Handle ad screws
    Did you find this story helpful?
    Thanks for voting and helping fellow customers!

    Switch stuck in the ON position.

    Jon - February 2, 2023
    Tool Type

    Grinder

    Difficulty

    Easy

    Time

    15-30 minutes

    Tools Used

    Screwdriver, T10 screwdriver

    You will need a T10 screwdriver, or a longer T10 driver bit to remove recessed case screws.
    Check YouTube for videos. EReplacementParts even has a few.
    Tip: make sure all the wires are tucked in before putting the case halves back together.
    Easy fix, a little over 15 minutes, faster after your first one.
    Did you find this story helpful?
    Thanks for voting and helping fellow customers!

    Switch was bad, grinder stayed on all the time.

    David - October 10, 2021
    Tool Type

    Grinder

    Difficulty

    Easy

    Time

    15-30 minutes

    Tools Used

    Screwdriver, Pliers

    Removed the screws and cover unplugged the switch, installed the new switch, put the cover on and installed screws.
    Did you find this story helpful?
    Thanks for voting and helping fellow customers!

    Tool would not shut off

    Brian - February 6, 2021
    Tool Type

    Grinder

    Difficulty

    Easy

    Time

    Less than 15 minutes

    Tools Used

    Screwdriver

    Replace the switch
    Did you find this story helpful?
    Thanks for voting and helping fellow customers!

    Milwaukee Vari-Speed 5" Grinder quit working practically right out of the box

    SIDNEY - December 20, 2020
    Tool Type

    Grinder

    Difficulty

    Medium

    Time

    30-60 minutes

    Tools Used

    Screwdriver, torx wrench, wire cutters, small wire nut

    This was a "backup" tool that sat new in the box on a shelf for a year or better until I needed it. So, when I finally opened it and started using it... it "quit" within a week... then Milwaukee "Would Not Honor" their 'so-called' "5yr-warranty!" So, I re-boxed the "basically new" non-working grinder and put it back on a shelf for a few more years until I decided to try and fix it myself.

    I assumed it was either the switch or the PCB, so I replaced both and it now works. My suggestion is take pictures and note where the wires route. The new switch did not come with some special clips but was able to reuse clips from the old switch. The only real difficult part is the reassembly... getting the wires and PCB stuffed back in position definitely takes patience.

    I say "Thanks" to the people at eReplacementParts.com for keeping my order open until the manufacturer (Milwaukee) was finally able to supply the needed parts.
    Did you find this story helpful?
    Thanks for voting and helping fellow customers!

    Grinder would not power up when switch level depressed.

    John - March 16, 2020
    Tool Type

    Grinder

    Difficulty

    Easy

    Time

    15-30 minutes

    Tools Used

    Screwdriver, Pliers

    Opened the Grinder housing cover.
    Tested switch using Ohm meter from plug end to output terminals of the switch. Determined the switch was faulty on one pole.
    Pulled old switch out of housing and removed the wire terminals.
    Put the wire terminals on the new switch and reinstalled it into the grinder housing.
    Re-installed the Grinder housing cover.
    Power tested the grinder and it functioned.

    Did you find this story helpful?
    Thanks for voting and helping fellow customers!

    Steve - April 29, 2019
    Tool Type

    Grinder

    Difficulty

    Easy

    Time

    15-30 minutes

    Tools Used

    Screwdriver

    After receiving the new switch sensor from ereplscement parts in 4 days I Removed housing and removed old sensor reassembled and now it works like it should
    Did you find this story helpful?
    Thanks for voting and helping fellow customers!

    Power switch to grinder quit working.

    Bryan - August 24, 2018
    Tool Type

    Grinder

    Difficulty

    Easy

    Time

    15-30 minutes

    Tools Used

    , Torx bit

    Use a multimeter to check the old switch. If it's bad replace. 4 torx bit screws on the handle, 2 screws for the power cord, and 2 wire connectors on back of the switch. The repair is straight forward.
    Did you find this story helpful?
    Thanks for voting and helping fellow customers!

    Switch stop working

    JEFFERY - August 18, 2017
    Tool Type

    Grinder

    Difficulty

    Easy

    Time

    15-30 minutes

    Tools Used

    Screwdriver

    Removed the screws from the rear handle, and separated them making a not where all of the internal parts were located. Made a wiring diagram and disconnected the wires from the switch. Connected the wires to the new switch, then installed the internal parts in place in the new handle set. Screwed the handle together, and tested the grinder. Worked like a charm
    Did you find this story helpful?
    Thanks for voting and helping fellow customers!

    OEM stands for Original Equipment Manufacturer and means the part you’re buying is sourced directly from the manufacturer who made your product. At eReplacementParts, we sell only genuine OEM parts, guaranteeing the part you’re purchasing is of better design and of higher quality than aftermarket parts.

    Our product descriptions are a combination of data sourced directly from the manufacturers who made your product as well as content researched and curated by our content & customer service teams. This content is edited and reviewed internally before being made public to customers.

    Our customer service team are at the ready daily to answer your part and product questions. We have a dedicated staff with decades of collective experience in helping customers just like you purchase parts to repair their products.

    All our part reviews are solicited directly from other customers who have purchased this exact part. While we moderate these reviews for profanity, offensive language or personally identifiable information, these reviews are posted exactly as submitted and no alterations are made by our team.

    All our customer repair instructions are solicited directly from other customers just like you who have purchased and replaced this exact part. While we moderate these reviews for profanity, offensive language or personally identifiable information, these reviews are posted exactly as submitted and no alterations are made by our team.

    Based on data from past customer purchasing behaviors, these parts are most commonly purchased together along with the part you are viewing. These parts may be necessary or helpful to replace to complete your current repair.

    All our installation videos are created and produced in collaboration with our in-house repair technician, Mark Sodja, who has helped millions of eReplacementParts customers over the last 13 years repair their products. Mark has years of experience in selling and repairing both commercial and residential products with a specialty in gas-powered equipment.

    This data is collected from customers who submitted a repair instruction after replacing this exact part. Customers can rate how easy the repair was to complete and how long it took. We aggregate this data to provide a repair rating that allows customers to quickly determine the difficulty and time needed to perform their own repair.

    eReplacementParts.com
    7174 South 400 West
    Suite 5
    Midvale, UT 84047
    visa mastercard discover american express PayPal