eReplacementParts.com
877-346-4815
Milwaukee Parts

Switch 23-66-1692

OEM part for: Milwaukee

Part Number: 23-66-1692


Install
Videos!
Switch - 23-66-1692:Milwaukee 360 View
Switch - 23-66-1692:MilwaukeeSwitch - 23-66-1692:MilwaukeeSwitch - 23-66-1692:Milwaukee 360 View
Usually ships in 7 - 12 business days
Leaves our warehouse within
7 - 12 business days
Medium 15-30 minutes (17 rated repairs)?
OEM: Original Equipment Manufacturer ?
Milwaukee
Does this d-block d-md-none fit my product?

Product Description ?

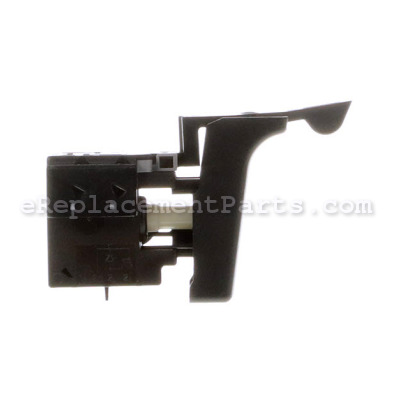
This Trigger switch has internal terminals, a locking mechanism for the trigger and a forward, reverse lever. It also includes 2 screws. This authentic Milwaukee replacement part is sold individually. Switches are commonly replaced parts in power tools. A switch handles all on/off and variable speed functions. They also have a role in electric breaking; they can momentarily reverse electrical polarity. Because switches use mechanical internals, they tend to degrade and wear out over time, eventually requiring replacement. Some common signs of a broken or failing switch are: The tool will not start when you use the switch, or it requires multiple tries to turn on, until eventually it refuses to start at all. The variable speed function and electric braking aren’t working properly.

  • Classification: Part
  • Weight: 0.05 lbs.
  • Shipping: Ships Worldwide

Compatibility

This part will fit the following 5 machines

Milwaukee

5378-20 (SER 897A) 1/2" Electric Hammer Drill View Diagrams & Manuals
5378-20 (SER 897B) 1/2" Electric Hammer Drill View Diagrams & Manuals
5378-20 (SER 897C) 1/2" Electric Hammer Drill View Diagrams & Manuals
5378-20 (SER 897D) 1/2" Electric Hammer Drill View Diagrams & Manuals
5378-20 (SER 897E) Electric Drill View Diagrams & Manuals
Don't see yours? Try searching our site for :

This item works with the following types of products:

  • Drill Parts
  • Electric Drill Parts
  • Hammer Drill Parts

This part replaces obsolete part #: 23-66-1690

Customer Part Reviews ?

4.9
Average Rating (out of 5):
11 Reviews
Click to filter by ratings:
5 stars
10
4 stars
1
3 stars
0
2 stars
0
1 stars
0
  • Highest Rating
  • Most Recent
< PREV
  • 1
  • 2
NEXT >
  • I would recommend Hudson Hi-Fi to all
    it was just what i needed
    Guest - October 20, 2023 Verified Purchase
    Fit lik it should.
    Shipped fast.
    Guest - December 17, 2022 Verified Purchase
    Switch
    Found the switch for an old drill, yeah
    Guest - December 12, 2022 Verified Purchase
    Easy to install
    Easy and exactly what we needed to get the equipment running again.
    Guest - February 2, 2022 Verified Purchase
    Works perfectly!
    The part was almost an exact duplicate of the original! Easy to install! Finally, my 1/2 Milwaukee hammer drill is back in service!!
    FELIX - January 11, 2022 Verified Purchase
    perfect part. just what I needed
    Found my part quickly and the order was shipped fast. My hammer drill is back on the job.
    Lee - October 20, 2020 Verified Purchase
    Worked as expected
    Worked as expected
    Guest - July 7, 2020 Verified Purchase
    Everything went smoothly.
    Great service.
    Guest - April 28, 2020 Verified Purchase
    great triger
    worked good replaced old one its like a new drill again
    Guest - April 1, 2020 Verified Purchase
    great company
    this part allowed me to get my high dollar drill working that saved me big bucks that for great service
    Guest - April 26, 2019 Verified Purchase
    t
    t
    t - t days ago Verified Purchase
    eReplacementParts Team
    t

    Questions & Answers ?

    Our customer Service team is at the ready daily to answer your part and product questions.

    photo of team member
    Ask our Team

    We have a dedicated staff with decades of collective experience in helping customers just like you purchase parts to repair their products.

    Does this fit my product?

    Questions & Answers for Switch


    Need to replace the switch on my 1/2" hammer drill, 5378-02, as it operates intermittently in forward and reverse speed. Found switch part (23-66-1692) and also reverse module (14-20-5378). Do I just need the switch? seems to work ok in reverse - just operates intermittently.
    David for model number 5378-02 897A79647 asked on 2024-01-16
    Hello David, thank you for your question. We found the Switch part number 23-66-1692 is what is needed. We hope this helps.
    eReplacementParts Team January 16, 2024

    Customer Repair Instructions ?

    All our customer repair instructions are solicited directly from other customers just like you who have purchased and replaced this exact part.

    Medium 15-30 minutes (17 rated repairs)?

    Main switch finally went out.

    David - September 19, 2016
    👍 10 of 11 people found this instruction helpful
    Tool Type

    Hammer Drill

    Difficulty

    Easy

    Time

    15-30 minutes

    Tools Used

    Screwdriver

    Main switch went out, fairly easy fix. decided that since i was fixing the switch and had it torn apart should replace the upper and lower brushes at the same time. Pretty straight forward to take apart and replace parts. I did take a picture of the different sides of the switch and made a schematic to make sure I put it back together right, just helps to make sure I don't have to tear it all apart again. I used a standard phillips, T-20 torx, and a little flat head screwdriver and small phillips (for the switch). You will need to remove the rear cushion on the handle, undo the phillips screws on the right side, the top and bottom torx screws on the right side (leave left side torx in place) from the front which removes the main case, leaving front case intact, there are a couple little rubber bumpers on the brushes (don't lose these) the switch wires are held in place by spring loaded clips in which you will need a small flat head screwdriver, use the screwdriver to move the clips and the wires will come out. the small phillips is for the power cord to switch connection. Assembly is pretty much in reverse order, you may have to play with the wires to get them to go where the are supposed to for reassembly, if the switch is not flat you will crush the wires and have to redo the job. Other than that fairly straight forward.
    Did you find this story helpful?
    Thanks for voting and helping fellow customers!

    Trigger was broken

    Jon - April 16, 2017
    👍 4 of 4 people found this instruction helpful
    Tool Type

    Hammer Drill

    Difficulty

    Easy

    Time

    15-30 minutes

    Tools Used

    Screwdriver, Torx bit

    Removed the screws from the housings and separated them
    Made up a wiring diagram
    Removed the cord clamp
    Removed the wires leads from the old switch and removed it
    Wired the new switch
    Screws the cord clamp back on
    Made sure that all of the parts were in the correct spot
    Screwed the housings together
    Did you find this story helpful?
    Thanks for voting and helping fellow customers!

    Drill would start intermittently with switch depressed

    James - December 15, 2016
    👍 3 of 4 people found this instruction helpful
    Tool Type

    Electric Drill

    Difficulty

    Medium

    Time

    30-60 minutes

    Tools Used

    Screwdriver

    Disassembled drill, compared wiring of old switch with contact points on new switch and noted the differences. Pulled wires from old switch and inserted them into the new one, tested the fix and reassembled the drill.
    Did you find this story helpful?
    Thanks for voting and helping fellow customers!

    Faulty switch

    Ray - March 18, 2019
    👍 1 of 1 people found this instruction helpful
    Tool Type

    Hammer Drill

    Difficulty

    Easy

    Time

    15-30 minutes

    Tools Used

    Screwdriver, Pliers, small point sciber

    1-remove cushion grip from rear of handle pry of with small screwdriver.
    2-Remove all screws from handle top casing.
    3- remove 2-screws retaining gear case to handle, ( do not remove other 2 gear case screws, keep gear case in position.
    4- remove old switch disconnect leads using small pointed scriber to release spring lead retainers after diagraming connections.
    5- install new switch as per your diagram. ensure switch leads do not prevent case closure.
    6- replace handle top casing, install all screws do not fully tighten until handle is snapped in place.
    7-replace cushion grip( snaps in place)
    Did you find this story helpful?
    Thanks for voting and helping fellow customers!

    Trigger switch stopped working

    David - March 11, 2019
    👍 1 of 1 people found this instruction helpful
    Tool Type

    Electric Drill

    Difficulty

    Easy

    Time

    Less than 15 minutes

    Tools Used

    Screwdriver, Eyeglass screwdriver

    Trigger switch on drill stopped working. Got new one took apart handle, front of drill had to come off as well took picture of switch wired. , dissasembled put new switch in reassembled
    Did you find this story helpful?
    Thanks for voting and helping fellow customers!

    Switch malfunction; kept running without pressing trigger

    Naweed - February 25, 2021
    Tool Type

    Hammer Drill

    Difficulty

    Medium

    Time

    15-30 minutes

    Tools Used

    Screwdriver, Star bit screw driver and a stiff wire point.

    1. After disassembly and after receiving new switch, take out one wire at a time from the old switch and insert into new one.
    2. The old wire has a tension catch which if pressed to the left with a stiff point will release it.
    3. One connection at a time is easy to do.
    4. Reassemble housing after setting switch in its cradle.
    Did you find this story helpful?
    Thanks for voting and helping fellow customers!

    the trigger quit working. unable to operate drill

    jay - July 26, 2020
    Tool Type

    Hammer Drill

    Difficulty

    Medium

    Time

    15-30 minutes

    Tools Used

    Screwdriver, Pliers

    diagnosed the point that voltage was not being passed through. checked ereplacement parts for new trigger. ordered, received and installed new trigger. use caution when replacingmotor in compartment, brushes want to fall out of alignment. be sure not to pinch wires. reassembled covers and drill works as advertised
    Did you find this story helpful?
    Thanks for voting and helping fellow customers!

    Switch died

    Todd - May 22, 2020
    Tool Type

    Rotary Hammer

    Difficulty

    Medium

    Time

    15-30 minutes

    Tools Used

    Screwdriver, Small pick

    1-remove all screws
    2-open case up and take picture of all placement of wires etc.
    3- pull old wire off switch and place on new switch. Some wires need to have a pick inserted to release wire.
    4-make sure all the wires are routed in the same spot.
    5- put case on and tighten screws
    Did you find this story helpful?
    Thanks for voting and helping fellow customers!

    Trigger switch for hammer drill stopped working

    Nathan - February 22, 2020
    Tool Type

    Hammer Drill

    Difficulty

    Easy

    Time

    Less than 15 minutes

    Tools Used

    Screwdriver, Pliers, Torx driver head needed to take screws off

    1. Took apart body of drill. Four torx screws at head of drill. 5 Phillip's head screws along side of body. One of which hidden behind the rubber grip.
    2. Unplugged wiring from trigger mechanism. Use needle nose pliers for this. Needed a fine needle to push down on the metal retentions to remove the plugs.
    3. Checked brushes to make sure they're making contact and didnt need replacement.
    Reassemble drill.
    Did you find this story helpful?
    Thanks for voting and helping fellow customers!

    No variable speed control. Chuck gear ring broken.

    Rick - April 15, 2019
    Tool Type

    Hammer Drill

    Difficulty

    Easy

    Time

    15-30 minutes

    Tools Used

    Screwdriver, Allen wrench to remove chuck. Wrench to hold motor from spin

    To remove chuck.
    Remove machine screw from inside church (reverse thread), using 1/4" screwdriver.
    Tighten chuck onto Allen wrench. Strike Allen wrench sharply with light hammer to loosen Chuck (regular threaded).
    Reverse procedure to reassemble.

    To replace switch
    Remove screws (phillips) holding body halves together, ( one screw is located underneath rubber palm cushion.
    Remove 4 torx screws holding gear head to body.
    Pry body halves apart.
    Note position of wires.
    Remove wires by inserting small pick in slot to release wire.
    Replace wires.
    Reverse procedure to reassemble.
    Did you find this story helpful?
    Thanks for voting and helping fellow customers!

    OEM stands for Original Equipment Manufacturer and means the part you’re buying is sourced directly from the manufacturer who made your product. At eReplacementParts, we sell only genuine OEM parts, guaranteeing the part you’re purchasing is of better design and of higher quality than aftermarket parts.

    Our product descriptions are a combination of data sourced directly from the manufacturers who made your product as well as content researched and curated by our content & customer service teams. This content is edited and reviewed internally before being made public to customers.

    Our customer service team are at the ready daily to answer your part and product questions. We have a dedicated staff with decades of collective experience in helping customers just like you purchase parts to repair their products.

    All our part reviews are solicited directly from other customers who have purchased this exact part. While we moderate these reviews for profanity, offensive language or personally identifiable information, these reviews are posted exactly as submitted and no alterations are made by our team.

    All our customer repair instructions are solicited directly from other customers just like you who have purchased and replaced this exact part. While we moderate these reviews for profanity, offensive language or personally identifiable information, these reviews are posted exactly as submitted and no alterations are made by our team.

    Based on data from past customer purchasing behaviors, these parts are most commonly purchased together along with the part you are viewing. These parts may be necessary or helpful to replace to complete your current repair.

    All our installation videos are created and produced in collaboration with our in-house repair technician, Mark Sodja, who has helped millions of eReplacementParts customers over the last 13 years repair their products. Mark has years of experience in selling and repairing both commercial and residential products with a specialty in gas-powered equipment.

    This data is collected from customers who submitted a repair instruction after replacing this exact part. Customers can rate how easy the repair was to complete and how long it took. We aggregate this data to provide a repair rating that allows customers to quickly determine the difficulty and time needed to perform their own repair.

    eReplacementParts.com
    7174 South 400 West
    Suite 5
    Midvale, UT 84047
    visa mastercard discover american express PayPal